background image

14

Approval Number: D01-1128JP

TELECOM ENGINEERING CENTER Approval Number: 03NY.A0018, 
03GZDA0017

The following restrictions apply:

Do not disassemble or modify the device.

Do not install the embedded wireless module into other device.

5.17 GHz to 5.23 GHz for indoor use only.

Radio approvals for wireless devices

The following information is dependent on what type of wireless device is in 
your computer.

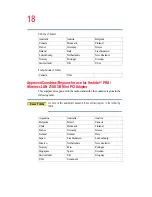
Approved Countries/Regions for use for the Atheros 
AR5BMB-43/44 Mini PCI Wireless network adapter

This equipment is approved to the radio standard by the countries/regions in the 
following table.

Do not use this equipment except in the countries/regions in the following 
table.

This device works on passive scan only. 

A peer-to-peer mode is not available in 802.11a and Turbo Mode.

802.11b (2.4 GHz)

Australia Austria  Belgium 

Canada Denmark 

Finland

France

Germany

Greece

Ireland Italy 

Liechtenstein

Luxembourg Netherlands

New 

Zealand 

Norway

Portugal

Sweden

Switzerland

UK

USA

NOTE

NOTE

Summary of Contents for Tecra A3

Page 1: ...e one of the following Toshiba s Support Website pcsupport toshiba com Toshiba Global Support Centre Calling within the United States 800 457 7777 Calling from outside the United States 949 859 4273 For more information see If Something Goes Wrong on page 180 in this guide ...

Page 2: ... FREE YOU AGREE THAT TOSHIBA ITS AFFILIATES AND SUPPLIERS SHALL HAVE NO RESPONSIBILITY FOR DAMAGE TO OR LOSS OF ANY BUSINESS PROFITS PROGRAMS DATA OR REMOVABLE STORAGE MEDIA ARISING OUT OF OR RESULTING FROM THE USE OF THE PRODUCT EVEN IF ADVISED OF THE POSSIBILITY THEREOF Protection of Stored Data For your important data please make periodic back up copies of all the data stored on the hard disk o...

Page 3: ...used in accordance with the instructions it may cause harmful interference to radio communications However there is no guarantee that interference will not occur in a particular installation If this equipment does cause harmful interference to radio or television reception which can be determined by turning the equipment off and on the user is encouraged to try to correct the interference by one o...

Page 4: ...ation number and ringer equivalence number REN for this equipment If requested the information must be provided to the telephone company The modem connects to the telephone line by means of a standard jack called the USOC RJ11C A plug and jack used to connect this equipment to the premises wiring and telephone network must comply with the applicable FCC part 68 rules and requirements adopted by th...

Page 5: ... complaint with the FCC if you believe it is necessary If trouble is experienced with this equipment for repair or limited warranty information please contact Toshiba Corporation Toshiba America Information Systems Inc or an authorized representative of Toshiba or the Toshiba Support Centre within the United States at 800 457 7777 or Outside the United States at 949 859 4273 If the equipment is ca...

Page 6: ...ssible to be connected to the facilities of the local telecommunications company The equipment must also be installed using an acceptable method of connection The customer should be aware that compliance with the above conditions may not prevent degradation of service in some situations Repairs to certified equipment should be coordinated by a representative designated by the supplier Any repairs ...

Page 7: ...LANs Revision A B G as defined and approved by the Institute of Electrical and Electronics Engineers The Wireless Fidelity Wi Fi certification as defined by the Wi Fi Alliance The Wi Fi CERTIFIED logo is a certification mark of the Wi Fi Alliance Bluetooth and Wireless LAN devices operate within the same radio frequency range and may interfere with one another If you use Bluetooth and Wireless LAN...

Page 8: ... on board airplanes or In any other environment where the risk of interference to other devices or services is perceived or identified as harmful If you are uncertain of the policy that applies on the use of wireless devices in a specific organization or environment e g airports you are encouraged to ask for authorization to use the Wireless LAN device prior to turning on the equipment Regulatory ...

Page 9: ...l interieur et devrait etre place loin des fenetres afin de Fournier un ecram de blindage maximal Si le matriel ou son antenne d emission est installe a l exterieur il doit faire l objet d une licence This device is restricted to indoor use due to its operation in the 5 15 GHz to 5 25 GHz frequency range Industry Canada requires this product to be used indoors for frequency range 5 15 GHz to 5 25 ...

Page 10: ...es dispositions de la directive 1999 5 CE qui lui sont applicables Swedish Härmed intygar TOSHIBA Corp Digital Media Network Company att denna Radio LAN device står I överensstämmelse med de väsentliga egenskapskrav och övriga relevanta bestämmelser som framgår av direktiv 1999 5 EG Danish Undertegnede TOSHIBA Corp Digital Media Network Company erklærer herved at følgende udstyr Radio LAN device o...

Page 11: ...mits Nevertheless the TOSHIBA Wireless LAN Mini PCI Card shall be used in such a manner that the potential for human contact during normal operation is minimized In normal operating configuration the LCD in the upright position the distance between the antenna and the user should not be less than 20 cm The antenna s used for this transmitter must not be co located or operating in conjunction with ...

Page 12: ...legal communications or from industrial scientific and medical radio emission electric machinery Using this Equipment in Japan In Japan the frequency bandwidth of 2 400 MHz to 2 483 5 MHz for second generation low power data communication systems such as this equipment overlaps that of mobile object identification systems premises radio station and specified low power radio station 1 Sticker Pleas...

Page 13: ...ems 3 TOSHIBA Direct PC Monday Friday 10 00 17 00 Toll Free Tel 0120 13 1100 Direct Dial 03 3457 5916 Fax 03 5444 9450 Device Authorization This device obtains the Technical Regulation Conformity Certification and the Technical Conditions Compliance Approval and it belongs to the device class of radio equipment of low power data communication system radio station stipulated in the Radio Law and th...

Page 14: ...r computer Approved Countries Regions for use for the Atheros AR5BMB 43 44 Mini PCI Wireless network adapter This equipment is approved to the radio standard by the countries regions in the following table Do not use this equipment except in the countries regions in the following table This device works on passive scan only A peer to peer mode is not available in 802 11a and Turbo Mode 802 11b 2 4...

Page 15: ...nregistrements et licences veuillez contacter I IBPT Deutschland License required for outdoor installations Check with reseller for procedure to follow Anmeldung im Outdoor Bereich notwendig aber nicht genehmigungspflichtig Bitte mit Händler die Vorgehensweise abstimmen France Restricted frequency band only channels 1 to 7 2400 MHz and 2454 MHz respectively may be used outdoors in France Please co...

Page 16: ...l technical support staff responsible for the wireless network The 5 GHz Turbo mode feature is not allowed for operation in any European Community country Australia Austria Belgium Canada Denmark Finland France Germany Greece Ireland Italy Liechtenstein Luxembourg Netherlands New Zealand Norway Portugal Sweden Switzerland UK USA Canada USA European Community Countries 5150 5250 MHz Channels 36 40 ...

Page 17: ...s radar detection feature will automatically restart operation on a channel free of radar You may consult with the local technical support staff responsible for the wireless network to ensure the Access Point device s are properly configured for European Community operation Approved Countries Regions for use for the Atheros AR5001X Mini PCI Wireless network adapter This equipment is approved to th...

Page 18: ...egions in the following table Australia Austria Belgium Canada Denmark Finland France Germany Greece Ireland Italy Liechtenstein Luxembourg Netherlands New Zealand Norway Portugal Sweden Switzerland UK USA Canada USA Argentina Australia Austria Belgium Brazil Canada Chile Denmark Finland France Germany Greece Iceland Ireland Italy Japan Liechtenstein Luxembourg Mexico Netherlands New Zealand Norwa...

Page 19: ...y product with Bluetooth wireless technology that is based on Frequency Hopping Spread Spectrum FHSS radio technology and is compliant to Bluetooth Specification as defined and approved by The Bluetooth Special Interest Group Logo certification with Bluetooth wireless technology as defined by The Bluetooth Special interest Group Australia Austria Belgium Canada Denmark Finland France Germany Greec...

Page 20: ...http www pcsupport global toshiba com in the United States for more information Bluetooth and Wireless LAN devices operate within the same radio frequency range and may interfere with one another If you use Bluetooth and Wireless LAN devices simultaneously you may occasionally experience a less than optimal network performance or even lose your network connection If you should experience any such ...

Page 21: ...gulatory statements This product complies with any mandatory product specification in any country region where the product is sold In addition the product complies with the following European Union EU and EFTA This equipment complies with the R TTE directive 1999 5 EC and has been provided with the CE mark accordingly Canada Industry Canada IC This device complies with RSS 210 of Industry Canada O...

Page 22: ...IBA shall be used in such a manner that the potential for human contact during normal operation is minimized In order to comply with FCC radio frequency radiation exposure guidelines for an uncontrolled environment the Bluetooth Card from TOSHIBA has to be operated while maintaining a minimum body to antenna distance of 20 cm Refer to the Regulatory Statements as identified in the documentation th...

Page 23: ...ject identification systems premises radio station and specified low power radio station 1 Sticker Please put the following sticker on devices incorporating this product Article 14 Unless approved for any model accredited low power radio frequency electric machinery any company trader or user shall not change the frequency increase the power or change the features and functions of the original des...

Page 24: ...irect PC Monday Friday 10 00 17 00 Toll Free Tel 0120 13 1100 Direct Dial 03 3457 5916 Fax 03 5444 9450 Device Authorization This device obtains the Technical Regulation Conformity Certification and it belongs to the device class of radio equipment of low power data communication system radio station stipulated in the Radio Law of Japan The Name of the radio equipment EYXF2CS TELECOM ENGINEERING C...

Page 25: ...zed Toshiba service provider if any repair or adjustment is required Location of the required label Sample shown below Location of the label and manufacturing information may vary This appliance contains a laser system and is classified as a CLASS 1 LASER PRODUCT To use this model properly read the user s guide carefully and keep it for your future reference Never attempt to disassemble adjust or ...

Page 26: ... prohibited Notice The information contained in this manual including but not limited to any product specifications is subject to change without notice TOSHIBA CORPORATION AND TOSHIBA AMERICA INFORMATION SYSTEMS INC TOSHIBA PROVIDES NO WARRANTY WITH REGARD TO THIS MANUAL OR ANY OTHER INFORMATION CONTAINED HEREIN AND HEREBY EXPRESSLY DISCLAIMS ANY IMPLIED WARRANTIES OF MERCHANTABILITY OR FITNESS FO...

Page 27: ...poration Wi Fi is a registered trademark of the Wi Fi Alliance Dolby Manufactured by Toshiba under license from Dolby Laboratories Dolby and the double D symbol are trademarks of Dolby Laboratories TouchPad is a trademark of Synaptics Inc Secure Digital and SD are trademarks xD Picture Card is a trademark of Fuji MultiMediaCard is a trademark of Infineon Technologies AG All other brand and product...

Page 28: ... a place to work 41 Creating a computer friendly environment 41 Keeping yourself comfortable 42 Other precautions 46 Important information on your computer s cooling fan 47 Setting up your computer 48 Setting up your software 49 Registering your computer with Toshiba 50 Setting up other devices 50 Connecting to a power source 50 Charging the main battery 53 ...

Page 29: ...dia 68 Deleting the Hard Disk Recovery Utility 71 Installing drivers and applications 72 Using the TouchPad 72 Scrolling with the TouchPad 73 Control buttons 73 Disabling or enabling the TouchPad 74 Turning off the computer 75 Closing the display panel 76 Using external display devices 76 Directing the display output when you turn on the computer 77 Adjusting the quality of the external display 78...

Page 30: ...rogram from the Run dialog box 89 Saving your work 90 Printing your work 92 Using the DVD ROM or multi function drive 93 Inserting a compact disc 95 Removing a disc with the computer on 97 Removing a disc with the computer off 98 Caring for CD or DVD Discs 98 Using the i LINK port 99 Using your computer at the office 99 Using a computer lock 99 Caring for your computer 100 Cleaning the computer 10...

Page 31: ...ns 122 Maximizing battery life 123 Disposing of used batteries 124 Conserving power 125 Power profiles 125 Using a hot key to set the power profile 126 Additional options for power 127 Chapter 4 Expansion Options 128 Devices for office computing 128 Using the Wi Fi Wireless LAN Mini PCI module 129 Connecting a local printer 129 Setting up your printer 131 Chapter 5 Enhancing Productivity 134 Explo...

Page 32: ...ng external speakers or headphones 149 Using PC Cards 150 Hot swapping 150 Inserting a PC Card 151 Removing a PC Card 152 Setting up a PC Card for your computer 153 Using the Bridge Media Adapter Slot 153 Inserting memory media 153 Removing memory media 154 Connecting your modem to a telephone line 155 Connecting to a phone line 155 Chapter 6 Toshiba Utilities 157 Fn esse 158 Starting Fn esse 158 ...

Page 33: ...TOSHIBA Zooming Utility 173 Using the TOSHIBA Touch and Launch utility 174 TOSHIBA Application Installer 178 Chapter 7 If Something Goes Wrong 180 Problems that are easy to fix 180 Problems when you turn on the computer 182 The Windows operating system is not working 184 Using Startup options to fix problems 184 Internet problems 185 The Windows XP operating system can help you 186 Resolving a har...

Page 34: ...7 Toshiba s worldwide offices 207 Appendix A Hot Keys 209 Volume Mute 209 Instant password security 210 Power usage profile 210 Stand By mode 211 Hibernation mode 212 Display modes 213 Display brightness 214 Disabling or enabling the TouchPad 214 Zooming applications in out 214 Keyboard hot keys 215 Appendix B Power Cord Cable Connectors 216 Appendix C Using ConfigFree with your Toshiba Computer 2...

Page 35: ...35 Contents Quick Connect 226 Using the Automatic Switch 229 Semi Automatic Switch Feature 230 Glossary 231 Index 246 ...

Page 36: ... you go Tecra A3 Series computers provide considerable computing power enabling you to perform the most demanding computing tasks from any location You will find your operating system Microsoft Windows XP Professional or Microsoft Windows XP Home already installed on your computer Your operating system offers exciting features and easy Internet access ...

Page 37: ...publication to ensure the accuracy of the information provided herein product specifications configurations prices system component options availability are all subject to change without notice For the most up to date product information about your computer or to stay current with the various computer software or hardware options visit Toshiba s Web site at pcsupport toshiba com This guide This gu...

Page 38: ...risk and the icons highlight these instructions as follows Indicates an imminently hazardous situation which if not avoided will result in death or serious injury Indicates a potentially hazardous situation which if not avoided could result in death or serious injury Indicates a potentially hazardous situation which if not avoided may result in minor or moderate injury Indicates a potentially haza...

Page 39: ...efinition of a term used in the text Other documentation Your computer comes with the following documentation This electronic user s guide Guides for other programs that may come preinstalled on your computer or that are available for installation on your Recovery media if applicable to your system For accessory information visit Toshiba s Web site at accessories toshiba com The Microsoft Windows ...

Page 40: ...omplement its limited warranty To stay current on the most recent software and hardware options for your computer and for other product information be sure to regularly check the Toshiba Web site at pcsupport toshiba com If you have a problem or need to contact Toshiba see If Something Goes Wrong on page 180 ...

Page 41: ... provides guidelines for setting up your computing environment Creating a computer friendly environment Place the computer on a flat surface that is large enough for the computer and any other items you need to use such as a printer Leave enough space around the computer and other equipment to give adequate ventilation otherwise they may overheat To keep your computer in prime operating condition ...

Page 42: ...nd sources of temperature change such as air conditioner vents or heaters Extreme heat cold or humidity Keeping yourself comfortable Strain and stress injuries are becoming more common as people spend more time using their computers However with a little care and the proper use of the equipment you can work comfortably throughout the day Using the computer keyboard incorrectly can result in discom...

Page 43: ...than eye level If you use a paper holder set it at the same height and distance as the screen Seating and posture When using your computer maintain good posture with your body relaxed and your weight distributed evenly Proper seating is a primary factor in reducing work strain Some people find a backless chair more comfortable than a conventional chair Whichever type you choose use the following g...

Page 44: ...th your back straight so that your knees hips and elbows form approximately 90 degree angles when you work Do not slump forward or lean back too far Lighting Proper lighting can improve the readability of the display and reduce eyestrain Position the display panel or external monitor so that sunlight or bright indoor lighting does not reflect off the screen Use tinted windows or shades to reduce g...

Page 45: ...ke frequent short breaks to change position stretch your muscles and relieve your eyes A break of two or three minutes every half hour is more effective than a long break after several hours Avoid performing repetitive activities for long periods Intersperse such activities with other tasks Focusing your eyes on your computer screen for long periods can cause eyestrain Look away from the computer ...

Page 46: ...verheating of a PC Card can result in errors or instability in the PC Card operation Be careful when you remove a PC Card that has been used for lengthy periods of time Avoid spilling liquids into the computer s keyboard If you do spill a liquid that gets into the keyboard turn off the computer immediately Leave the computer turned off overnight to let it dry out before you use it again Never turn...

Page 47: ...uter may have a CPU cooling fan that cools the CPU by drawing outside air into the computer The cooling fan may be located on the bottom of the computer To prevent possible overheating of the CPU make sure the air intake on the cooling fan is not blocked The fan draws in air by creating a vacuum If the fan is blocked it could cause the CPU to run at a lower performance level or cause the computer ...

Page 48: ...r See Connecting to a power source on page 50 To register your computer online or to sign up for an Internet account you must be connected to the Internet using a modem or LAN connection Before adding any of these devices to the computer be sure to complete Setting up your software on page 49 After setting up your computer you may want to Add more memory see Adding memory on page 56 Connect a mous...

Page 49: ...ropriate option from the Help protect your computer screen and click Next 4 Enter the computer name and description and click Next or Skip 5 Select how your computer will connect to the internet and click Next The computer will pause for a moment while checking for an internet connection A window will display the message An Internet connection could not be chosen If you are connecting your compute...

Page 50: ...k the icon on your desktop or go to the Toshiba Web site at www register toshiba com Customer failure to complete Product Registration will not diminish Customer rights under this limited Warranty Setting up other devices You may want to take this time to set up your printer For more information see Setting up your printer on page 131 Connecting to a power source Your computer requires power to op...

Page 51: ...l outlet should be the last step otherwise the adapter DC output plug could hold an electrical charge and cause an electrical shock or minor bodily injury when touched As a general safety precaution avoid touching any metal parts Use only the AC adapter supplied with your computer or an equivalent adapter that is compatible Use of any incompatible adapter could damage your computer Toshiba assumes...

Page 52: ...to a live electrical outlet If the electrical outlet is live the system indicator panel s AC power light glows green If the main battery is present the battery light glows Amber while the battery is charging Green when the battery is fully charged If the battery light flashes amber during charging the battery is not receiving input from the AC power supply Disconnect the AC cable and remove the ba...

Page 53: ...er into a live wall outlet It takes several hours to charge the battery with the computer off It takes much longer to charge the battery wile the computer is on For more information on battery use see Running the computer on battery power on page 112 Once the battery is charged for the first time avoid leaving the computer plugged in and turned off for more than a few hours at a time Continuing to...

Page 54: ...ght 2 Lift the display panel Sample opening the display panel To avoid damaging the display panel do not force it beyond the point where it moves easily and never lift the computer by the display panel Small bright dots may appear on your TFT display when you turn on your computer Your display contains an extremely large number of thin film transistors TFT and is manufactured using high precision ...

Page 55: ...sible configurations for an entire product Series Your selected model may not have all the features and specifications corresponding to all of the icons or switches shown on the notebook chassis unless you have selected all those features Below are examples of some of the many possible icons that may come on your computer Sample system icons This information applies to all the features and icons d...

Page 56: ...computer for the first time do not turn off the power again until the operating system has loaded completely Adding memory HINT To purchase additional memory modules see the accessories information packaged with your system or visit accessories toshiba com YourTecra A3 Series computercomes with enough memory to run most of today s popular applications You may want to increase the computer s memory...

Page 57: ...er that is in good condition Installing a memory module with the computer s power on may damage the computer the module or both The computer has two memory module slots Slot A and Slot B You can install one or two memory modules Before you install or remove a memory module turn off the computer using the Start menu If you install or remove a memory module while the computer is in Standby or Hibern...

Page 58: ... batteries on page 119 5 Close the display panel and turn the computer upside down to locate the memory module slot cover to the memory module slot Sample locating the memory module slot cover 6 Using a standard Phillips no 1 screwdriver unscrew the screw that secures the memory module slot cover then remove the memory slot cover Sample removing the memory module slot cover Memory module slot cove...

Page 59: ...emory module be careful not to touch its pin connector on the side you insert into the computer 8 Remove the new memory module from its antistatic packaging 9 Holding the memory module by its edges so that the gold connector bar faces the slot fit the module into the socket 10 Gently press down on the memory module connector until the clips snap into place Do not force the memory module into posit...

Page 60: ...e at least one memory module installed for the computer to work You can now continue setting up the computer When the operating system has loaded you can verify that the computer has recognized the additional memory module If you are adding an extra memory module after setting up the computer verify that the computer has recognized it correctly as described in Checking total memory on page 62 Remo...

Page 61: ...Standby configuration will not be saved The following message appears when you turn on the power Warning Resume Failure Press Any Key To Continue If the computer hangs up when you turn it on perform the following Press the power button and hold it down for at least ten seconds then turn the power on again 2 Pull the clips away from the memory module The memory module pops partially out of the slot...

Page 62: ...atically appears and shows total memory If the computer does not recognize the memory configuration turn off the computer remove the memory slot cover and make sure the memory module is seated properly as described in step 10 of Adding memory Hard Drive Recovery Utilities Your computer has been configured with a hard disk partition to allow you to recover your hard disk drive or reinstall selected...

Page 63: ...r Creating Recovery CDs DVDs Copying the Hard Drive Recovery Utilities to CD or DVD gives you the ability to recover your hard disk drive and reclaim additional hard disk space used to store the Hard Drive Recovery Utilities on your computer The system will prompt you to insert the appropriate number of CDs or DVDs to copy the Hard Drive Recovery Utilities If your optical disk drive is not writabl...

Page 64: ...iginal bundled drivers and applications or both the recovery files and applications 4 Click Burn 5 Insert the first CD or DVD into your computer s CD DVD writable drive when prompted 6 Follow the on screen prompts for completing the copy process For more information on using the Recovery media you have created with the preceding steps see Hard Disk Drive Recovery using the Recovery media on page 6...

Page 65: ...DD 1 Make sure the computer is turned off 2 Press and hold the 0 zero key on your keyboard while powering on the computer When the computer powers on the TOSHIBA HDD Recovery Utility screen displays Sample TOSHIBA HDD Recovery Utility screen Recovering the original factory image recommended Recovering a hard disk drive to its factory default setting deletes all partitions on the hard disk drive an...

Page 66: ...he recovered drive will be lost Be sure to save your work first If you have created other partitions for example a D drive those partitions and any information on them will not be affected and remain intact To recover only your C drive 1 Press 2 on the keyboard when the TOSHIBA HDD Recovery Utility screen displays A confirmation message appears reminding you that all information on the C drive wil...

Page 67: ... confirmation message appears reminding you that all partitions will be reformatted and all information will be lost during the recovery process Be sure you have saved your work before proceeding 2 Click Yes to begin the restoration and to specify the size of the C drive Press the Left Right Arrow keys to increase decrease the C drive size by 1 GB Press the Up Down Arrow keys to increase decrease ...

Page 68: ...ve and power on the computer When the computer powers on the TOSHIBA HDD Recovery Utility screen displays Sample TOSHIBA HDD Recovery Utility screen Recovering the original factory image recommended Recovering a hard disk drive to its factory default setting deletes all partitions on the hard disk drive and your information will be lost Be sure to save your work first 1 Press 1 on the keyboard to ...

Page 69: ... and any information on them will not be affected and remain intact To recover only your C drive 1 Press 2 on the keyboard when the TOSHIBA HDD Recovery Utility screen displays A confirmation message appears reminding you that all information on the C drive will be lost during the recovery process Be sure you have saved your work before proceeding 2 Click Yes to begin the restoration Once complete...

Page 70: ...eminding you that all partitions will be reformatted and all data will be lost during the recovery process Be sure you have saved your work before proceeding 2 Click Yes to begin the restoration Once complete a message displays that the HDD has been recovered 3 Press any key on your keyboard to restart the computer Checking the HDD operating status After restoring your hard disk drive you can chec...

Page 71: ...ion When the computer powers on the Delete Hard Disk Recovery Utility warning screen displays Sample Delete Hard Disk Recovery Utility screen 2 Click OK to continue 3 When the following warning screen displays click OK to confirm After the Delete Hard Disk Recovery Utility has completed it assigns the appropriate drive letter for example E drive for the extra space and formats the drive Sample Del...

Page 72: ...ick Install 5 Follow the on screen prompts to complete the installation process Using the TouchPad The TouchPad the small smooth square cutout located in front of the keyboard is sensitive to touch and enables you to move the cursor with the stroke of a finger Simply move your finger on the TouchPad in the direction you would like to move the cursor To move the cursor to the top of the page push y...

Page 73: ...el device on a mouse or trackball To scroll vertically run your finger up or down along the right edge of the TouchPad To scroll horizontally run your finger along the bottom edge of the TouchPad Control buttons When a step instructs you to click or choose an item move the cursor to the item then press and release the primary left hand button To double click press the primary button twice in rapid...

Page 74: ...hen Control Panel The Control Panel window appears 2 Click Printers and Other Hardware 3 Click the Mouse icon 4 Click the TouchPAD ON OFF tab The TouchPAD ON OFF tab view window appears Sample TouchPAD ON OFF screen 5 Select Disable or Enable whichever is appropriate 6 Click Apply 7 Click OK The Mouse Properties window closes 8 Close the Printers and Other Hardware window ...

Page 75: ... Off or Shut down Hibernate and Standby Each option has its advantages Use the Shut down command if you are using the Windows XP Professional operating system and are connected to a domain server If you have work in progress and are not connected to a network use the Windows Standby or Hibernate commands to save your system settings to memory so that when you turn on the computer again you will au...

Page 76: ...rn Off see Hibernation mode on page 212 Using external display devices Your computer comes with a built in LCD display but you can also connect an external display device to the available video port An external monitor or projector via the RGB monitor port Before connecting an external monitor or video projector configure your computer for the type of device you are connecting To do this refer to ...

Page 77: ... use the display hot key Fn F5 1 Press Fn and F5 simultaneously 2 While holding down Fn press F5 repeatedly until the setting you want takes effect This hot key cycles through the settings in the following order Built in display only Built in display and external monitor simultaneously External monitor only TV only 3 Release the Fn key TECHNICAL NOTE You can also change these settings using the Di...

Page 78: ...h the resolution of the external display device Using an external keyboard If you prefer to use a full size keyboard you can attach one to your computer The computer s USB ports support any USB compatible keyboard Using a mouse You may want to use a mouse instead of the computer s built in TouchPad You can use a USB compatible mouse TECHNICAL NOTE With a USB mouse you can choose to have the TouchP...

Page 79: ...is ready to use Connecting an optional external diskette drive Some operations such as creating a password service diskette require a diskette drive designed for use with 3 5 inch diskettes Sample optional external USB diskette drive To connect an optional external USB diskette drive connect the cable to one of the computer s USB ports Sample connecting an optional external USB diskette drive ...

Page 80: ... is inserted the internal speakers are automatically disabled Before playing an audio CD turn the volume down Playing the CD at maximum volume could damage your ears To turn the volume down use the Volume Control switch or access the Volume Control program click Start All Programs Accessories Entertainment Volume Control Connecting a microphone To record high quality sounds you can attach a microp...

Page 81: ...features Computing tips Save your work frequently Your work stays in the computer s temporary memory until you save it to the disk If the network you are using goes down and you must restart your computer to reconnect or your battery runs out of charge while you are working you will lose all work since you last saved ...

Page 82: ...d disk suddenly fails you will lose all the data on it unless you have a separate backup copy Use Error checking and Disk Defragmenter regularly to conserve disk space and improve performance Scan all new files for viruses This precaution is especially important for files you receive via diskette email or download from the Internet Take frequent breaks to avoid repetitive motion injuries and eyest...

Page 83: ...y be lost Using the keyboard Your computer s keyboard contains character keys control keys function keys and special Windows keys providing all the functionality of a full size keyboard Sample keyboard Character keys Typing with the character keys is very much like typing on a typewriter except that The space bar creates a space character instead of just passing over an area of the page The lowerc...

Page 84: ...ever some programs assign separate functions to the right and left Ctrl and Alt keys or to the regular and numeric pad Enter keys on the full sized keyboard Using the Fn key you can simulate these separate keys as follows Press Fn and Ctrl simultaneously to simulate the Ctrl key on the right side of the enhanced keyboard Press Fn and Enter simultaneously to simulate the Enter key on the numeric pa...

Page 85: ... page 158 or Hot Keys on page 209 Windows special keys Sample Windows special keys Your computer s keyboard has two keys that have special functions in Windows Start key Opens the Start menu Application key Has the same function as the secondary mouse button Overlay keys The keys with gray numbers and symbols on the front of them form the numeric and cursor overlay This overlay lets you enter nume...

Page 86: ...e overlay off hold down the Fn key and press F11 again The numeric mode light on the keyboard indicator panel goes out Using the overlay for cursor control The keys with the gray arrows and symbols on their left front are the cursor control overlay keys To turn the cursor control overlay on press Fn and F10 simultaneously The cursor control mode light on the keyboard indicator panel glows when the...

Page 87: ...how to start a program from the Start menu Explorer and the Run dialog box Starting a program from the Start menu When you install a program the operating system usually puts an icon in the All Programs menu To start a program that has an icon in the All Programs menu follow these steps which use the Windows WordPad program as an example 1 Click Start then point to All Programs The Windows XP oper...

Page 88: ...utable file this file ends with exe This example opens WordPad using its file name wordpad exe 1 Click Start then point to All Programs 2 Click Accessories 3 Click Windows Explorer 4 Click My Computer to expand the window 5 In the left part of the window click the line that ends in C 6 In the left part of the window under the C icon double click the folder containing the program in this case Progr...

Page 89: ...d line For a program in the Windows folder type just the program name Otherwise type the full file path For example to access WordPad type c Program Files Windows NT Accessories Wordpad exe then click OK If you do not know the location you can search for it by clicking Start and then Search When the Search screen displays follow the displayed instructions HINT To run the same program again click t...

Page 90: ...s is quick and easy so it is a good idea to get in the habit of saving frequently Many programs offer a feature that saves documents at regular intervals Check your program s documentation to see if it has an automatic save feature Saving files 1 On the File menu of your Windows program click Save If you are working with a document that already has a file name this is all you need to do If you cre...

Page 91: ... of up to 255 characters the names can include spaces Some applications still require file names limited to eight characters File names If you plan to share your files with a computer using a pre Windows 95 version of the Windows operating system the file name must be no more than eight characters long Typically the file name also has an extension consisting of a period and up to three additional ...

Page 92: ...gram is unlikely to recognize a strange extension and may refuse to handle your file correctly Printing your work Ensure the operating system is set up for your printer as described in Using the Wi Fi Wireless LAN Mini PCI module on page 129 HINT You only need to set up the printer the first time you connect it If you use more than one printer or are changing printers you will need to set up the W...

Page 93: ...i function drive Optical storage has become the preferred medium for software music and video Digital versatile discs DVDs provide a significant increase in data storage and support features that are not available on any other video platform These features include wide screen movies multiple language tracks digital surround sound multiple camera angles and interactive menus For these reasons your ...

Page 94: ...he drive will only play DVDs from that last region Note that changing from region 1 to region 2 and back to region 1 is counted as two changes For optimum DVD performance it is recommended that you play DVDs while running the computer on AC power Your computer s Power Saver utility can be used to select a power level setting for DVD playback Refer to TOSHIBA Power Saver on page 163 for more inform...

Page 95: ...ction Manual eject hole Use if you need to release the disc tray when the power is off Use a straightened paper clip or other narrow object to press the manual eject button located inside the hole Never use a pencil to press the manual eject button Pencil lead can break off inside the computer and damage it Inserting a compact disc To insert a compact disc into the drive 1 Make sure the computer i...

Page 96: ...ot open if the computer s power is off 4 Grasp the tray and pull it fully open 5 Hold the disc by its edges and check that it is free of dust If the disc is dusty clean it as described in Caring for CD or DVD Discs on page 98 6 Place the disc carefully in the disc tray label side up Sample positioning the disc in the drive ...

Page 97: ...f this happens contact Toshiba support for assistance 9 Push the disc tray in by pressing gently on the center of the tray until it clicks into place You are ready to use the disc Removing a disc with the computer on To remove a compact disc CD or DVD with the computer turned on 1 Press the eject button on the drive Do not press the eject button while the in use indicator light is glowing Doing so...

Page 98: ...o protect them from scratches and keep them clean Do not bend a disc or place heavy objects on top of it Do not apply a label to or otherwise mar the surface of a disc Hold a disc by its outside edge Fingerprints on the surface can prevent the DVD ROM drive or multi function drive from reading the data properly Do not expose discs to direct sunlight or extreme heat or cold To clean a disc that is ...

Page 99: ...rnal full size keyboard and a mouse you can work with your notebook as if it were a standard office computer An external monitor or projector connects to the RGB monitor port Any USB device can connect to the USB ports Using a computer lock For your own peace of mind you may want to secure your computer to a heavy object such as your desk The easiest way to do this is to purchase an optional PORT ...

Page 100: ...and moving your computer For information about taking care of your computer s battery see Running the computer on battery power on page 112 Cleaning the computer Keep liquids including cleaning fluid out of the computer s keyboard speaker and other openings Never spray cleaner directly onto the computer Never use harsh or caustic chemical products to clean the computer To keep your computer clean ...

Page 101: ...essories information packaged with your system or visit accessories toshiba com Backing up your work Back up all the files you create in case something happens to your computer If you have a network partition you can hold copies of your files there Alternatively you can back up your files to diskette one at a time as you are working on them To back up several files at one time use the Microsoft Wi...

Page 102: ...eady exists on the hard disk Make sure the backup version is the one you want before overwriting the existing file Preparing for communications To connect to the Internet use an online service or communicate across the telephone lines with another computer you need A modem supplied with your computer A telephone line A browser or communications program An Internet Service Provider ISP or an online...

Page 103: ...e computer you have three options to choose from Turn Off Computer Standby and Hibernation TECHNICAL NOTE Before using any of these options to power down your computer save your files and make sure the disk activity lights are off If you change your mind and decide to continue working after all wait a few seconds before turning the computer on again Using Turn Off Computer or Shut Down For the Win...

Page 104: ...he Stand By button to hibernate For more information about setting up hibernation refer to Using Hibernation on page 106 Shutting down more quickly You can shut down the computer by pressing the power button or closing the display panel To use either of these methods you first need to turn it on in Toshiba s Power Saver utility 1 Open the Start menu click Control Panel then Performance and Mainten...

Page 105: ... information about the Power Saver utility see TOSHIBA Power Saver on page 163 Starting again after Shut down To start the computer up again press the power button until the on off light changes to green If you shut down the computer by closing the display panel you can start it again by opening the display panel NOTE ...

Page 106: ...ower Because the mode of the system is held on the hard disk no data is lost if the main battery discharges When starting up again Hibernation uses less time and battery power than does Turn off computer Restarting from Hibernation uses a little more time and battery power to start up than restarting from Standby because information is being retrieved from the hard disk rather than from memory Whe...

Page 107: ...ower Saver utility see TOSHIBA Power Saver on page 163 Once the computer is configured put the computer into Hibernation mode by either pressing the power button or closing the display panel depending on the hibernation options taken Starting again from Hibernation mode Use these instructions to restart the computer when you enter Standby mode by closing the display panel When using AC power open ...

Page 108: ...ain battery will last up to eight hours in Standby mode Restarting from Standby uses less time and battery power than restarting from Turn off computer or Hibernation When starting up again the computer returns to the mode in which you left it including all open programs and files you were using If you power down using the Standby command and the main battery discharges fully your information will...

Page 109: ...ode by either pressing the power button or closing the display panel You can also specify an amount of time after which the computer automatically goes into Standby mode To use any of these methods you first need to enable them in Toshiba s Power Saver utility 1 Open the Start menu click Control Panel then Performance and Maintenance 2 Click the Toshiba Power Saver icon 3 Click the Setup Action ta...

Page 110: ... using AC power open the display panel When using battery power open the display panel and press the power button until the on off light changes to green The computer returns to the screen you were previously using Toshiba s online resources Toshiba maintains a number of online sites to which you can connect These sites provide information about Toshiba products give help with technical questions ...

Page 111: ...n it is not being used thereby conserving energy and saving money in the process It has a number of other features that enhance its energy efficiency Many of these energy saving features have been set by Toshiba We recommend you leave these features active allowing your computer to operate at its maximum energy efficiency so that you can use it for longer periods while traveling ...

Page 112: ...sories information that shipped with your computer or to stay current on the most recent software and hardware options for your computer and for other product information regularly check the Toshiba Web site at accessories toshiba com To ensure that the battery maintains its maximum capacity operate the computer on battery power at least once a month until the battery is fully discharged Please se...

Page 113: ...ness of the screen Charging the batteries Battery charge time may vary depending on the applications power management settings and features used The battery needs to be charged before you can use it to power the computer Never leave batteries in the battery charger for more than a week at a time Doing so may reduce the potential charge of the battery Use only battery chargers designed to work with...

Page 114: ... to recharge The battery may not start charging immediately if The battery is extremely hot or cold To ensure that the battery charges to its full capacity wait until it reaches room temperature 50 to 80 degrees Fahrenheit 10 to 26 degrees Celsius The battery is almost completely discharged Leave the power connected and the battery should begin charging after a few minutes HINT Once the battery is...

Page 115: ...TC battery is low the real time clock and calendar may display the incorrect time and date or stop working It is seldom necessary to charge the RTC battery because it charges while the computer is on If the RTC battery is low the real time clock and calendar may display the incorrect time and date or stop working When Hibernation mode is enabled and the RTC battery is completely discharged a warni...

Page 116: ...r indicates that the computer is using battery power and the battery s charge is running low HINT Be careful not to confuse the battery light with the on off light When the on off light flashes amber it indicates that the system is suspended using Windows XP Standby command Displaying remaining battery power You can monitor the battery s remaining charge The computer calculates the remaining batte...

Page 117: ...r battery will not power the computer for as long as a new battery even when both are fully charged HINT Wait at least 16 seconds after turning on the computer before trying to monitor the remaining battery power The computer needs this time to check the battery s remaining capacity and perform its calculations The computer drains battery power more quickly at low temperatures Check your remaining...

Page 118: ...ssary steps to save your work Your Windows operating system offers two alarms before your system shuts down To change the default alarm settings 1 Open the Start menu click Control Panel then Performance and Maintenance 2 Click the Toshiba Power Saver icon 3 Click the Setup Action tab 4 Select the Alarm settings in the Setup Alarm section Before your computer runs out of battery power save your da...

Page 119: ...ul not to damage the casing or short circuit the terminals To change the battery 1 Save your work 2 Shut down and turn off the computer 3 Remove all cables connected to the computer 4 Turn the computer over 5 If the battery release lock is in the locked position slide it toward the unlocked position Sample battery release lock ...

Page 120: ...battery out from the back of the computer Sample removing the discharged battery If the battery is leaking or its case is cracked put on protective gloves to handle it and discard it immediately following the advice in Disposing of used batteries on page 124 8 Wipe the terminals of the charged battery with a clean cloth to ensure a good connection ...

Page 121: ... been designed so that you cannot install it with reverse polarity If the battery does not slide into the slot easily move the battery release lock to the unlocked position and try again Do not force the battery into position 10 Reset the battery release lock to the locked position 11 Turn the computer right side up 12 Reconnect any cables 13 Restart the computer ...

Page 122: ...ng could damage it Avoid touching the metal terminals of the battery with another metal object Short circuiting the battery can cause it to overheat and may cause damage to the battery or the computer Do not incinerate a spent battery as this could cause it to explode and release toxic materials If a battery is leaking or damaged replace it immediately Use protective gloves when handling a damaged...

Page 123: ...wer for five minutes If the battery pack has at least five minutes of operating time continue operating until the battery pack is fully discharged If the battery light flashes or there is some other warning to indicate a low battery go to step 4 4 Connect the AC adapter to the computer and the power cord to a power outlet The DC IN or AC power light should glow green and the battery light should g...

Page 124: ...omputer s main battery is a Lithium Ion Li Ion battery which can explode if not properly replaced used handled or disposed of Putting spent batteries in the trash is not only irresponsible it may be illegal Dispose of the battery as required by local ordinances or regulations Use only batteries recommended by Toshiba After repeated use the batteries will finally lose their ability to hold a charge...

Page 125: ...ower saving options These power saving options control the way in which the computer is configured By using them you can greatly increase the length of time you can use the computer before you need to recharge the battery Toshiba has combined these options into preset power profiles Using one of these profiles lets you choose between maximum power savings and peak system performance You may also s...

Page 126: ... power profile 1 Press Fn and F2 simultaneously to display the power profile pop up window Sample Power Profile mode pop up window 2 While continuing to press Fn press F2 until you select the desired power profile The power profile options are Full Power High Power Normal DVD Playback Presentation and Long Life 3 Release the Fn key The pop up window disappears You are now in the selected mode For ...

Page 127: ... you spend away from external power sources the capacity of one battery pack may be sufficient for your needs However if you need more portable power Toshiba provides these options Purchase extra battery packs Purchase a battery charger that charges one main battery pack and one secondary battery pack at a time ...

Page 128: ...r Devices for office computing By connecting optional devices such as an external monitor a full size keyboard and a mouse you can work with your notebook as if it were a standard office computer You can connect any of these optional devices Expansion memory modules Standard 101 key keyboard Mouse or trackball Printer PC Cards Toshiba Advanced Port Replicator III Some of these devices listed are T...

Page 129: ...a Toshiba Wireless Authorized Service Partner For systems equipped with Wi Fi slide the wireless on off switch to the On position Connecting a local printer Your printer documentation may require you to install the printer software before physically connecting the printer to your computer If you do not install the software as instructed by the printer manufacturer the printer may not function corr...

Page 130: ...ation To achieve the connection you need a suitable USB cable which may come with your printer You can purchase one from a computer or electronics store To connect a USB printer 1 Plug the USB connector into one of the USB ports on your computer 2 Plug the printer s power cable into a live AC outlet To connect a parallel printer Connecting the parallel printer cable while the computer is on may da...

Page 131: ...stand If you are using any non Windows programs set up a printer driver for each of those programs Refer to your program s documentation for more information TECHNICAL NOTE If you have the manufacturer s disk that came with your printer you can use it to install the printer on your computer The manufacturer s disk may include additional drivers and fonts To set up a printer with the Add Printer Wi...

Page 132: ...ting system recognizes it automatically You can ignore the remainder of this section See your printer manual 4 If the printer you are setting up Is not connected to a network select Local printer attached to this computer Is connected to a network select Network printer or a printer attached to another computer 5 Click Next The Add Printer Wizard looks for a Plug and Play printer If it does not lo...

Page 133: ... printer HINT If you are using more than one printer make sure the name is descriptive enough to help you tell the difference 9 If you want this printer to be The default printer click Yes Available when specifically requested click No 10 Click Next 11 Click Finish The Windows XP operating system prints a test page 12 To complete the setup click OK You are now ready to print Depending on your prog...

Page 134: ...rything you can do in the Windows XP Professional operating system You use its features to start programs find documents set up system components and perform most other computing tasks HINT The illustrated examples in this guide may appear slightly different from the screens displayed by your system The differences are not significant and do not indicate any change in the functionality of your sys...

Page 135: ... system tray and background pattern Sample Windows XP operating system desktop Icons An icon represents a folder file or program that can be quickly activated by double clicking the icon You can create a new desktop icon for any folder file or program by dragging the element s icon from its location in a window to the desktop area Start button Taskbar Icons System tray ...

Page 136: ...Internet Explorer The Microsoft browser that provides access to the Internet If you place the cursor over an icon a popup description of the file contents appears Your desktop may contain other icons depending on your configuration See Windows XP online help for more specific information on each icon and how to use it Start button You use the Start button to Start programs Access Microsoft Windows...

Page 137: ... the Web or any other Internet facility Generically it is known as the Web site address System tray The System tray displays icons of tasks or programs that run continuously in the background To learn more about each task position the cursor over the icon for a few moments and a short description of the task appears Typical tasks in the System tray are Current time Power usage mode Mouse propertie...

Page 138: ...ne the current COM port name and possibly change it To find out which port your modem is connected to 1 Open the Start menu and click Control Panel 2 Click Printers and Other Hardware 3 Click Phone and Modem Options The Phone and Modem Options Properties dialog box displays 4 Fill in the Local Information text boxes and click OK 5 Click the Modems tab Your modem should be listed next to one of the...

Page 139: ...information see Connecting to a phone line on page 155 Connecting your computer to a network You can connect your computer to a network to increase its capabilities and functionality using one of its communication ports Accessing a network To access a network At the office connect an Ethernet cable to the RJ45 jack on your computer For specific information about connecting to the network consult y...

Page 140: ...server If the computer is not connected to a network it may pause a few minutes as it waits for a reply To avoid this delay you can reconfigure Windows to disable the LAN port To disable the LAN port 1 Click Start click Control Panel then Performance and Maintenance 2 Click the System icon then click the Hardware tab and then click the Device Manager button 3 Select the appropriate network adapter...

Page 141: ...ns Your system may come with an optional wireless LAN module This is a technology that expands wireless communication beyond networking equipment and can connect many different kinds of electronic devices without the need for cables For information on how to set up a wireless connection refer to your wireless networking device documentation or your network administrator To use your wireless commun...

Page 142: ... Transfer Protocol HTTP The World Wide Web offers information as text images audio or video to be referenced from anywhere in the world Special programs called Web browsers are specifically designed to work with HTTP They make it easier to connect to a particular network address and send and receive information Internet Service Providers To connect a computer directly to the Internet many people a...

Page 143: ...necting your modem to a telephone line on page 155 2 Start your Web browser Have your modem dial the ISP s telephone number and establish a connection with the ISP s computer If you are using your computer at the office then you probably connect to the Internet through your company s network See your network administrator about connecting to the Internet Surfing the Internet Once connected to the ...

Page 144: ...il address at the same time you sign up for the service Internet chat rooms A chat room is a Web site that offers a place where people with similar interests and ideas communicate in real time one on one or in groups by typing messages which are instantly viewed by others on their computer screens Internet news groups A news group is similar to a chat room but instead of using a dedicated site to ...

Page 145: ...a Exploring audio features You can use your computer to record sounds using an external microphone You can play wav sound files or audio CDs using the built in speakers headphones or external speakers Playing an audio CD Insert an audio CD and close the disc tray If the computer is turned on Windows Media Player opens and the CD begins to play You can use the Windows Media Player program to contro...

Page 146: ...rol panel To stop the CD click the Stop button Before using headphones to listen to an audio CD turn the volume dial down Playing the CD with the volume set too high could damage your ears Playing CDs using Auto Run If you insert a CD into the DVD ROM multi function drive and the Auto Run feature does not automatically start your disk try launching the CD manually To do this follow these steps 1 O...

Page 147: ...ciated software to open the files on the disk Creating a CD Depending on your computer s configuration your computer may come with a multi function drive that allows you to Play pre recorded DVDs Play pre recorded CDs Read and write data depending on your system configuration and music files to CD Recordable CD R and CD Rewritable CD RW discs and DVD R RW or DVD RAM discs Copy protection technolog...

Page 148: ...L NOTE If you record MP3 files you will only be able to play them on a device capable of playing MP3 files Using a microphone 1 Connect an external microphone to the computer 2 Click Start point to All Programs Accessories Entertainment then click Sound Recorder Sample Sound Recorder screen 3 Click the Record button 4 Speak normally into the microphone 5 When you have finished recording click the ...

Page 149: ...akers or headphones Your computer is equipped with a full stereo sound system with internal speakers Instead of using the internal speakers you can connect headphones or a pair of external stereo speakers TECHNICAL NOTE Use amplified speakers that require an external power source Other types of speakers will be inadequate to produce sound from the computer To play back sound files through external...

Page 150: ...they conform to the PCMCIA 2 1 standard or later Other cards may work with your computer but are likely to be much more difficult to set up and use Hot swapping With PC Cards you can replace one PC Card with another while the computer is on This is called hot swapping Hot swapping precautions Although you can insert a PC Card at any time remember not to remove a card while it is in use Otherwise y...

Page 151: ...h as cables attached to your computer or to the computer itself Before you insert a PC Card refer to the documentation that comes with the card to see if you need to do anything before you insert it To insert a PC Card 1 Turn off the computer You may also hot swap a PC Card Stop the PC Card by clicking the Safely Remove Hardware icon on the System tray After the PC Card is stopped it is safe to re...

Page 152: ...emoving a PC Card Stop the PC Card by clicking the Safely Remove Hardware icon on the System tray After the PC Card is stopped it is safe to remove 1 Locate the PC Card ejection button 2 Press the PC Card eject button once to extend it and push it in to remove the PC Card The PC Card ejects slightly from the slot 3 Grasp the edges of the PC Card and slide it out of the slot Sample removing a PC Ca...

Page 153: ...uipped with a Bridge Media Adapter Slot which supports the use of Memory StickTM or Memory StickTM PRO media Secure DigitalTM SDTM Cards SmartMedia or xD Picture Cards This media can be used with a variety of digital products digital music players cellular phones PDAs digital cameras digital video camcorders etc Do not use the Copy Disk function for this type of media To copy data from one media t...

Page 154: ...t remove memory media while data is being written or read Even when the message copying in the windows disappears writing to the media might still be in progress and your data could be destroyed Wait for the indicator light to go out Removing memory media 1 Right click the Safely Remove Hardware icon on the System tray After the media is stopped it is safe to remove 2 Grasp the card and pull it st...

Page 155: ...network administrator Send a fax directly from your computer For more detailed information regarding your computer s modem visit Toshiba s Web site at accessories toshiba com Connecting to a phone line Before you can communicate using the modem you need to connect it to a telephone line Your computer s built in modem port provides an RJ 11 jack allowing you to connect the modem to a standard voice...

Page 156: ...gned for use with a standard analog telephone line Do not connect the modem to a digital telephone line A digital line will damage the modem Now you are ready to send a fax or use the modem to connect to an online service or the Internet For more information on using a modem see Setting up for communications on page 137 ...

Page 157: ...ermine certain system details set additional options or change default options This chapter describes the utilities supplied by Toshiba Fn esse Hotkey utility TOSHIBA Assist TOSHIBA HW Setup TOSHIBA Power Saver Hibernation mode Setting a user password Using a supervisor password Using the TOSHIBA Zooming Utility Using the TOSHIBA Touch and Launch utility TOSHIBA Application Installer ...

Page 158: ...ly access your programs and files With Fn esse you can assign an Fn key combination to Open a Windows XP operating system program Open a file in its associated program Display a customized folder of programs and or files from which to choose Fn esse also has several keys known as hot keys that perform preassigned operations For more information see Hot Keys on page 209 You can assign any key that ...

Page 159: ...r document 1 Start both Fn esse and Windows Explorer or the program supporting drag and drop 2 Resize the Explorer window so that you can see both the Fn esse keyboard and Explorer at the same time 3 In the Explorer window highlight the program or document file you wish to assign to a key 4 Click and hold the primary button as you drag the highlighted item from Explorer to the key on the Fn esse k...

Page 160: ...her Using the keyboard press and hold the Fn key then press the desired assignment key Using the pointing device move the cursor over the desired key in the Fn esse window and press the secondary button The Assignment Type dialog box appears Sample Fn esse assignment type dialog box Making a direct key assignment 1 Select Direct to display the Add Edit Command dialog box 2 Enter the Description Co...

Page 161: ... refer to your Windows XP operating system documentation 4 Click OK to associate the folder with the key you just selected To open a popup list showing the items in that folder press Fn plus the appropriate key from within any Windows program Viewing existing key assignments To view the existing key assignments choose Assignments from the Fn esse keyboard Fn esse displays the Function Key Assignme...

Page 162: ...st The TOSHIBA Assist provides quick access to computer functions and allows you to customize a range of computer settings To access the control panel 1 Click Start then click All Programs 2 Point to TOSHIBA Assist then click the resulting Toshiba Assist selection The TOSHIBA Assist window appears Sample TOSHIBA Assist window The TOSHIBA Assist offers four categories of features Connect Secure ...

Page 163: ...DVD Drive Acoustic Silencer TOSHIBA Application Installer Network The Network category features Connectivity Doctor Security The features available in this category are Supervisor password User password TOSHIBA Power Saver The TOSHIBA Power Saver feature enables you to control your computer s power usage regardless of the source and use the many preset power modes or create one yourself To access ...

Page 164: ...se one of the preset modes or create and use your own customized profile The preset profiles cannot be deleted By changing the options that appear in the Toshiba Power Saver Properties window and clicking OK you can reconfigure that function Any options that you change become effective when you click either OK or Apply Profiles This section lists the preset profiles along with the estimated batter...

Page 165: ...Copy 3 A new mode appears with the title Copy of Name where Name is the title of the mode you copied You can change the name description or icon for this profile by clicking Property Customizing a power mode 1 Highlight the profile you want to modify 2 Change the settings you want on the Basic Setup tab 3 You may also change settings on the Setup Action tab Keep in mind however that by default the...

Page 166: ... 1 Click Start All Programs Toshiba Utilities then click the Hotkey utility The Hotkey window appears Sample Toshiba Hotkey utility window 2 Select the desired option 3 Click OK TOSHIBA HW Setup TOSHIBA HW Setup is the Toshiba configuration management tool available through Windows To access it open the Start menu click Control Panel then Printers and Other Hardware Then click the Toshiba HWSetup ...

Page 167: ...t security Device Config Shows the Device configuration options Parallel Printer Allows you to configure the parallel port default settings if applicable to your system Display Allows you to change various default settings for the built in LCD display CPU Allows you to change the dynamic CPU frequency mode Dynamically Switchable This mode is the default setting for your computer and automatically ...

Page 168: ...unction key and access the wake on keyboard function USB Allows you to enable or disable USB Legacy Emulation LAN Allows you to set networking functions By changing any of the options that appear in the dialog boxes and clicking Apply you can reconfigure that function Any options that you change will become default settings when you restart your system Setting user passwords Setting a password lea...

Page 169: ...visor password is set Using an instant password An instant password secures your system with a single keystroke Use this feature when you leave your desk for a few minutes and do not want to turn off the computer To use an instant password press Fn then press F1 This freezes the keyboard and TouchPad and blanks the screen An instant password has no effect on an optional USB mouse or trackball To u...

Page 170: ...t again box 8 Click Set 9 Click OK Disabling a user password To cancel the power on password function 1 Click Start then click All Programs 2 Point to Toshiba Assist then click the resulting Toshiba Assist selection The Toshiba Assist window appears 3 On the left side select Security 4 Select the User Password icon 5 Select Verify by Password 6 Type the correct password 7 Click Delete 8 Click OK ...

Page 171: ...ble for any losses that may occur to you your organization or others as a result of the inability to access the computer A supervisor password prevents other users from changing hardware configuration options Setting a supervisor password To register a password for the power on password functions 1 Click Start then click All Programs 2 Point to Toshiba Assist then click the resulting Toshiba Assis...

Page 172: ... Using a supervisor password Sample Toshiba Assist Security window 4 Select the Supervisor Password icon 5 Click Set 6 Type your password in the Input box 7 Retype your password in the Input again box 8 Click Set 9 Click OK ...

Page 173: ...upervisor Password icon 5 Select Verify by Password 6 Select the Supervisor Password tab 7 Type the correct password 8 Click Verify 9 Click Delete 10 Select Verify by Password 11 Type the correct password 12 Click Verify Using the TOSHIBA Zooming Utility This utility allows you to zoom in and zoom out of applications as well as the icons for Microsoft Internet Explorer Microsoft Office Windows Med...

Page 174: ...h utility TOSHIBA Touch and Launch is a program that adds features to the TouchPad For example by selecting an icon you can Open a document Launch a program Show a list of windows and switch the active window Open Internet Explorer favorites TOSHIBA Touch and Launch is like a miniature Windows desktop You can personalize TOSHIBA Touch and Launch to help you work more efficiently ...

Page 175: ...indow the icon is highlighted or selected Release your finger from a selected icon to choose the icon s function If the icon is highlighted in orange and selected the function corresponding to the selected icon launches and the TOSHIBA Touch and Launch window closes If the icon is highlighted in blue and selected the function corresponding to the selected icon launches and the TOSHIBA Touch and La...

Page 176: ...lect one of the corner icons The type and number of icons you see in the main part of the TOSHIBA Touch and Launch window are determined by which of the corner icons you select TOSHIBA Touch and Launch is controlled adjusted via an icon on the system tray The icon will change color when the TOSHIBA Touch and Launch is active Double click the icon to open the TOSHIBA Touch and Launch Settings windo...

Page 177: ...Touch and Launch Settings When you choose the Settings shortcut menu entry the TOSHIBA Touch and Launch Settings window appears Sample TOSHIBA Touch and Launch Settings window In the Corner Assignment section you can change the icons you see at the four corners of the TOSHIBA Touch and Launch window using the drop down list boxes The icons are referred to as tables in the TOSHIBA Touch and Launch ...

Page 178: ...HIBA Touch and Launch Settings As you select a table the Settings button may become active Not all tables have settings The New Table button allows you to create a new table The Delete button deletes the selected table Disabling or enabling TOSHIBA Touch and Launch You can set clear the Disable TOSHIBA Touch and Launch check box in the TOSHIBA Touch and Launch Settings window to disable enable the...

Page 179: ...ation Installer screen 3 Click the item s you want to install To select multiple items hold down the Ctrl key as you make your selections Sample TOSHIBA Application Installer selection screen 4 Click Install 5 Follow the on screen prompts to complete the installation process ...

Page 180: ...encounter If all else fails contact Toshiba You will find information on Toshiba s support services at the end of this chapter Problems that are easy to fix Your program stops responding If you are working with a program that suddenly freezes all operations chances are the program has stopped responding You can exit the failed program without shutting down the operating system or closing other pro...

Page 181: ...rn off The computer turns off Your program performs an illegal operation If you receive the message Your program has performed an illegal operation you should wait to see if it happens again If it does record the details of the message and consult the software manufacturer To record the details 1 Click the Details button and select the text the operating system displays The Details button displays...

Page 182: ...ify that the computer is on by looking at the on off indicator If the indicator is glowing the computer is on If you are using an AC adapter verify that the computer is receiving power from the external power source by looking at the AC power light If the indicator is glowing the computer is connected to a live external power source The computer starts but when you press a key nothing happens Veri...

Page 183: ...he computer s memory has been lost However data stored in the computer s hard drive may not be affected Always save your data even when you are using the Stand By If your battery fully discharges information that has not been saved will be lost Your computer can be configured to warn you when the battery is running low For more information see What to do when the battery alarm sounds on page 118 I...

Page 184: ...ing system responds differently from the normal routine The screen does not look right Problems usually occur when you change the system in some way such as installing a new program or adding a device If you experience any of these problems use the options in the Startup menu to fix the problem Using Startup options to fix problems If the operating system fails to start properly you may have to ch...

Page 185: ...s Restore Mode Windows domain controllers only Debugging Mode Start Windows normally Reboot Return to OS Choices menu See your Windows documentation for further explanation TECHNICAL NOTE If your computer is connected to a network the Startup menu may display different versions of Safe mode Internet problems My Internet connection is very slow Many factors contribute to the speed with which you ca...

Page 186: ...ing A site you bookmarked yesterday may not be available today or its server may be down for temporary repair Try again later The Windows XP operating system can help you If the operating system has started properly but you still have a problem using your computer the online Help can assist you in troubleshooting the problem To access Windows XP Help and Support 1 Click Start then click Help and S...

Page 187: ... A plan of action The smooth operation of the system depends on the interaction of all devices programs and features If the system or one of its attached devices is not working resolving the problem can be time consuming and frustrating The recommended procedure for getting multiple devices to work together is to add and set up one device at a time After you add each device test it to make sure it...

Page 188: ... channel for adapter cards to bypass the microprocessor and access memory directly If two or more devices use the same DMA the data required by one device overwrites the data required by the other causing a hardware conflict Resolving conflicts There are several things you can do to resolve hardware conflicts Get the most recent drivers from the manufacturer Disable the device For an older device ...

Page 189: ...nu click Control Panel then Performance and Maintenance 2 Click the Administrative Tools icon 3 Double click Computer Management and then click Device Manager 4 Select the specific device from the device category To expand a device category double click the category 5 In the toolbar look to the far right for an icon of a monitor with a strike mark through a circle on the front This is the disable ...

Page 190: ... the device The operating system displays the Device Properties dialog box which provides an array of tabs They may include The Resource tab which lists resources assigned to the monitor DVD ROM multi function drive diskette disk drive and other power using functions This tab does not appear if the device is not using resources The Driver tab which displays the drivers being used by the device The...

Page 191: ...ck for the error again 6 If the error recurs remove the memory module entirely and check for the error again If removing the memory module eliminates the error the memory module may be faulty If the error recurs without the memory module installed the error is not caused by the memory module TECHNICAL NOTE You must have a least one memory module installed for the computer to work Power and the bat...

Page 192: ...attery clean the contacts with a soft dry cloth if necessary and replace the battery The battery may be too hot or too cold to charge properly If you think this is the probable cause let the battery reach room temperature and try again If the battery has completely discharged it will not begin charging immediately Leave the AC adapter and power cord cable connected wait 20 minutes and see if the b...

Page 193: ... or cursor control light is on press Fn and F10 simultaneously to turn off the cursor control light or press Fn and F11 simultaneously to turn off the numeric keypad light If the problem occurs when both the keypad overlays are off make sure the software you are using is not remapping the keyboard Refer to the software s documentation and check that the program does not assign different meanings t...

Page 194: ...mly plugged into a working power outlet Check that the cable connecting the external monitor to the computer is firmly attached Try adjusting the contrast and brightness controls on the external monitor Press Fn and F5 simultaneously to make sure the display priority is not set for the built in screen The screen does not look right You can change the display settings by clicking a blank area of th...

Page 195: ...Properties window appears 2 Click Properties then click the Settings tab 3 Adjust the screen resolution and or color quality 4 Click OK The display mode is set to Simultaneous and the external display device does not work Make sure the external monitor is capable of displaying at resolutions of 800 x 600 or higher Devices that do not support this resolution will only work in Internal External mode...

Page 196: ...ss the disk or as sector errors Sometimes a disk problem may cause one or more files to appear to have garbage in them Typical disk problems are You are having trouble accessing a disk or one or more files appear to be missing Make sure you are identifying the drive by its correct name A or C Error checking Run Error checking which analyzes the directories files and File Allocation Table FAT on th...

Page 197: ... data files are damaged or corrupted Refer to your software documentation for file recovery procedures Many software packages automatically create backup files You may also be able to recover lost data using utility software which is available from your dealer Some programs run correctly but others do not This is probably a configuration problem If a program does not run properly refer to its docu...

Page 198: ...ecking on the faulty diskette for instructions see Disk drive problems on page 196 DVD ROM or multi function drive problems You cannot access a disc in the drive Make sure the drive tray has closed properly Press gently until it clicks into place Open the drive tray and remove the disc Make sure the drive tray is clean Any dirt or foreign object can interfere with the laser beam Examine the disc t...

Page 199: ...ocumentation and check that the hardware configuration meets the program s needs Sound system problems You do not hear any sound from the computer Adjust the volume control Press Fn Esc to see if Volume Mute is enabled If you are using external headphones or speakers check that they are securely connected to your computer The computer emits a loud high pitched noise This is feedback between the mi...

Page 200: ...icrosoft documentation for more information or refer to the documentation that came with the PC Card Some card manufacturers use special software called enablers to support their cards Enablers result in nonstandard configurations that can cause problems when installing the PC Card If your system does not have built in drivers for your PC Card and the card did not come with an operating system dri...

Page 201: ...are tab 4 Click the Device Manager button 5 Double click the PCMCIA adapter 6 Double click the appropriate PC Card The operating system displays your PC Card s Properties dialog box which contains information about your PC Card configuration and status The computer stops working hangs when you insert a PC Card The problem may be caused by an I O input output conflict between the PCMCIA socket and ...

Page 202: ...lfunctioning card and reinstalling it can correct many problems A PC Card error occurs Reinsert the card to make sure it is properly connected If the card is attached to an external device check that the connection is secure Refer to the card s documentation which should contain a troubleshooting section Printer problems This section lists some of the most common printer problems The printer will ...

Page 203: ...rinter s manufacturer The printer will not print what you see on the screen Many programs display information on the screen differently from the way they print it See if your program has a print preview mode This mode lets you see your work exactly as it will print Contact the software manufacturer for more information Modem problems This section lists common modem problems The modem will not rece...

Page 204: ... an automatic backup but you should not rely solely on this feature Save your work See Computing tips on page 81 for instructions On a regular basis back up the information stored on your hard disk Here are some ways you can do this Copy files to CD DVD or diskette following the steps in Saving your work on page 90 Connect a tape drive to the system and use specialized software to copy everything ...

Page 205: ...tance If you have followed the recommendations in this chapter and are still having problems you may need additional technical assistance This section contains the steps to take to ask for help Before you contact Toshiba Since some problems may be related to the operating system or the program you are using it is important to investigate other sources of assistance first Try the following before c...

Page 206: ...ty of resources to help you Toshiba s Technical Support Website For technical support or to stay current on the most recent software and hardware options for your computer and for other product information be sure to regularly check the Toshiba Web site at pcsupport toshiba com Toshiba voice contact Before calling Toshiba make sure you have Your computer s serial number The computer and any option...

Page 207: ...oshiba com Marketing and product information in the USA www toshiba ca Canada www toshiba Europe com Europe www toshiba co jp index htm Japan http servicio toshiba com Mexico and all of Latin America Australia Toshiba Australia Pty Limited 84 92 Talavera Road North Ryde NSW 2113 Sydney Australia Canada Toshiba Canada Ltd 191 McNabb Street Markham Ontario L3R 8H2 Canada France Toshiba Systèmes Fran...

Page 208: ... 949 859 4273 outside of the US this call may incur long distance charges Mexico Toshiba de México S A de C V Sierra Candela No 111 6to Piso Col Lomas de Chapultepec CP 11000 Mexico DF Spain Toshiba Information Systems España S A Parque Empresarial San Fernando Edificio Europa 1a Planta Escalera A 28831 Madrid San Fernando de Henares Spain United Kingdom Toshiba Information Systems U K Ltd Toshiba...

Page 209: ...Fn key turn system functions on and off Hot keys have a legend on or above the key indicating the option or feature the key controls Volume Mute Fn This hot key enables disables volume mute on your computer When volume mute is enabled no sound will come from the speakers or headphones ...

Page 210: ... profile Fn This hot key blanks the display Fn This hot key displays the power usage pop up window and cycles through the profiles The power usage profiles are Full Power High Power Normal DVD Playback Presentation and Long Life Sample power usage modes The properties of each mode are set in the Toshiba Power Management utility For more information see Mobile Computing on page 111 ...

Page 211: ... into Stand By mode A message box is displayed by default to confirm that the computer is going into Stand By mode This message box can be set so it does not display Sample Stand By confirmation box For more information about Stand By mode please see Using Standby on page 108 ...

Page 212: ...led the default a message box is displayed by default to confirm the computer is going into Hibernation mode The message box can be set so it does not display Sample Hibernation confirmation box If Hibernation mode is disabled this hot key will not respond For more information on Hibernation mode see Using Hibernation on page 106 ...

Page 213: ... display modes are Built in display panel only Built in display panel and external monitor simultaneously External monitor only Sample display options window In order to use a simultaneous mode you must set the resolution of the internal display panel to match the resolution of the external display device ...

Page 214: ...s Fn This hot key enables disables the TouchPad To use the TouchPad see Disabling or enabling the TouchPad on page 74 Sample disable and enable TouchPad windows Fn This hot key turns the Zooming utility to zoom in For more information see Using the TOSHIBA Zooming Utility on page 173 Fn This hot key turns the Zooming utility to zoom out For more information see Using the TOSHIBA Zooming Utility on...

Page 215: ... cursor control overlay on and off Fn This hot key turns the numeric overlay on and off Fn This hot key turns the scroll lock feature on and off Fn Spacebar This hot key toggles the resolution between SVGA 800 x 600 XGA 1024 x 768 and SXGA 1400 x 1050 if supported F10 F11 F12 ...

Page 216: ...rsal power supply you can use worldwide This appendix shows the shapes of the typical AC power cord cable connectors for various parts of the world USA and Canada UL approved CSA approved United Kingdom BS approved Australia AS approved Europe VDA approved NEMKO approved ...

Page 217: ...Connectivity Doctor utility is used to analyze network connections and fix networking problems with your notebook computer For more information see Connectivity Doctor on page 219 Search for Wireless Devices The Search for Wireless Devices utility searches for wireless LAN and Bluetooth devices used in the neighborhood and displays information about them on a virtual map For more information see S...

Page 218: ...dows XP or 2000 Click the Start button and select All Programs TOSHIBA Networking ConfigFree Double click the ConfigFree icon on the taskbar Press the Toshiba Assist button if applicable to your system to open the Toshiba Assist and then click the ConfigFree icon Click the ConfigFree icon on the taskbar and then click the desired utility If your computer is not connected to a network the ConfigFre...

Page 219: ... you analyze your network connections and fix network connection problems Using Connectivity Doctor you can view detailed network information by simply moving the mouse pointer The Connectivity Doctor works with the following network devices Wired and wireless network devices Routers hubs and bridges Access points Wireless LAN Bluetooth Connectivity Doctor Profiles ...

Page 220: ... mouse pointer over a wired or wireless network device icon displays information about the device such as its IP address subnet mask and MAC address A wireless network device also shows information such as the network SSID and the device s Wired Equivalent Privacy WEP key settings Sample viewing device information ...

Page 221: ...t appears next to the wireless communication switch Clicking the exclamation point displays a description of the problem and a solution The following checkboxes and buttons are provided on the Connectivity Doctor screen Stayonthetask tray When checked the ConfigFree icon resides in the system tray Options Displays ConfigFree setting screen Log Letsyoucreateadiagnosticlog viewahistoryof log files o...

Page 222: ...reless devices that have been detected Search for Wireless Devices can also be started from the ConfigFree Launcher For Wi Fi networks the intensity of a signal is displayed in five levels or bands The signal from the connected access point is displayed in the bands surrounding the PC icon at the center of the map Placing the pointer over the displayed point of light shows detailed information abo...

Page 223: ...ollowing screen shows an example of Bluetooth devices that are detected As with the Wi Fi screen moving the mouse pointer over a device icon displays information about the device Sample viewing Bluetooth devices You can connect to devices shown on the Bluetooth map 1 Click the icon of a Bluetooth device ...

Page 224: ...xample you can set up a profile to match that environment and connect to the network Similarly users who access networks in the office and at home can set up profiles to handle these networking environments A profile contains the currently configured network settings on the computer as well as information about any network devices The following settings can be saved or captured in a profile Intern...

Page 225: ...the profile you want to create 6 Enter any optional comments if desired 7 Click Change Icon and select an icon for this profile 8 Under Captured Items select the items you want to capture for this profile 9 If connecting with a wireless network select the desired Auto Switch Settings These options are unavailable if wireless devices have been disabled 10 Under Execute this program after switching ...

Page 226: ...e imported and exported This feature is useful when transferring profile settings to other computers For more information about modifying importing and exporting profiles refer to the online help Quick Connect The Quick Connect feature switches the Wireless LAN connection to connect to a Toshiba Wireless Projector Once the projector utility is installed launching the Quick Connect utility automati...

Page 227: ... connection is broken and re established later To review the current Toshiba Wireless Projector settings and change them if necessary 1 Click the icon in the system tray 2 Move the mouse pointer to Toshiba Wireless Projector DPJ then click Settings The Quick Connect properties dialog box appears 3 Complete the settings Refer to the online help if necessary 4 Click OK The default connection setting...

Page 228: ...1b and then connects to the projector The wireless LAN configuration returns to the settings that were last used before the Quick Connect function was started If the Toshiba Wireless Projector utility is closed If you select Toshiba Wireless Projector DPJ from the ConfigFree tray menu this disconnects the wireless LAN connection If you select a profile from the ConfigFree tray menu or when you dis...

Page 229: ...witching between wired and wireless devices With these options the computer automatically switches to a wireless LAN network when the cable of the wired LAN network is removed from the computer When the cable is reconnected the connection to the wired LAN is re established To use the Automatic Switch feature 1 Right click the icon in the system tray 2 Click Auto Switch The Auto Switch dialog box a...

Page 230: ... the SSID is detected then click Add The profile is moved to the List of target SSIDs and profiles 5 Repeat the previous step for each additional profile you want to select 6 Select Automatically switch profiles when connected to this SSID 7 Check Automatically switch profile when connected to this SSID 8 Click OK The computer is now configured to use the Semi Automatic Switch feature When the com...

Page 231: ...pear in this user s guide AC alternating current BIOS basic input output system bps bits per second CD compact disc CD ROM compact disc read only memory CD RW compact disc rewrite memory CMOS complementary metal oxide semiconductor COM1 communications port 1 serial port COM2 communications port 2 serial port CPU central processing unit ...

Page 232: ...ocation table FCC Federal Communications Commission GB gigabyte HDD hard disk drive HTML Hypertext Markup Language IEEE Institute of Electrical and Electronics Engineers I O input output IRQ interrupt request ISP Internet service provider KB kilobyte LAN local area network LCD liquid crystal display LPT1 line printer port 1 parallel port LSI large scale integration MB megabyte MIDI Musical Instrum...

Page 233: ...e is one thin film transistor TFT for each cell This type of display works well with notebook computers because of its shallow depth and high quality color Active matrix displays are viewable from wider angles than most passive matrix displays adapter A device that provides a compatible connection between two units For example the computer s internal display adapter receives information from the s...

Page 234: ...ght bits is a byte See also byte bits per second bps A way of measuring the speed at which information is passed between two devices The basic measure used in modem communications bps is similar but not identical to the baud rate See also baud rate boot To start the computer The term boot originates from bootstrap program as in pulling itself up by its bootstraps a program that loads and initializ...

Page 235: ...r number or symbol you can use on the computer Some characters are non printing characters such as a paragraph break in a word processing program A character occupies one byte of computer storage chip A small piece of silicon containing computer logic and circuits for processing memory input output and or control functions Chips are mounted on printed circuit boards click To press and release the ...

Page 236: ...ng device A component attached to the computer Devices may be external outside the computer s case or internal inside the computer s case Printers disk drives and modems are examples of devices device driver A program called a driver that permits a computer to communicate with a device dialog box An on screen window displayed by the operating system or a program giving a direction or requesting in...

Page 237: ...ame by which it can be retrieved See also file double click To press the TouchPad control button or mouse button rapidly twice without moving the cursor or mouse In the Windows operating system this refers to the primary TouchPad control button or left mouse button unless otherwise stated double density diskette A 3 5 inch diskette that can hold up to 720 KB ofinformation half the capacity of a hi...

Page 238: ...apter extension See file extension external device See device F file A collection of related information saved on disk with a unique name A file may be a program information used by a program or a document See also document file allocation table FAT The section of a disk that keeps track of the location of files stored on the disk file name A set of characters that uniquely identifies a file withi...

Page 239: ...tter or platters that can be magnetically coded with data Hard disks hold much more information than diskettes and are used for long term storage of programs and data The primary or only hard disk in a computer is usually fixed but some computers have secondary hard disks that are removable By default the hard disk is referred to as drive C hardware The physical components of a computer system Com...

Page 240: ...See also byte L L1 level one cache Memory cache built into the processor to help improve processing speed See also cache CPU cache L2 cache L2 level two cache Memory cache installed on the motherboard to help improve processing speed It is slower than L1 cache and faster than main memory See also cache CPU cache L1 cache LAN local area network A group of computers or other devices dispersed over a...

Page 241: ...ting musical instruments synthesizers and computers The MIDI standard provides a way of translating music into a form computers can use and vice versa modem Short for modulator demodulator A device that converts information from digital to analog and back to digital enabling information to pass back and forth between digital computers and analog telephone lines motherboard The main circuit board i...

Page 242: ... of information at a time On your computer the parallel port provides a parallel communications interface between the computer and an appropriate device Most modern printers are parallel Compare serial password A unique string of characters entered by a user to verify his or her identity to the computer or the network PC Card A credit card sized expansion card designed to increase the capabilities...

Page 243: ... as read By volatile we mean that information in RAM is lost when you turn off your computer This type of memory is used for your computer s main memory See also memory Compare ROM random access memory See RAM read only memory See ROM reboot See boot restart removable disk A disk that can be removed from a disk drive A diskette is one example of a removable disk resolution A measure of the sharpne...

Page 244: ... device Compare parallel shortcut See keyboard shortcut software See program Compare hardware Standby A feature of some Windows operating systems that allows you to turn off the computer without exiting your open applications and to continue from where you left off when you turn the computer on again Suspend A feature of some Windows operating systems that allows you to turn off the computer witho...

Page 245: ...USB utility A computer program designed to perform a narrowly focused operation or solve a specific problem Utilities are often related to computer system management W Web See World Wide Web Wi Fi A trademarked term by the Wi Fi Alliance which stands for Wireless Fidelity and is another term for the communication protocol to permit an Ethernet connection using wireless communication components Wor...

Page 246: ... files 148 audio features 145 Auto Run 146 B backing up files 82 battery caring for 122 changing 119 charge does not last 192 charging 53 114 charging before use 48 conserving power 125 disposal 124 not charging 192 power usage hot key 126 power usage mode 210 removing 120 unlocking 120 battery alarms 118 battery power displaying remaining 116 monitoring 116 Bridge Media Adapter Slot 153 button po...

Page 247: ...8 computer friendly environment 41 computing tips 81 connecting to a power source 50 connection set up 139 control buttons 73 critical applications 3 Ctrl keys 84 D desktop creating new icon 135 major features 135 desktop exploration 134 desktop icons 135 Device Manager 189 checking properties 190 disabling a device 189 190 devices keyboard 78 mouse 78 disable enable TOSHIBA Touch and Launch 178 D...

Page 248: ...king 196 Ethernet LAN port 140 expansion memory slot 58 exploring the desktop 134 external mouse 78 external diskette drive connecting 79 external display adjusting 78 external monitor not working 195 external speakers 80 F FAT File Allocation Table 196 FCC Notice Declaration of Con formity Information 3 FCC requirements 4 file extensions 92 file names 91 file backing up 82 files backing up 101 pr...

Page 249: ...ked site not found 186 connecting to 143 features 144 slow connection 186 surfing 143 uploading and downloading files 145 URL address not found 186 Internet Explorer icon 136 Internet Service Providers 142 IRQ Interrupt Request 188 ISPs 142 J jack RJ 11 155 K keeping comfortable 42 key assign 160 changing 161 direct assign 160 popup 161 removing 161 key assignment viewing existing 161 key assignme...

Page 250: ...installing 78 serial 78 N network 163 accessing 139 Dial Up Networking Wizard 139 networking wireless 139 O office computing 128 opening the display panel 54 optional devices 128 other documentation 39 overlay keys 85 P password deleting a supervisor 173 disabling a user 170 supervisor set up 171 passwords instant using 169 setting user 168 PC Card checklist 200 CIS Card Information Structure 200 ...

Page 251: ... device properties 190 compact discs not running correctly 199 computer will not power up 182 contacting Toshiba 205 206 corrupted damaged data files 197 Device Manager 189 disabling a device 189 190 disk drive is slow 197 display is blank 193 DVD ROM multi function drive tray does not eject 199 external display not working 195 external keyboard not working 193 external monitor 194 faulty memory 1...

Page 252: ...ckers 194 seating 43 secondary button 73 Secure Digital SD Cards 153 security 163 selecting a place to work 41 setting up adding memory 56 computer 57 TOSHIBA Touch and Launch 177 setting up a connection 139 setting up your computer 48 settings TOSHIBA Touch and Launch 177 shutting down more quickly 104 SmartMedia 153 sound problem solving 199 sounds recording 148 speakers external connecting 80 u...

Page 253: ...g 168 using a file extension 92 utilities Toshiba Power Saver Utility 163 V video projector adjusting display 78 volume mute hot key 209 W warranty limited warranty 40 Web sites 206 Support Online 186 Web sites Toshiba 207 Wi Fi wireless networking 139 Wi Fi Mini PCI modules 129 Windows Explorer 88 Windows Media Player 145 Windows Millennium Edition Help 187 Windows Start menu 87 Windows XP Help 1...

Reviews: