background image

8-2

User’s Manual

Optional Devices

PC card

The computer is equipped with a PC card slot that can accommodate a 
Type II card. Any PC card that meets industry standards (manufactured by 
TOSHIBA or other vendor) can be installed. The slot supports 16-bit PC 
cards, including PC card 16’s multifunction card and CardBus PC cards. 

CardBus supports the new standard of 32-bit PC cards. The bus provides 
superior performance for the greater demands of multimedia data 
transmission.

Inserting a PC card

Windows hot-install feature lets you insert PC cards while the computer’s 
power is on.

To insert a PC card, follow the steps below:

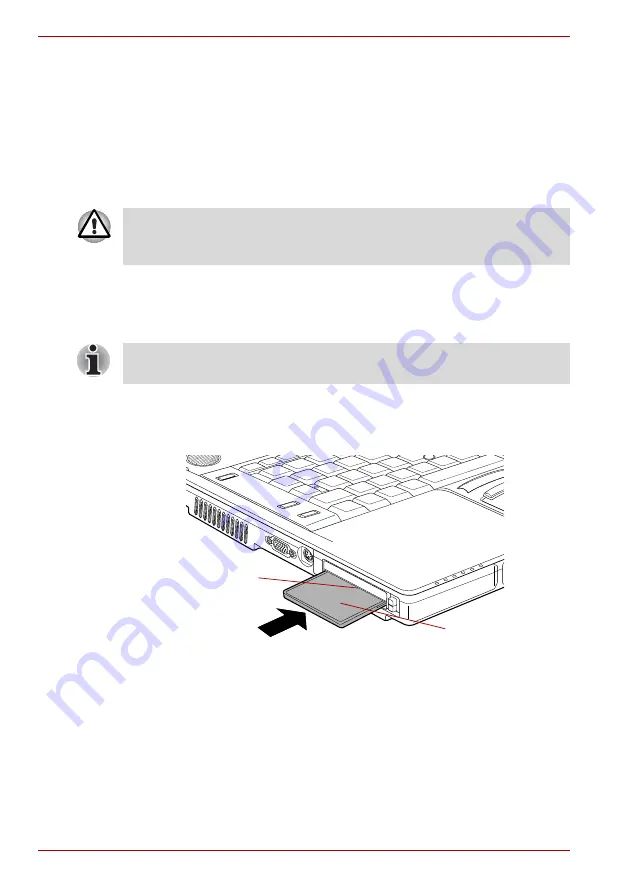
1. Insert a PC card in the PC card slot.

2. Press gently to ensure a firm connection.

Inserting the PC card

3. After inserting the PC card, refer to the PC card’s documentation and 

check the configuration in Windows to make sure it is appropriate for 
your PC card.

PC cards can sometimes become hot during PC operation. Before you 
remove a PC card always wait for it to cool. You could get burned 
removing a hot PC card.

Do not insert a PC card while the computer is in Standby or Hibernation 
Mode. Some cards might not work properly.

PC card

PC card slot

Summary of Contents for Tecra S4

Page 1: ...User s Manual TECRA S4 ...

Page 2: ...ii User s Manual ...

Page 3: ...de 2 3 Right side 2 5 Back side 2 6 Underside 2 7 Front with the display open 2 9 System indicators 2 12 Keyboard indicators 2 13 USB floppy disk drive optional 2 14 Optical disc drives 2 15 AC adaptor 2 17 Chapter 3 Getting Started Connecting the AC adaptor 3 2 Opening the display 3 4 Turning on the power 3 5 Starting up for the first time 3 5 Turning off the power 3 6 Restarting the computer 3 9...

Page 4: ...ng the computer 4 37 Using Hard Disk Drive HDD Protection 4 38 Heat dispersal 4 41 Chapter 5 The Keyboard Typewriter keys 5 1 Function keys F1 F12 5 2 Soft keys Fn key combinations 5 2 Hot keys 5 3 Windows special keys 5 7 Keypad overlay 5 7 Generating ASCII characters 5 9 Chapter 6 Power and Power Up Modes Power conditions 6 1 Power indicators 6 2 Battery types 6 3 Care and use of the battery pac...

Page 5: ... III Plus 8 19 Parallel printer 8 20 Serial devices 8 20 Security lock 8 21 Chapter 9 Troubleshooting Problem solving process 9 1 Hardware and system checklist 9 3 TOSHIBA Support 9 21 Chapter 10 Legal Footnotes CPU 10 1 Memory Main System 10 2 Battery Life 10 2 Hard Disk Drive HDD Capacity 10 2 LCD 10 3 Graphics Processor Unit GPU 10 3 Wireless LAN 10 3 Non applicable Icons 10 3 Copy Protection 1...

Page 6: ... 4 Appendix E Bluetooth wireless technology Interoperability Bluetooth wireless technology and your Health E 3 Regulatory statements E 3 Using Bluetooth Card from TOSHIBA equipment in Japan E 6 Approved Countries Regions for use Bluetooth wireless technology E 7 Appendix F AC Power Cord and Connectors Certification agencies F 1 Appendix G TOSHIBA Anti theft Protection Timer Appendix H If your comp...

Page 7: ... manual Disclaimer This manual has been validated and reviewed for accuracy The instructions and descriptions it contains are accurate for the TOSHIBA Tecra S4 Portable Personal Computer at the time of this manual s production However succeeding computers and manuals are subject to change without notice TOSHIBA assumes no liability for damages incurred directly or indirectly from errors omissions ...

Page 8: ... problems you should contact your equipment supplier in the first instance Network Compatibility Statement This product is designed to work with and is compatible with the following networks It has been tested to and found to conform with the additional requirements conditional in EG 201 121 Germany ATAAB AN005 AN006 AN007 AN009 AN010 and DE03 04 05 08 09 12 14 17 Greece ATAAB AN005 AN006 and GR01...

Page 9: ...America Department of Health Human Services Food and Drug Administration In other countries the drive is certified to comply with the requirement pursuant to IEC 825 and EN60825 on class 1 laser product This computer is equipped with the optical drive in the following list according to the model The use of the symbol indicates that this product may not be treated as household waste By ensuring thi...

Page 10: ...User s Manual x ...

Page 11: ... you are an experienced computer user please continue reading the preface to learn how this manual is organized then become acquainted with this manual by browsing through its pages Be sure to look over the Special features section of the Introduction to learn about features that are uncommon or unique to the computer and carefully read HW Setup BIOS Setup If you are going to install PC cards or c...

Page 12: ...his manual to bring important information to your attention Each type of message is identified as shown below ABC When procedures require an action such as clicking an icon or entering text the icon s name or the text you are to type in is represented in the type face you see to the left S ABC Names of windows or icons or text generated by the computer that appear on its display screen are present...

Page 13: ...ugh space around the computer and other equipment to provide adequate ventilation Otherwise they may overheat To keep your computer in prime operating condition protect your work area from Dust moisture and direct sunlight Equipment that generates a strong electromagnetic field such as stereo speakers other than speakers that are connected to the computer or headphones Rapid changes in temperature...

Page 14: ...itive to heat The material could be damaged Pressure or impact damage Do not apply heavy pressure to the computer or subject it to any form of strong impact as this can damage the computer s components or otherwise cause it to malfunction PC card overheating Some PC Cards can become hot during prolonged use which may result in errors or instability in the operation of the device in question In add...

Page 15: ... unpack your computer taking care to save the box and packing materials for future use Hardware Check to make sure you have all the following items Tecra S4 Portable Personal Computer AC adaptor and power cord Modular cable for modem optional Some of the features described in this manual may not function properly if you use an operating system that was not preinstalled by TOSHIBA ...

Page 16: ...rint Utility TOSHIBA SD Memory Card Format Utility TOSHIBA HDD Protection TOSHIBA Hotkey Utility for Display Devices TOSHIBA Display Device Change Utility Wireless Hotkey Utility InterVideo WinDVD Creator 2 Platinum CD DVD Drive Acoustic Silencer Record Now Basic for TOSHIBA DLA for TOSHIBA Bluetooth Stack for Windows by Toshiba Infineon Trusted Platform Module Utility preinstalled in some models ...

Page 17: ...rates 2MB Level 2 cache memory and supports Enhanced Intel SpeedStep Technology Intel Core 2 Duo processor which incorporates 4MB Level 2 cache memory and supports Enhanced Intel SpeedStep Technology Some models in this series use Intel Centrino Duo Mobile Technology which is based on three separate components the Intel Core Duo processor Intel PRO Wireless network connection and the Mobile Intel ...

Page 18: ...ck The computer is powered by one rechargeable lithium ion battery pack Legal Footnote Battery Life For more information regarding Battery Life please refer to Chapter 10 Legal Footnotes RTC battery The internal RTC battery backs up the Real Time Clock RTC and calendar AC adaptor The AC adaptor provides power to the system and recharges the batteries when they are low It comes with a detachable po...

Page 19: ...er to Chapter 10 Legal Footnotes Your computer is configured with an optical disc drive installed in the Ultra Slim Bay The available optical disc drives are described below DVD ROM and CD R RW drive Some models are equipped with a full size DVD ROM and CD R RW drive module that lets you run CD DVDs without using an adaptor It reads DVD ROMs at maximum 8 speed and CD ROMs at maximum 24 speed It wr...

Page 20: ...peed DVD R DL at up to 2 speed DVD R DL at up to 2 4 speed DVD RAM at maximum 3 speed This drive supports the following formats in addition to the DVD ROM and CD R RW drive DVD R DVD R DL DVD RW DVD R DVD R DL DVD RW DVD RAM Built in 15 TFT LCD screen 16 M colors with one of the following resolutions XGA 1024 horizontal 768 vertical pixels SXGA 1400 horizontal 1050 vertical pixels Legal Footnote L...

Page 21: ...l device ECP compatible Serial The integrated serial port provides RS 232C compatibility through the internal 16550UART controller External monitor The analog VGA port provides support for VESA DDC2B compatible functions Universal Serial Bus USB 2 0 The computer supports multiple Universal Serial Bus ports that comply with the USB 2 0 standard Docking This port allows the connection of an optional...

Page 22: ...t the data output will depend on the type of device that is connected Headphone jack A 3 5mm mini headphone jack enables connection of stereo headphones Microphone jack A 3 5mm mini microphone jack enables connection of a three conductor microphone for monaural input Modem The integrated modem provides capability for data and fax communications that support the V 90 V 92 standards and includes a m...

Page 23: ...els Card Power Management Wired Equivalent Privacy WEP data encryption based on an 128 bit encryption algorithm Wi Fi Protected Access WPA support Advanced Encryption Standard AES data encryption Wake up on Wireless LAN support The values shown above are the theoretical maximums for Wireless LAN standards The actual values may differ The transmission speed over the wireless LAN and the distance ov...

Page 24: ...these modules when you are using an operating system that supports Plug and Play Security lock slot Connects security lock to anchor the computer to a desk or other large object Ultra Slim Bay latch When this latch is in its locked position the installed Ultra Slim Bay module is secured into the computer In addition removal of the module can be prevented by securing the latch in its locked positio...

Page 25: ...tegrated into the keyboard Refer to the Keypad overlay section in Chapter 5 The Keyboard for instructions on using the keypad overlay Power on password Two levels of password security supervisor and user are available to prevent unauthorized access to your computer Instant security A hot key function blanks the LCD screen and disables the computer providing data security Intelligent power supply A...

Page 26: ...ptical media drive can be turned on using the optical media drive icon HDD Protection Using the acceleration sensor built in the computer HDD Protection detects vibration shocks and those signs in the computer and automatically moves the HDD Hard Disk Drive head to the safe position to reduce the risk of damage that could be caused to the disk by head to disk contact Refer to the Using Hard Disk D...

Page 27: ...functions to the TOSHIBA Presentation button default setting is the simultaneous display on LCD and CRT with resolution of 1024 768 and to the TOSHIBA Assist button default setting is the TOSHIBA Assist Fingerprint utility This product has a fingerprint utility installed for the purpose of enrolling and recognizing fingerprints which can then be linked to a username and password in order to remove...

Page 28: ...allows you to enlarge or reduce the icon size on the Windows Desktop or the zoom factor associated with specific supported applications RecordNow Basic for TOSHIBA You can create CDs and DVDs in a number of formats including audio CDs that can be played on a standard CD player and data CDs DVDs which can store copies of the files and folders on your notebook s hard disk drive This software can be ...

Page 29: ...Pad to be customized and also supports the Fn F9 function to quickly and easily disable enable their operation TOSHIBA Mic Effect The TOSHIBA Mic Effect utility can be used to remove or reduce any harsh echoes or howling sounds that may occur when playing audio sounds recorded with a microphone through the speakers Please note that this echo cancellation function is only available when you use tel...

Page 30: ... letter like a floppy disk or other removable disks TOSHIBA Hotkey Utility for Display Devices This utility allows you to change both the active display device and its associated display resolution you should use this utility in conjunction with the Fn F5 keys to change the active display device and the Fn Space keys to change the display resolution TOSHIBA SD Memory Card Format The TOSHIBA SD Mem...

Page 31: ...ite in order to remove the need to always carry the adaptor with you Battery charger The optional battery charger allows you to charge extra battery packs outside of having to use the computer Security lock A slot is available into which you can attach a security cable in order to deter theft of the computer USB FDD Kit The USB floppy diskette drive accommodates either a 1 44MB or 720KB floppy dis...

Page 32: ...mouse compatible with Bluetooth You can buy the Bluetooth Wireless Mouse from a TOSHIBA dealer Bluetooth Wireless Stereo The Bluetooth Wireless Stereo is a wireless stereo headphone set compatible with Bluetooth You can buy the Bluetooth Wireless Stereo from a TOSHIBA dealer DVD ROM and CD R RW Kit Refer to the Features section for details DVD Super Multi Drive Kit Refer to the Features section fo...

Page 33: ...tion Front of the computer with LCD display panel closed Legal Footnote Non applicable Icons For more information on the Legal Footnote regarding Non applicable Icons please refer to Chapter 10 Legal Footnotes Display latch System indicators Wireless communication switch Infrared port Volume control Microphone jack Headphone jack Microphone i LINK IEEE1394 port System indicators These LEDs let you...

Page 34: ...o not use the Wi Fi or Bluetooth functionalities near a microwave oven or in areas subject to radio interference or magnetic fields Interference from a microwave oven or other source can disrupt Wi Fi or Bluetooth operation i LINK IEEE1394 port This port allows you to connect an external device such as a digital video camera for high speed data transfer Microphone jack A 3 5 mm mini microphone jac...

Page 35: ... slot PC card slot SD card slot PC card eject button LAN active indicator orange LAN jack Link indicator green ExpressCard slot ExpressCard eject button Video out jack External monitor port Security lock slot A security cable attaches to this slot The optional security cable anchors your computer to a desk or other large object to deter theft LAN jack This jack lets you connect to a LAN The adapto...

Page 36: ...r video out The S Video cable carries video signal ExpressCard slot The ExpressCard slot can accommodate an ExpressCard ExpressCard eject button This is a button for taking out ExpressCard from ExpressCard slot PC card slot The PC card slot can accommodate a Type II card The slot supports 16 bit PC cards and CardBus PC cards PC card eject button This is a button for taking out PC card from a PC ca...

Page 37: ...irmed Some functions might not execute properly Modem jack The modem jack allows you use to attach a modular cable in order to connect the internal modem directly to a telephone line Connection to any communication line other than an analog phone line could cause a PC system failure Connect the built in modem only to ordinary analog phone lines Never connect the built in modem to a digital line IS...

Page 38: ...em serial mouse or serial printer Parallel port DC IN 15V jack USB port Universal Serial Bus USB 2 0 port One Universal Serial Bus port is on the back side Refer to Right side section for details DC IN 15V jack The AC adaptor connects to this jack Use only the model of AC adaptor that comes with the computer Using the wrong adaptor can damage your computer Parallel port This Centronics compatible ...

Page 39: ...ter when the AC adaptor is not connected For detailed information on the battery pack refer to Chapter 6 Power and Power Up Modes Notches Notches on the computer engage hooks on the Advanced Port Replicator III Plus to ensure a secure connection Battery release latch Slide and hold this latch to release the battery pack for removal For detailed information on removing the battery pack refer to Cha...

Page 40: ... computer Ultra Slim Bay lock screw One screw secures the Ultra Slim Bay latch Memory module cover This cover protects memory module sockets Refer to the Memory expansion section in Chapter 8 Optional Devices HDD pack cover screw One screw secures the HDD cover Hard disk drive This contains a Hard disk drive pack which can be removed and reinstalled For more information on how to remove or reinsta...

Page 41: ...h the LCD panel open Display screen Stereo speaker Right Touch Pad control buttons Touch Pad TOSHIBA Presentation button TOSHIBA Assist button Power button Display hinge Stereo speaker Left LCD Sensor switch Not shown AccuPoint AccuPoint control buttons Fingerprint Sensor Display hinge The display hinge holds the LCD display panel at easy to view angles Fingerprint Sensor This sensor enables you t...

Page 42: ...audio alarms such as low battery condition generated by the system AccuPoint control buttons Control buttons below the keyboard let you select menu items or manipulate text and graphics designated by the on screen pointer Refer to the Using the AccuPoint section in Chapter 4 Operating Basics AccuPoint A pointer control device located in the center of the keyboard is used to control the on screen p...

Page 43: ... button Press this button to launch a program automatically When power off stand by and hibernation press this button to start the computer and launch the program You can select the function on TOSHIBA Controls properties The default is TOSHIBA Assist Power button Press the power button to turn the computer s power on and off LCD Sensor switch This switch senses when the computer s LCD display pan...

Page 44: ...er The Power indicator glows green when the computer is on If you select Standby from Shut Down Windows this indicator flashing one second on two seconds off while the computer shuts down Battery The Battery indicator shows the condition of the battery s charge Green indicates full charge orange indicates battery charging and flashing orange indicates a low battery charge Refer to Chapter 6 Power ...

Page 45: ...l caps mode Caps Lock indicator Keypad overlay indicators Caps Lock indicator Caps Lock This indicator glows green when the alphabet keys are locked in uppercase Numeric mode indicator Arrow mode indicator Arrow mode When the Arrow mode indicator lights green you can use the keypad overlay gray labeled keys as cursor keys Refer to the Keypad overlay section in Chapter 5 The Keyboard Numeric mode Y...

Page 46: ... is fully seated in the drive the eject button pops out To remove a floppy disk push in the eject button and the floppy disk pops out partially for removal Eject button Floppy disk slot Disk In Use Indicator USB connector Check the Disk In Use indicator when you use the USB floppy disk drive Do not press the eject button or turn off the computer while the light is glowing Doing so could destroy da...

Page 47: ... will not play properly Writable discs This section describes the types of writable CD DVD discs Check the specifications for your drive to for the type of discs it can write Use RecordNow to write compact discs Refer to Chapter 4 Operating Basics CDs CD R discs can be written only once The recorded data cannot be erased or changed CD RW discs including multi speed CD RW discs high speed CD RW dis...

Page 48: ... XA Mode 2 Form1 Form2 DVD Video CD Text CD ROM Mode 1 Mode 2 Enhanced CD CD EXTRA Addressing Method 2 The read speed is slower at the center of a disc and faster at the outer edge DVD read 8 speed maximum CD read 24 speed maximum CD R write 24 speed maximum CD RW write 24 speed maximum Ultra speed media The read speed is slower at the center of a disc and faster at the outer edge DVD read 8 speed...

Page 49: ...ply connect the AC adaptor to a power source and the computer Refer to Chapter 6 Power and Power Up Modes for details The AC adaptor 2 pin plug The AC adaptor 3 pin plug Depending on the model a 2 pin plug or 3 pin plug set of the above may be bundled Do not use a 3 pin to 2 pin conversion plug The supplied power cord conforms to safety rules and regulations in the region the product is bought and...

Page 50: ...e TOSHIBA Battery Charger that may have been provided with your PC or use AC adaptors and battery chargers specified by TOSHIBA to avoid any risk of fire or damage to the PC possibly resulting in serious injury TOSHIBA assumes no liability for any damage caused by use of an incompatible adaptor or charger ...

Page 51: ...computer Restoring the preinstalled software All users should be sure to read the section Starting up for the first time Be sure to read the enclosed Instruction Manual for Safety and Comfort for information on the safe and proper use of this computer It is intended to help you be more comfortable and productive while using a notebook computer By following the recommendations in it you may reduce ...

Page 52: ...IBA AC adaptor that was provided with your computer and the TOSHIBA Battery Charger that may have been provided with your computer or use AC adaptors and battery chargers specified by TOSHIBA to avoid any risk of fire or other damage to the computer Use of an incompatible AC adaptor or Battery Charger could cause fire or damage to the computer possibly resulting in serious injury TOSHIBA assumes n...

Page 53: ...change and cause an electrical shock or minor bodily injury when touched As a general safety precaution avoid touching any metal parts Never place your computer or AC adaptor on a wooden surface furniture or any other surface that could be marred by exposure to heat since the computer base and AC adaptor s surface increase in temperature during normal use Always place your computer or AC adaptor o...

Page 54: ...lay panel can be rotated in a wide range of angles for optimal viewing 1 Slide the display latch on the front of the computer to unlatch the display panel 2 While holding down the palm rest with one hand so that the main body is not raised lift the panel slowly Adjust the angle of the panel to provide optimal clarity Opening the LCD display panel DC IN 15V jack Use reasonable care when opening and...

Page 55: ... power the computer s initial screen is the Microsoft Windows XP Startup Screen Logo Follow the on screen directions for each screen During setup you can click the Back button to return to the previous screen After you turn on the power for the first time do not turn it off until you have set up the operating system Refer to the section Starting up for the first time If an optional USB floppy disk...

Page 56: ... off If you turn off the power while a disk disc is being accessed you can lose data or damage the disk disc Never turn off the power while an application is running Doing so could cause loss of data Never turn off the power disconnect an external storage device or remove storage media during data read write Doing so can cause data loss Do not turn the computer or devices back on immediately Wait ...

Page 57: ...Utility described in the Control Panel Open Performance and Maintenance and open TOSHIBA Power Saver When you turn the power back on you can continue where you left when you shut down the computer Before entering Standby Mode be sure to save your data Do not install or remove a memory module while the computer is in Standby Mode The computer or the module could be damaged Do not remove the battery...

Page 58: ...en you turn on the computer Saves power by shutting down the system when the computer receives no input or hardware access for the duration set by the System hibernate feature You can use the panel power off feature Save your data While entering Hibernation Mode the computer saves the contents of memory to the hard disk drive However for safety sake it is best to save your data manually Data will ...

Page 59: ... Action window 6 Enable the desired Hibernation settings for When I press the power button and When I close the lid 7 Click the OK button Data save in Hibernation Mode When you turn off the power in Hibernation Mode the computer takes a moment to save current memory data to the hard disk During this time the HDD indicator will light After you turn off the computer and the content of memory has bee...

Page 60: ...sor key to select the CD ROM icon in the display menu For details refer to the Boot Priority section in Chapter 7 HW Setup BIOS Setup 4 Follow the on screen instructions 5 If your computer came with additonal software installed this software can not be recovered from the Product Recovery DVD ROM Re install these applications e g Works Suite DVD Player Games etc separately from other media Restorin...

Page 61: ...l Pointing Device The computer is equipped with a dual point system a Touch Pad and an AccuPoint pointing stick Using the Touch Pad To use the Touch Pad simply touch and move your fingertip across it in the direction you want the on screen pointer to go Touch Pad and Touch Pad control buttons Touch Pad Touch Pad control buttons AccuPoint AccuPoint control buttons Fingerprint Sensor ...

Page 62: ...tion for details AccuPoint precautions Certain conditions can affect the on screen pointer when using AccuPoint For example the pointer may travel contrary to AccuPoint operation or an error message may appear if You touch the AccuPoint during power up You apply constant soft pressure during power up There is a sudden temperature change Strong stress is applied to the AccuPoint If an error message...

Page 63: ...assword onto the fingerprint authentication feature it is no longer necessary to input the password from the keyboard Fingerprint feature enables you to Logon to Windows and access a security enabled homepage through Internet Explorer Files and folders can be encrypted decrypted and third party access to them prevented Disable the password protected screen saver when returning from a power saving ...

Page 64: ...any metal surface Static electricity is a common cause of sensor failures especially when the weather is dry Clean the sensor with a lint free cloth do not use detergent or any other chemicals to clean the sensor Avoid the following finger conditions for enrollment or recognition as they may result in fingerprint enrollment errors or a drop in the fingerprint recognition success rate Soaked or swo...

Page 65: ...d then Remove 6 Check whether all of the fingerprint data was deleted on the Fingerprint Storage Inspector screen Fingerprint Sensor Limitations Please be aware of the following limitations of the fingerprint sensor The fingerprint sensor compares and analyzes the unique characteristics in a fingerprint A warning message will be displayed when recognition is abnormal or recognition is not successf...

Page 66: ... Set Up Procedure Please use the following procedure when first using fingerprint authentication Fingerprint Registration You should initially enroll the required authentication data using the User Enrollment Wizard 1 Click start followed by All Programs followed by Protector Suite QL and then click User Enrollment Wizard 2 Click Next You are able to backup saved fingerprint data and information w...

Page 67: ...ted again the latest information will be enrolled and any previous information over written 8 At Advanced Security screen select whether you wish to enable the security function and then click Next 9 At Finalization screen click Finish this will complete the fingerprint registration process Windows Logon via Fingerprint Authentication If required you are also able to use fingerprint authentication...

Page 68: ...enu It is recommended that the keyboard cursor keys movement and enter key selection or the directional pad be used when selecting an Item from the Menu in laptop or landscape modes 3 At the Fingerprint Software Management screen click Settings and then click Power on Security 4 At the Power on Security screen place a check mark in the Replace the power on and hard disk drive passwords with the fi...

Page 69: ... across the fingerprint sensor 2 MENU will appear in the lower right corner of the screen Swipe your finger on the fingerprint sensor and then select Control Center from the items presented in this menu It is recommended that the keyboard cursor keys movement and enter key selection or the directional pad be used when selecting an Item from the Menu in laptop or landscape modes 3 The Fingerprint S...

Page 70: ...e sure that the center of the fingerprint is touching the sensor before swiping Confirm the center of the fingerprint whirl before swiping Always confirm the center of the fingerprint whirl so that it is swiped along the center line of the sensor When fingerprint reading is not successful There is a possibility of authentication failures if the finger is swiped too quickly or too slowly Follow the...

Page 71: ...disks are operating currently 2 Turn the computer upside down 3 Remove the screw near the icon securing the Ultra Slim Bay 4 Make sure the screw in the Ultra Slim Bay lock screw is set in the hole for the unlock position 5 Slide the Ultra Slim Bay latch to the unlock position 6 Grasp the optical disc drive and slide it out If you disconnect the USB floppy disk drive or turn off the power while the...

Page 72: ...e computer as shown below and press until the ejector clicks 2 If you want to lock the Ultra Slim Bay HDD adaptor set the Ultra Slim Bay lock screw in the hole for the lock position 2 The lock screw is inserted in the unlock position 1 at the time of purchasing Inserting the Ultra Slim Bay HDD adaptor Lock screw optical disc drive Ultra Slim Bay latch Ultra Slim Bay HDD adaptor Lock screw ...

Page 73: ...e a DVD Super Multi drive refer also to the Writing CD DVDs on DVD Super Multi drive section for precautions on writing to CDs DVDs Loading discs To load CD DVDs follow the steps below 1 When the computer s power is on press the eject button to open the disc tray slightly Pressing the eject button 2 Grasp the disc tray gently and pull until it is fully opened Pulling the disc tray open Use the Win...

Page 74: ...ill extend slightly over the CD DVD tray Therefore you will need to turn the CD DVD at an angle when you place it in the disc tray After seating the CD DVD however make sure it lies flat Do not touch a laser lens and its circumference portion Doing so could cause misalignment Prevent foreign objects from entering the drive Check the surface of the disc tray especially the area behind the front edg...

Page 75: ... and lift it out Removing a CD DVD 3 Push the center of the disc tray to close it Press gently until it locks into place Do not press the eject button while the computer is accessing the disc drive Wait for the optical disc drive indicator to go out before you open the disc tray Also if the CD DVD is spinning when you open the disc tray wait for it to stop before you remove it When the disc tray p...

Page 76: ...ject hole 1 5mm Diameter 1 0mm Turn off the power before you use the eject hole If the CD DVD is spinning when you open the disc tray the CD DVD could fly off the spindle and cause injury Refer to the Writable discs section in Chapter 2 The Grand Tour for details about the types of writable CD DVD discs Do not turn off the power of the optical disc drive while the computer is accessing the drive I...

Page 77: ...y load on the CPU Operate the computer at full power Do not use power saving features Do not write while virus check software is running Wait for it to finish then disable virus detection programs including any software that checks files automatically in the background Do not use hard disk utilities including those intended to enhance hard disk drive access speeds They may cause unstable operation...

Page 78: ...h as airplanes trains or cars Do not use an unstable surface such as a stand Keep mobile phones and other wireless communication devices away from the computer Writing CD DVDs on DVD Super Multi drive You can use the DVD Super Multi drive to write data to either CD R RW or DVD R RW R RW RAM discs The following applications for writing are provided RecordNow and DLA licensed by Sonic Solutions and ...

Page 79: ...by the change or loss of the recorded contents Damage that may be caused by using third party equipment or software Given the technological limitations of current optical disc writing drives you may experience unexpected writing or rewriting errors due to disc quality or problems with hardware devices Also it is a good idea to make two or more copies of important data in case of undesired change o...

Page 80: ...D Matsushita Electric Industrial Co Ltd DVD R DL MITSUBISHI CHEMICAL CORPORATION DVD R MITSUBISHI CHEMICAL CORPORATION RICOH Co Ltd DVD R DL MITSUBISHI CHEMICAL CORPORATION DVD RW DVD Specifications for Recordable Disc for Version 1 1 or version 1 2 VICTOR COMPANY OF JAPAN LIMITED MITSUBISHI CHEMICAL CORPORATION DVD RW MITSUBISHI CHEMICAL CORPORATION RICOH Co Ltd DVD RAM DVD Specifications for DVD...

Page 81: ...s 2000 without DVD RAM Driver Software When multiple drives that can write data to discs are connected be careful not to write to the wrong drive Be sure to connect the AC adaptor before you write or rewrite Before you enter standby Hibernation Mode be sure to finish DVD RAM writing Writing is finished if you can eject DVD RAM media Be sure to close all other software programs except the writing s...

Page 82: ...eted if you can open the DVD ROM CD R RW or DVD Super Multi drive tray Set the computer on a level surface and avoid places subject to vibration such as airplanes trains or cars Do not use an unstable surface such as a stand Keep mobile phones and other wireless communication devices away from the computer Always copy data from the hard disk drive to the optical media Do not use cut and paste The ...

Page 83: ...rrectly When you back up a DVD R DVD RW DVD R or DVD RW be sure to use the same type of disc You cannot partially delete any data written to a CD RW DVD RW or DVD RW disc Data Verification To verify that data is written or rewritten correctly follow the steps below before you write or rewrite a Data CD DVD 1 Click the Options button on the RecordNow Console to open the Options panels 2 Select the ...

Page 84: ...trol Panel 2 Click the Performance and Maintenance icon in the Control Panel 3 Click the System icon in the Performance and Maintenance window 4 Click the Advanced tab in the System Properties window 5 Click the Settings icon in the Performance section 6 Click the Advanced tab in the Performance Options window 7 Click the Change icon in the virtual memory section 8 Select the Custom size button in...

Page 85: ...it or play copy protected content Do not change display settings while using WinDVD Creator Do not enter standby Hibernation Mode while using WinDVD Creator Do not operate WinDVD Creator immediately after turning on the computer Please wait until all disk disc drive activity has stopped When recording to a DV Camcorder to ensure you capture all of your data let the camcorder record for a few secon...

Page 86: ...tor can write DVD RAM RW in VR format but the disc may only play on your computer When writing to a DVD disc WinDVD Creator requires 2GB or more of disk space for every one hour of video When you make a fully recorded DVD the chapter sequence may not play correctly 3 About Disc Manager WinDVD Creator can edit one play list on a disc WinDVD Creator might show a different thumbnail than you previous...

Page 87: ... similar cleaner Floppy disks 1 Store your floppy disks in the container they came in to protect them and keep them clean If a floppy disk is dirty do not use cleaning fluid Clean it with a soft damp cloth 2 Never open the shutter or touch the magnetic surface of your floppy disk You could permanently damage it and lose data 3 Always handle floppy disks with care to prevent the loss of stored data...

Page 88: ...To view details of the Volume Control click Help on the Volume Control Microphone level The change the microphone gain follow the steps below 1 Click start followed by All Programs followed by Accessories followed by Entertainment and then click Volume Control 2 Click Options and then point to Properties 3 Select Recording and then click OK 4 Click Options and then select Advanced Controls 5 Click...

Page 89: ...matically When you select a telephony location the corresponding region is automatically selected and it becomes the modem s current region setting Connection to any communication line other than an analog phone line could cause a PC system failure Connect the built in modem only to ordinary analog phone lines Never connect the built in modem to a digital line ISDN Never connect the built in modem...

Page 90: ...the modem and Telephony Current Location region code do not match A warning dialog box is displayed if current settings for region code and telephony location are incorrect Modem Selection If the computer cannot recognize the internal modem a dialog box is displayed Select the COM port for your modem to use Dialing Properties Select this item to display the dialing properties Connecting To connect...

Page 91: ...e or to a digital private branch exchange PBX Never connect the built in modem to a key telephone system for residences or offices Never operate your PC on AC power during a thunderstorm If you see lightning or hear thunder immediately turn off the PC An electric surge caused by the storm may result in a system failure loss of data or hardware damage Modular cable Modem jack Telephone jack Do not ...

Page 92: ...sion A B or G Theoretical maximum speed 54Mbps IEEE802 11a 802 11g Theoretical maximum speed 11Mbps IEEE802 11b Frequency Channel Selection Revision A 5 GHz Revision B G 2 4 GHz Roaming over multiple channels Card Power Management Wired Equivalent Privacy WEP data encryption based on the 128 bit encryption algorithm Wi Fi Protected Access WPA Advanced Encryption Standard AES data encryption The va...

Page 93: ...the 2 4 GHz band which is license free and compatible with radio systems in most countries in the world Radio links You can easily establish links between two or more devices The link is maintained even if the devices are not within line of sight Security Two advanced security mechanisms ensure a high level of security Authentication prevents access to critical data and makes it impossible to fals...

Page 94: ...s communication switch You can enable or disable Wireless LAN and Bluetooth functions with the on off switch No transmissions are sent or received when the switch is off Slide the switch to the right to turn it on and to the left to turn it off Do not use the Wi Fi or Bluetooth functionalities near a microwave oven or in areas subject to radio interference or magnetic fields Interference from a mi...

Page 95: ... CAT5E cable or higher You cannot use a CAT3 or CAT5 cable If you are using Fast Ethernet LAN 100 megabits per second 100BASE TX be sure to connect with a CAT5 cable or higher You cannot use a CAT3 cable If you are using Ethernet LAN 10 megabits per second 10BASE T you can connect with a CAT3 or higher Indicator status Indication Indicator off Wireless communication switch is set to off Automatic ...

Page 96: ...in the same manner Check with your LAN administrator before disconnecting from the hub Connect the AC adaptor before connecting the LAN cable The AC adaptor must remain connected during LAN use If you disconnect the AC Adaptor while the computer is accessing a LAN the system may hang up Do not connect any other cable to the LAN jack except the LAN cable Otherwise malfunctions or damage may occur D...

Page 97: ...is in the drives remove it Also make sure the disc tray is securely closed Turn off the power to the computer Disconnect the AC adaptor and all peripherals before moving the computer Close the LCD display panel Do not pick up the computer by its display panel Before carrying your computer shut down the computer disconnect the power cable and wait until the PC cools down Failure to follow this inst...

Page 98: ...llowing message will be displayed and the icon in the notification area of the Windows Task Bar changed to its protection state this message will be displayed for thirty seconds or until the OK button is pressed When the cause of the vibration or shock has subsided or been removed the Task Bar icon returns to its normal state HDD Protection Message Taskbar Icon Please be aware that this function d...

Page 99: ...ion This section allows you to configure whether the TOSHIBA Hard Disk Drive Protection function is enabled or disabled Detection Level This function can be set to one of four levels OFF 1 2 and 3 depending on the environment in which the computer is being used The Level 3 setting is recommended to provide a higher level of protection but if the computer is used in a mobile or other unstable envir...

Page 100: ...erties window Details Detection Level Amplification These settings allow the hard disk drive protection feature to be configured such that when the AC adaptor is disconnected or the LCD display panel is closed its assumes that the computer is about to be moved and sets the detection level to its maximum level for a period of ten seconds HDD Protection Message This option specify whether a message ...

Page 101: ...ssary lowering the processor speed or by lowering the processor speed first then if necessary turning on the fan these functions are controlled within the Cooling Method item of the Basic Setup tab in TOSHIBA Power Saver When the processor s temperature falls to a normal range the fan will be turned off and the processor operation returned to its standard speed If the processor s temperature reach...

Page 102: ...4 42 User s Manual Operating Basics ...

Page 103: ...r on the screen There are some differences however between using a typewriter and using a computer keyboard Letters and numbers produced in computer text vary in width Spaces which are created by a space character may also vary depending on line justification and other factors The lowercase l el and the number 1 one are not interchangeable on computers as they are on a typewriter The uppercase O o...

Page 104: ...ced keyboard layout The keyboard is designed to provide all the features of the 101 key enhanced keyboard The 101 102 key enhanced keyboard has a numeric keypad and scroll lock key It also has additional Enter and Ctrl keys to the right of the main keyboard Since the keyboard is smaller and has fewer keys some of the enhanced keyboard functions must be simulated using two keys instead of one on th...

Page 105: ...rsor on a specific line The power on default is off Press Fn Enter to simulate Enter on the enhanced keyboard s numeric keypad Press Fn Ctrl to simulate the enhanced keyboard s right Ctrl key Hot keys Hot keys Fn a function or Esc key let you enable or disable certain features of the computer Sound mute Pressing Fn Esc in a Windows environment turns sound on or off When you press these hot keys th...

Page 106: ...settings dialog box for the Power Save Mode will be displayed Continue holding down Fn and release and press F2 again to toggle between the settings Release both Fn and F2 to put the new setting into effect You can also change this setting through the Profile options in TOSHIBA Power Saver Standby When you press Fn F3 the computer enters the Standby Mode Before entering Standby a dialog box appear...

Page 107: ...screen Brightness Pressing Fn F7 increases the LCD screen brightness in increments When you press these hot keys the current setting will be displayed for two seconds by a pop up icon You can also change this setting through the Screen brightness item of the Basic Setup tab in TOSHIBA Power Saver Wireless setting If your computer has both Bluetooth and Wireless LAN functions you can press Fn F8 to...

Page 108: ... power of the optical disc drive on or eject the disc tray A dialog box is displayed when this hotkey is pressed To choose between the functions press the Tab key while holding down the Fn key The chosen function is executed when the Fn Tab keys are released TOSHIBA Zooming Utility reduce To reduce the icon size on the desktop or the application window press the 1 key while holding down the Fn key...

Page 109: ...computer s keyboard does not have an independent numeric keypad but its numeric keypad overlay functions like one The keys in the center of the keyboard with gray letters make up the numeric keypad overlay The overlay provides the same functions as the numeric keypad on the 101 102 key enhanced keyboard Turning on the overlays The numeric keypad overlay can be used for numeric data input or cursor...

Page 110: ...erate as if the overlay were off 2 Type upper case characters by holding Fn Shift and pressing a character key 3 Release Fn to continue using the overlay Temporarily using overlay overlay off While using the normal keyboard you can temporarily use the keypad overlay without turning it on 1 Press and hold down Fn 2 Check the keyboard indicators Pressing Fn turns on the most recently used overlay If...

Page 111: ...rating ASCII characters Not all ASCII characters can be generated using normal keyboard operation But you can generate these characters using their ASCII codes With the overlay on 1 Hold down Alt 2 Using the overlay keys type the ASCII code 3 Release Alt and the ASCII character appears on the display screen With the overlay off 1 Hold down Alt Fn 2 Using the overlay keys type the ASCII code 3 Rele...

Page 112: ...5 10 User s Manual The Keyboard ...

Page 113: ...charge status are affected by the power conditions whether an AC adaptor is connected whether a battery pack is installed and what the charge level is for the battery Power conditions Power on Power off no operation AC adaptor connected Battery fully charged Operates No charge LED Battery green DC IN green LED Battery green DC IN green Battery partially charged or no charge Operates Quick Charge L...

Page 114: ... battery trigger point Operates LED Battery flashes orange DC IN off Battery charge is exhausted Computer goes into Hibernation Mode and shuts down No battery installed No operation LED Battery off DC IN off Flashing orange The battery charge is low The AC adaptor must be connected to recharge the battery Orange Indicates the AC adaptor is connected and charging the battery Green Indicates the AC ...

Page 115: ... adaptor is connected and supplying proper power to the computer Flashing orange Indicates a problem with the power supply Plug the AC adaptor into another power outlet If it still does not operate properly contact your dealer No light Under any other conditions the indicator does not light Green Indicates power is being supplied to the computer and the computer is turned on Blinking orange Indica...

Page 116: ...tery and the Battery indicator may not indicate a low battery condition The battery pack is a lithium ion battery which can explode if not properly replaced used handled or disposed of Dispose of the battery as required by local ordinances or regulations Use only batteries recommended by TOSHIBA as replacements Always use the battery pack supplied as an accessory or an equivalent battery pack spec...

Page 117: ...ly discharged Standby Mode does not function and the computer loses all data in memory When the Extended capacity battery pack is connected to the computer do not hold on only to the Extended capacity battery pack when lifting the computer up The Extended capacity battery pack may separate from the computer causing it to fall and cause injuries The battery pack is a lithium ion battery which can e...

Page 118: ...t for detailed precautions and handling instructions The computer s RTC battery is a Ni MH battery and should be replaced only by your dealer or by a TOSHIBA service representative The battery can explode if not properly replaced used handled or disposed of Dispose of the battery as required by local ordinances or regulations The RTC battery does not charge while the computer is turned off even if...

Page 119: ...move a battery pack disable the Wake up on Wireless LAN function To ensure the battery pack maintains maximum capacity operate the computer on battery power once a week until the battery pack is fully discharged Refer to the section Extending battery life in this chapter for procedures If the computer is continuously operated on AC power for an extended period more than a week the battery might fa...

Page 120: ...h case follow the steps below 1 Fully discharge the battery by leaving it in the computer with the power on until the power automatically shuts off 2 Connect the AC adaptor to the DC IN 15V jack of the computer and the AC adaptor into power outlet 3 Charge the battery until the Battery indicator glows green Repeat these steps two or three times until the battery recovers normal capacity Battery ty...

Page 121: ... power Whether you enable Standby Mode which can conserve battery power if you are frequently turning the computer off and on Where you store your programs and data Whether you close the LCD display panel when you are not using the keyboard closing the display saves power The environmental temperature operating time decreases at low temperatures You should wait for approximately fifteen seconds af...

Page 122: ...in and body fatigue For example stand up and walk around or stretch for a few minutes every hour To change the screen refresh rate follow the steps as detailed below 1 Click start and click Control Panel 2 Click Appearance and Themes and click Display to open the Display Properties window 3 Select the Settings window and click the Advanced button to open the Default Monitor and Mobile Intel 945GM ...

Page 123: ... In addition to this you might also replace a discharged battery pack with a charged spare when you are operating your computer away from an AC power source for an extended period of time This section explains how to remove and install the battery pack and begins with the removal process which is detailed through the following steps 1 Turn off the computer s power 2 Disconnect the AC adaptor and t...

Page 124: ...o disengage the battery pack and then remove it from the computer 3 Releasing the battery pack Do not remove the battery pack while the computer is in Standby Mode Data is stored in RAM so if the computer loses power it will be lost In Hibernation Mode data will be lost if you remove the battery pack or disconnect the AC adaptor before the save is completed Wait for the HDD indicator to go out Do ...

Page 125: ...assword To start the utility point to or click the following items start All Programs TOSHIBA Utilities Password Utility The User Password dialog box contains two main fields User Password and User Token User authentication may be required to validate user rights when using TOSHIBA Password Utility to delete or change passwords or create tokens etc Do not touch the battery release latch while hold...

Page 126: ...k Create You can use an SD card of any capacity but it must be formatted correctly If an unformatted card or one with an incompatible format is inserted you will be prompted to format it with a tool named TOSHIBA SD Memory Card Format To start the format tool point to or click the following items start All Programs TOSHIBA Utilities SD Memory Card Format Disable button Click this button to invalid...

Page 127: ...cate the fingerprint for some reasons push the BkSp key to skip the fingerprint authentication screen You can try to swipe the fingerprint up to five times If you failed fingerprint authentication more than five times you must enter the password manually to start the computer Enter the password manually To enter a password manually follow these steps 1 Turn on the power as described in Chapter 3 G...

Page 128: ... on off You can set up your computer so that power turns off automatically when you close the display panel When you open the panel power will be turned on in Standby Mode or Hibernation Mode but not in boot mode System Auto Off This feature turns the system off automatically if it is not used for a set duration The system shuts down in Standby Mode or Hibernation Mode in Windows If you enter the ...

Page 129: ... and Other Hardware and then click TOSHIBA HW Setup HW Setup window The HW Setup window contains a number of tabs General Display Boot Priority Keyboard CPU LAN Device Config Parallel Printer and USB to allow specific functions of the computer to be configured There are also three buttons OK Cancel and Apply OK Accepts your changes and closes the HW Setup window Cancel Closes the window without ac...

Page 130: ...ies Default Return all HW Setup values to the factory settings About Display the HW Setup version Auto Selected Selects an external monitor if one is connected otherwise it selects the internal LCD display default LCD Analog RGB Selects both the internal LCD and an external monitor for simultaneous display If the connected external monitor does not support the computer s current video mode selecti...

Page 131: ...r looks for bootable files in the following order HDD floppy disk drive 1 CD ROM 2 and LAN Default FDD HDD CD ROM LAN The computer looks for bootable files in the following order floppy disk drive 1 HDD CD ROM 2 and LAN HDD CD ROM LAN FDD The computer looks for bootable files in the following order HDD CD ROM 2 LAN and floppy disk drive 1 FDD CD ROM LAN HDD The computer looks for bootable files in...

Page 132: ... appear under the selected device If a Supervisor Password has been set manual boot device selection functions may be restricted The boot device selection methods described above will not change the boot priority settings that have been configured in HW Setup In addition if you press a key other than one of those listed or if the selected device is not installed the system will continue to boot ac...

Page 133: ...d disk drive default With this setting the USB memory device can be used to start the computer as though it were a hard disk drive based on the hard disk drive settings within both the Boot Priority and HDD Priority options detailed previously FDD Sets the USB memory to be the equivalent of a floppy diskette drive With this setting the USB memory device can be used to start the computer as though ...

Page 134: ...nabled Connect the AC adaptor when using the Wake up on LAN function The battery retention time will be shorter than the times listed in this manual when this function is enabled Refer to the section in chapter 6 Retaining data with power off Enabled Enables the Wake up on Keyboard function Disabled Disables the Wake up on Keyboard function Default Dynamically Switchable The processor s power cons...

Page 135: ...ng system does not support USB devices you can still use a standard USB mouse and keyboard to achieve this you should set the appropriate option s to Enabled Do not install or remove an optional memory module while Wake up on LAN is enabled The Wake up on LAN function consumes power even when the system is off Leave the AC adaptor connected while using this feature Enabled Enables Built in LAN fun...

Page 136: ...ive legacy emulation function Notes before using the BIOS Setup In most cases changes to the system s configuration should be made within Windows by using applications such as TOSHIBA HW Setup TOSHIBA Password Utility TOSHIBA Power Saver Windows Device Manager and so forth If you make changes to the configuration through the BIOS setup program please be aware that the configuration set through the...

Page 137: ...the Y key this will save the configuration changes and end the BIOS setup application automatically restarting the computer Ending the BIOS Setup Program Halfway The configuration settings can be terminated halfway without saving any of the changes made by following the steps detailed below 1 Press the Esc key the Exit without saving Y N prompt to be displayed at the bottom of the screen 2 Press t...

Page 138: ...uffer overflow attacks when combined with a supporting operating system such as Windows XP LCD Display Stretch Select the display function of the LCD The Virtualization Technology is supported with some models Enabled Enables Virtualization Technology Disabled Disables Virtualization Technology Default Enabled This lowers the power consumption Default Disabled This does not lower the power consump...

Page 139: ... carrying out this operation The procedure to follow is as detailed below 1 Move the cursor to the Clear TPM Owner setting and press either the Space Bar or BkSp key 2 A message is displayed at which you should press the Y E S and Enter keys in sequence the Trusted Platform Module information will then be erased 3 The Trusted Platform Module setting will then change from being Enable to Disabled a...

Page 140: ...7 12 User s Manual HW Setup BIOS Setup ...

Page 141: ...ollowing devices which are available from your TOSHIBA dealer Cards memory PC card ExpressCard SD card Memory expansion Power devices Battery pack AC adaptor Battery charger Peripheral devices Hard disk drive pack Ultra Slim Bay HDD adaptor USB floppy disk drive External monitor i LINK IEEE1394 Advanced Port Replicator lll Plus Parallel printer Serial devices Other Security lock ...

Page 142: ...PC card Windows hot install feature lets you insert PC cards while the computer s power is on To insert a PC card follow the steps below 1 Insert a PC card in the PC card slot 2 Press gently to ensure a firm connection Inserting the PC card 3 After inserting the PC card refer to the PC card s documentation and check the configuration in Windows to make sure it is appropriate for your PC card PC ca...

Page 143: ...s interface that supports the reading and writing of data at a theoretical maximum rate of 2 5 Gbps Inserting an ExpressCard Windows hot install feature lets you insert an ExpressCard while the computer s power is on If the PC card is not inserted all the way the eject button may not cause it to pop out sufficiently to allows it to be grasped Be sure to push the PC card firmly into the computer an...

Page 144: ...sCard Removing an ExpressCard To remove the ExpressCard follow the steps below 1 Open the Safely Remove Hardware icon on the Task Bar 2 Point to ExpressCard and click 3 Press the ExpressCard eject button to extend it 4 Press the extended eject button to pop the card out slightly 5 Grasp the ExpressCard and draw it out Removing the ExpressCard ExpressCard ExpressCard slot If the ExpressCard is not ...

Page 145: ... to TOSHIBA point to Utilities and click SD memory card Format The TOSHIBA SD memory card format utility does not format the protected area of the SD memory card Should you need to format all areas of the memory card including the protected area you will need to obtain an appropriate application that applies the copy protection system Inserting an SD card To insert an SD card follow the steps belo...

Page 146: ...Do not leave an SD card partially inserted in the slot Press the SD card until you hear it click into place Make sure the SD card is oriented properly before you insert it Do not turn the computer off or switch to Standby Mode or Hibernate Mode while files are being copied doing so may cause data to be lost SD card SD card slot Make sure the SD card indicator is out before you remove the SD card o...

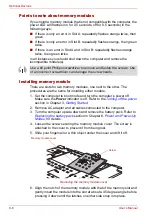
Page 147: ... Avoid mats made of materials that generate static electricity When you install or remove a memory module ensure that you do not touch any other internal areas of the computer Use only memory modules approved by TOSHIBA Do not try to install or remove a memory module under the following conditions as you can damage the computer and or the module and you risk losing data a The computer is turned on...

Page 148: ...e and turn the computer s power off Make sure the Power indicator is off Refer to the Turning off the power section in Chapter 3 Getting Started 2 Remove AC adaptor and all cables connected to the computer 3 Turn the computer upside down and remove the battery pack Refer to Replacing the battery pack section in Chapter 6 Power and Power Up Modes for details 4 Loosen the screw securing the memory m...

Page 149: ...ong the edges of the memory module with the locking tabs on the connector and insert the module into the connector firmly If you find it difficult to install the memory module gently prize the locking tabs outwards using the tip of your finger Ensure that you hold the memory module along its left and right hand edges the edges with the grooves in Never allow metal objects such as screws staples an...

Page 150: ...in object under the cover and lift it off 6 Push the latches to the outside to release the module A spring will force one end of the module up 7 Grasp the module by the sides and pull it out Removing the memory module 8 Seat the memory module cover and secure it with one screw 9 Install the battery pack Refer to Replacing the battery pack section in Chapter 6 Power and Power Up Modes for details 1...

Page 151: ...omputer The battery charger holds up to two battery packs lithium ion Hard disk drive pack An extra hard disk drive expands the flexibility of your system and lets you carry your data without carrying the computer Removing the hard disk drive pack To remove the hard disk drive pack follow the steps below 1 Set the computer to boot mode and turn off the power 2 Disconnect the AC adaptor and all ext...

Page 152: ... disk drive pack Installing the hard disk drive pack To install the hard disk drive pack follow the steps below 1 Move the connector until it is vertical 2 Hold the hard disk drive vertically with its label on the left 3 Connect the hard disk drive to the connector Screw Hard disk drive cover Plastic tab Hard disk drive pack Ensure that the hard disk drive is connected to the connector in a vertic...

Page 153: ... screw 7 Turn your computer over Ultra Slim Bay HDD adaptor You can increase your computer s data storage capacity by installing an additional 80 0 billion bytes 74 53 GB or 100 0 billion bytes 93 16 GB hard disk drive in the Ultra Slim Bay To install an hard disk drive in the Ultra Slim Bay HDD adaptor follow the steps below 1 Slide the lock to the unlock position and open the lid Opening the lid...

Page 154: ...id and slide the lock to the lock position Closing the lid For details on inserting the Ultra Slim Bay HDD adaptor in the computer s Ultra Slim Bay slot refer to Chapter 4 Operating Basics USB floppy disk drive The USB floppy disk drive module can be connected to a USB port For details on connecting the USB floppy disk drive module refer to Chapter 4 Operating Basics Hard disk drive Lid ...

Page 155: ... monitor s power on 4 Turn the computer s power on When you turn on the power the computer automatically recognizes the monitor and determines whether it is color or monochrome However the Windows Desktop appears on a display device that you used last time to shut down your computer if the display device exists when you turn on the power To change the display settings press Fn F5 If you disconnect...

Page 156: ...change the resolution follow the steps below 1 Open Display properties and select the Settings tab 2 Select Advanced 3 Select the Adapter tab then select List all modes 4 Select a resolution from the menu Video out jack TV adaptor cable If a television is connected to the computer set the TV type in Display Properties Follow the steps below a Click start click Control Panel and click Appearance an...

Page 157: ...or Primary Device Movies will be displayed full screen on the computer s internal LCD and in a window on the TV or CRT monitor Secondary Device Movies will be displayed full screen on the TV or CRT monitor and in a window on the computer s internal LCD Disable Movies will not be displayed on a TV or CRT monitor d Click OK e Click OK in the Display Properties screen i LINK IEEE1394 i LINK IEEE1394 ...

Page 158: ... i LINK device to from another i LINK device that is currently exchanging data with the computer data frames might be dropped Make sure data transfer has ended or turn off the computer before you Connect disconnect an i LINK device to from the computer Connect disconnect an i LINK device to from another i LINK device that is connected to the computer Connecting 1 Make sure the connectors are prope...

Page 159: ...ort Serial port PS 2 mouse port PS 2 keyboard port DC IN 15V jack Security lock slot Audio line in line out jacks Universal Serial Bus 2 0 ports four i LINK IEEE 1394 port DVI port This port is not supported by the computer Refer also to the documentation that came with your i LINK device The computer must be configured properly before connecting to a LAN Logging onto a LAN using the computer s de...

Page 160: ... s power 7 Turn on the computer s power 8 Start the HW Setup program Refer to Chapter 7 HW Setup BIOS Setup 9 Select the Parallel Printer tab from the TOSHIBA HW Setup window 10 Set the Parallel Port Mode and press OK 11 Choose Reboot for the change to take effect 12 Select the printer in Windows Add Print Wizard To access the Add Print Wizard utility click start click Control Panel click Printers...

Page 161: ...other heavy object to help prevent unauthorized removal of the computer or Advanced Port Replicator III Plus The computer has a security lock slot on the left side Attach one end of a cable to a desk and the other end to the security lock slot 1 Turn the computer so the left side faces you 2 Align the holes for the security lock and attach the lock Security lock Serial connector Serial port Securi...

Page 162: ...8 22 User s Manual Optional Devices ...

Page 163: ...xists Further action may result in data loss or damage You may destroy valuable problem related information that can help solve the problem Observe what is happening Write down what the system is doing and what actions you performed immediately before the problem occurred If you have a printer attached print a copy of the screen using PrtSc The questions and procedures offered in this chapter are ...

Page 164: ...your dealer If a problem recurs the log will help you identify the problem faster Analyzing the problem Sometimes the system gives clues that can help you identify why it is malfunctioning Keep the following questions in mind Which part of the system is not operating properly keyboard floppy disk drives hard disk drive optical disc drive display Each device produces different symptoms Is the opera...

Page 165: ... messages in the operating system documentation Hardware If you cannot find a software problem check your hardware First run through the items in the preliminary checklist above If you still cannot correct the problem try to identify the source The next section provides checklists for individual components and peripherals Before using a peripheral device or application software that is not an auth...

Page 166: ... primary power source However your computer has a number of other power resources including an intelligent power supply and a Real Time Clock battery These resources are interrelated and any one could affect apparent power problems This section provides checklists for AC power and the battery If you cannot resolve a problem after following them the cause could lie with another power resource In su...

Page 167: ...icator is flashing green Indicates a problem with the heat dispersal system Please contact your dealer Problem Procedure AC adaptor doesn t power the computer DC IN indicator does not glow green Check the connections Make sure the cord is firmly connected to the computer and a power outlet Check the condition of the cord and terminals If the cord is frayed or damaged replace it If the terminals ar...

Page 168: ...l Connect the AC adaptor and replace the battery Make sure it is securely seated Check the Battery indicator If it does not glow let the computer charge the battery for at least 20 minutes If the Battery indicator glows after 20 minutes let the battery continue to charge at least another 20 minutes before turning on the computer If the indicator still does not glow the battery may be at the end of...

Page 169: ...up 2 Set the date in System Date 3 Set the time in System Time 4 Press End key Confirmation message will appear 5 Press Y key BIOS setup will terminate and the computer will be rebooted Problem Procedure Cannot enter password Refer to the TOSHIBA Password Utility section in Chapter 6 Power and Power Up Modes Problem Procedure Some letter keys produce numbers Check that the numeric keypad overlay i...

Page 170: ...ur software s documentation to determine if the software is causing the difficulty Run a diagnostic test Contact your dealer if the problems continue Problem Procedure Computer does not boot from hard disk drive Check if a floppy disk is in the floppy disk drive or a CD ROM is in the optical disc drive Remove any floppy disk and or CD DVD and check the Boot priority Refer to the Boot Priority sect...

Page 171: ...eign object Check whether the CD DVD is dirty If it is wipe it with a clean cloth dipped in water or a neutral cleaner Refer to the Media care section in Chapter 4 Operating Basics for details on cleaning Some CD DVDs run correctly but others do not The software or hardware configuration may be causing a problem Make sure the hardware configuration matches your software s needs Check the CD DVD s ...

Page 172: ...sist contact your dealer Problem Procedure Problem Procedure You cannot access a CD DVD in the drive Make sure the drive s disc tray is securely closed Press gently until it clicks into place Check whether the drive power is on If the power is off click on the optical disc drive icon in the task tray and turn on the power Open the disc tray and make sure the CD DVD is properly seated It should lie...

Page 173: ...on the DVD It must match that on the DVD Super Multi drive Region codes are listed in the Optical disc drives section in Chapter 2 The Grand Tour Problem Procedure Problem Procedure Drive does not operate There may be a faulty cable connection Check the connection to the computer and to the drive Some programs run correctly but others do not The software or hardware configuration may be causing a ...

Page 174: ... Procedure PC card error occurs Reseat the PC card to make sure it is firmly connected Make sure the connection between the external device and the card is firm Check the card s documentation If problems persist contact your dealer Problem Procedure ExpressCard error occurs Reseat the ExpressCard to make sure it is firmly connected Make sure the connection between the external device and the card ...

Page 175: ...evice On screen pointer does not respond to Pad operation The system might be busy If the pointer is shaped as an hourglass wait for it to return to its normal shape and try again to move it The mouse pointer moves too fast or too slow Try changing the speed setting in the mouse control utility 1 Click start click Control Panel click Printers and Other Hardware and select Mouse icon 2 Click the Po...

Page 176: ... control utility 1 Click start click Control Panel click Printers and Other Hardware and select Mouse icon 2 Click the Pointer Options tab 3 Set the speed as required and click OK The mouse pointer moves erratically The mouse might be dirty Refer to your mouse documentation for instructions on cleaning If problems persist contact your dealer Problem Procedure Reading of the fingerprint was not suc...

Page 177: ...function the power LED flashes on for 0 5 seconds off for 0 5 seconds in the following ways If there is only an error in Slot A repeatedly flashes orange twice then green If there is only an error in Slot B repeatedly flashes orange then green twice If there is an error in Slot A and in Slot B repeatedly flashes orange twice then green twice In the event of power LED flashing indicated on the left...

Page 178: ...onflict with other hardware devices that you may have connected to the computer Annoying sound is heard You may be experiencing feedback Refer to Sound system in Chapter 4 Operating Basics If problems persist contact your dealer Problem Procedure Monitor does not turn on Make sure that the external monitor s power switch is on Confirm that the external monitor s power cable is plugged into a worki...

Page 179: ...dial detection feature is disabled You can also use the ATX command You place a call but a connection can t be made Make sure the settings are correct in your communications application After making a call you can t hear a ring Make sure the tone or pulse selection in your communications application is set correctly You can also use the ATD command Communication is cut off unexpectedly The compute...

Page 180: ...also use the ATS0 command If problems persist contact your dealer Problem Procedure Problem Procedure Cannot access LAN Check for a firm cable connection between the LAN jack and the LAN hub Wake up on LAN does not work Make sure the AC adaptor is connected The Wake up on LAN function consumes power even when the system is off If problems persist consult your LAN administrator Problem Procedure Ca...

Page 181: ... computer The built in Bluetooth function and an optional Bluetooth PC card cannot operate simultaneously If problems persist contact your dealer Problem Procedure Printer does not turn on Check that the printer is connected to an electric outlet Make sure the outlet is supplying power by plugging in an appliance Computer printer do not communicate Make sure the printer is turned on and is online ...

Page 182: ...for a target file Putting files in the Recycle Bin and emptying the Recycle Bin Reformatting the media Reinstalling an operating system from the recovery CD ROM The procedures above delete only the initial part of the data used for file management This makes the file invisible to the operating system but the data can still be read by specialized utilities If you dispose of the PC please delete all...

Page 183: ...eview troubleshooting sections in the documentation for software and peripheral devices If a problem occurs when you are running software applications consult the software documentation for troubleshooting suggestions Call the software company s technical support for assistance Consult the dealer you purchased your computer and or software from They are your best sources for current information an...

Page 184: ...9 22 User s Manual Troubleshooting ...

Page 185: ...ipheral products use of battery power instead of AC power use of certain multimedia computer generated graphics or video applications use of standard telephone lines or low speed network connections use of complex modeling software such as high end computer aided design applications use of several applications or functionalities simultaneously use of computer in areas with low air pressure high al...

Page 186: ...space for computing activities will be considerably less and will vary by model and system configuration Battery Life Battery life may vary considerably depending on product model configuration applications power management settings and features utilized as well as the natural performance variations produced by the design of individual components Published battery life numbers are achieved on sele...

Page 187: ...Wireless LAN The transmission speed over the wireless LAN and the distance over which wireless LAN can reach may vary depending on surrounding electromagnetic environment obstacles access point design and configuration and client design and software hardware configurations 54Mbps is the theoretical maximum speed under the IEEE802 11 a b g standard The actual transmission speed will be lower than t...

Page 188: ...10 4 User s Manual Legal Footnotes ...

Page 189: ...8 6 h millimeters not including parts that extend beyond the main body Conditions Ambient temperature Relative humidity Operating 5 C 41 F to 35 C 95 F 20 to 80 Non operating 20 C 4 F to 65 C 149 F 10 to 95 Thermal Gradient 20 C per hour maximum Wet bulb temperature 26 C maximum Conditions Altitude from sea level Operating 60 to 3 000 meters Non operating 60 to 10 000 meters maximum ...

Page 190: ...ions Communication system Data Full duplex Fax Half duplex Communication protocol Data ITU T Rec V 21 V 22 V 22bis V 32 Former CCITT V 32bis V 34 V 90 Bell 103 212A Fax ITU T Rec V 17 V 29 V 27ter Former CCITT V 21 ch2 Communication speed Data transmission and reception 300 1200 2400 4800 7200 9600 12000 14400 16800 19200 21600 24000 26400 28800 31200 33600 bps Data reception only with V 90 28000 ...

Page 191: ...cations Transmitting level 10 dBm Receiving level 10 to 40 dBm Input output impedance 600 ohms 30 Error correcting MNP class 4 and ITU T V 42 Data compression MNP class 5 and ITU T V 42bis Power supply 3 3V supplied by computer ...

Page 192: ...A 4 User s Manual Specifications ...

Page 193: ...um number of colors that can be displayed on screen Software written for a given video mode will run on any computer that supports the mode Video modes Video mode settings are configured via the Display Properties dialog To open the Display Properties dialog click on the Start button select Control Panel and from the Control Panel click on Appearance and Themes and then click on Display When the D...

Page 194: ...three ways To define the performance select the menu options shown below Display Property Settings Advanced Quadro NVS 110M tab Quadro NVS 110M button nView Display Settings PowerMizer The graphics processor offers three options Maximum Power Savings Balanced and Maximum Performance in each of the AC power mode and battery power mode Multiple Monitors and Quadro NVS 110M ...

Page 195: ...e Compatibility IEEE 802 11 Standard for Wireless LANS Wi Fi Wireless Fidelity certified by the Wi Fi Alliance The Wi Fi CERTIFIED logo is a certification mark of the Wi Fi Alliance Network Operating System Microsoft Windows Networking Media Access Protocol CSMA CA Collision Avoidance with Acknowledgment ACK Data Rate Theoretical maximum speed 54Mbps IEEE802 11a IEEE802 11g 11b g 11a b g combo typ...

Page 196: ...tacles in the signal path of the radio that may either absorb or reflect the radio signal Supported Frequency Sub bands Subject to the radio regulations that apply in the countries regions your Wireless LAN card may support a different set of 5 GHz 2 4 GHz channels Consult your Authorized Wireless LAN or TOSHIBA Sales office for information about the radio regulations that apply in the countries r...

Page 197: ...n roaming between different access points the station can dynamically switch to another channel if required For Wireless LAN cards installed in wireless clients that operating in a peer to peer mode the card will use the default channel 10 In a Wireless LAN Access Point the Wireless LAN card will use the factory set default channel printed in bold unless the LAN Administrator selected a different ...

Page 198: ...C 4 User s Manual Wireless LAN 60 5300 64 5320 100 5500 104 5520 108 5540 112 5560 116 5580 120 5600 124 5620 128 5640 132 5660 136 5680 140 5700 149 5745 153 5765 157 5785 161 5805 165 5825 ...

Page 199: ...If you have not yet done so launch the Recovery Disc Creator and create the recover discs now If you have data on the hard drive that you wish to keep make a backup of that data onto external media such as a CD now You will not be able to create recovery discs nor access any data from the hard disk after reconfiguring your hard disk A power on password can help restrict access to your data It can ...

Page 200: ... such Refer to the Starting Modifying and Ending the BIOS Setup Program in this chapter Windows Setup Procedure 1 Insert the Windows Setup CD ROM into the CD ROM drive and boot up The Windows Setup program will start 2 When the message Press F6 if you need to install a third party SCSI or RAID driver appears on the screen press the F6 key 3 When the message Setup will load support for the followin...

Page 201: ...hard disk drive The additional 20 GB capacity over the 60 GB hard disk drive of the 80 GB hard disk drive cannot be used If a hard disk drive had been replaced execute the rebuild command and rebuild the RAID 1 mirroring configuration Implementing the media checking schedule Media checks should be carried out regularly to ensure even more stable operation of the RAID configuration and to make it e...

Page 202: ...he settings as necessary Configuration status and settings Please refer to the operating instructions displayed in the settings screen Current State Shows the current hard disk status Create State Modify the hard disk configuration Modifications are made with this setting Built in HDD Status of the connected hard disk Second HDD Status of the second hard disk JBOD No RAID settings Windows cannot b...

Page 203: ... End key The Are you sure Y N The changes you made will cause the system to reboot message is displayed 2 Press the Y key The configured settings are saved and the BIOS setup program ends The computer may reboot depending on the settings that were modified Pressing the Home key will revert the modified Create State settings back to the Current State settings S Warning If you change the RAID array ...

Page 204: ...D 6 User s Manual TOSHIBA RAID ...

Page 205: ... any product with Bluetooth wireless technology that is based on Frequency Hopping Spread Spectrum FHSS radio technology and is compliant to Bluetooth Specification Ver2 0 EDR as defined and approved by The Bluetooth Special Interest Group Logo certification with Bluetooth wireless technology as defined by The Bluetooth Special interest Group ...

Page 206: ...ce while you use Bluetooth Cards from TOSHIBA always change the frequency move your computer to the area outside of the interference range of 2 4 GHz Wireless LAN devices 40 meters 43 74 yards or more or stop transmitting from your computer Please contact TOSHIBA PC product support on Web site http www toshiba europe com computers tnt bluetooth htm in Europe or http www pc support global toshiba c...

Page 207: ...lding or responsible representatives of the organization These situations may for example include Using the equipment with Bluetooth wireless technology on board of airplanes or In any other environment where the risk of interference to other devices or services is perceived or identified as harmful If you are uncertain of the policy that applies on the use of wireless devices in a specific organi...

Page 208: ...ce with the instructions it may cause harmful interference to radio communications However there is no guarantee that interference will not occur in a particular installation If this equipment does cause harmful interference to radio or television reception which can be determined by tuning the equipment off and on the user is encouraged to try and correct the interference by one or more of the fo...

Page 209: ...her antenna or transmitter The installer of this radio equipment must ensure that the antenna is located or pointed such that it does not emit RF field in excess of Health Canada limits for the general population consult Safety Code 6 obtainable from Health Canada s website www hc sc gc ca rpb Taiwan Article 12 Without permission granted by the DGT any company enterprise or user is not allowed to ...

Page 210: ...00 MHz to 2 483 5 MHz It is impossible to avoid the band of mobile object identification systems 3 TOSHIBA Direct PC Monday Friday 10 00 17 00 Toll Free Tel 0120 15 1048 Direct Dial 03 3457 4850 FAX 03 3457 4868 The frequency bandwidth of this equipment may operate within the same range as industrial devices scientific devices medical devices microwave ovens licensed radio stations and non license...

Page 211: ...mbedded wireless module into other device Approved Countries Regions for use Bluetooth wireless technology Bluetooth Card from TOSHIBA equipment is approved to the radio standard by the countries regions in the following table Countries regions that have approved Bluetooth Card from TOSHIBA Do not use this equipment except in the countries regions in the following table Australia Austria Belgium C...

Page 212: ...E 8 User s Manual Bluetooth wireless technology Interoperability ...

Page 213: ...pecifications Certification agencies Length Minimum 2 meters Wire size Minimum 0 75 mm2 Current rating Minimum 2 5 amperes Voltage rating 125 or 250 VAC depending on country region s power standards U S and Canada UL listed and CSA certified No 18 AWG Type SVT or SPT 2 Australia AS Japan DENANHO Europe Austria OVE Italy IMQ Belgium CEBEC The Netherlands KEMA Denmark DEMKO Norway NEMKO Finland FIMK...

Page 214: ...n must be a 2 15P 250V or 1 15P 125V and three pin plug configuration must be 6 15P 250V or 5 15P 125V as designated in the U S National Electrical code handbook and the Canadian Electrical Code Part II The following illustrations show the plug shapes for the U S A and Canada the United Kingdom Australia and Europe USA United Kingdom Australia Europe Canada CSA approved Approved by the appropriate...

Page 215: ... Password from the supervisor tab in TOSHIBA Password Utility and set the password on the dialog screen that appears Then click on the Set button in TOSHIBA Anti theft Protection Timer Take the following action if the set limit is exceeded If the Supervisor Password is registered but the User Password is not enter the Supervisor Password to boot up the computer If both the Supervisor Password and ...

Page 216: ...G 2 User s Manual TOSHIBA Anti theft Protection Timer ...

Page 217: ... address below To register the theft online please follow these procedures Visit www toshiba europe com on the Internet In the product area choose Computer Systems In the Computer Systems page open the Support Downloads menu and choose the Stolen Units Database option Your entries are used to track your computer at our service points Always take care of your computer and try to prevent it from bei...

Page 218: ...ical Service and Support Leibnizstr 2 93055 Regensburg Germany Fax number 49 0 941 7807 921 Owner s details Country stolen Machine type e g Satellite A50 Model number e g PSA50 YXT Serial number e g 12345678G Date stolen Last name first name Company Street Postal Code City Country Phone Fax Year Month Day ...

Page 219: ...mpact Disc ReWritable CMOS complementary metal oxide semiconductor CPU central processing unit CRT cathode ray tube DC direct current DDC display data channel DMA direct memory access DOS disk operating system DVD digital versatile disc DVD R Digital Versatile Disc Recordable DVD RAM Digital Versatile Disc Random Access Memory DVD ROM Digital Versatile Disc Read Only Memory DVD RW Digital Versatil...

Page 220: ...UXGA ultra extended graphics array VESA Video Electronic Standards Association VGA video graphics array VRT voltage reduction technology WXGA wide extended graphics array XGA extended graphics array A AccuPoint A pointing device integrated into the TOSHIBA computer keyboard adaptor A device that provides an interface between two dissimilar electronic devices For example the AC adaptor modifies the...

Page 221: ...asynchronous asynchronous Lacking regular time relationship As applied to computer communications asynchronous refers to the method of transmitting data that does not require a steady stream of bits to be transmitted at regular time intervals B backup A duplicate copy of files kept as a spare in case the original is destroyed batch file A file that can be executed from the system prompt containing...

Page 222: ...rather than the main memory which saves time The computer has two cache levels Level one is incorporated into the processor and level two resides in external memory capacity The amount of data that can be stored on a magnetic storage device such as a floppy disk or hard disk It is usually described in terms of kilobytes KB where one KB 1024 bytes and megabytes MB where one MB 1024 KB card Synonym ...

Page 223: ...rts of a system which make up the whole system computer program A set of instructions written for a computer that enable it to achieve a desired result computer system A combination of hardware software firmware and peripheral components assembled to process data into useful information configuration The specific components in your system such as the terminal printer and disk drives and the settin...

Page 224: ... loads when you turn the computer on dialog box A window that accepts user input to make system settings or record other information disk drive The device that randomly accesses information on a disk and copies it to the computer s memory It also writes data from memory to the disk To accomplish these tasks the unit physically rotates the disk at high speed past a read write head disk storage Stor...

Page 225: ...t transmitted to a CRT or other peripheral device and then retransmits the data to printer the printer is said to echo the CRT erase See delete escape 1 A code ASCII code 27 signaling the computer that what follows are commands used with peripheral devices such as printers and modems 2 A means of aborting the task currently in progress escape guard time A time before and after an escape code is se...

Page 226: ... to present information H hard disk A non removable disk usually referred to as drive C The factory installs this disk and only a trained engineer can remove it for servicing Also called fixed disk hard disk drive HDD An electromechanical device that reads and writes a hard disk See also hard disk hardware The physical electronic and mechanical components of a computer system typically the compute...

Page 227: ...ardware and or software components of a system used specifically to connect one system or device to another 2 To physically connect one system or device to another to exchange information 3 The point of contact between user the computer and the program for example the keyboard or a menu interrupt request A signal that gives a component access to the processor I O Input output Refers to acceptance ...

Page 228: ...gration 1 A technology that allows the inclusion of up to 100 000 simple logic gates on a single chip 2 An integrated circuit that uses large scale integration M main board See motherboard megabyte MB A unit of data storage equal to 1024 kilobytes See also kilobyte megahertz A unit of wave frequency that equals 1 million cycles per second See also hertz menu A software interface that displays a li...

Page 229: ...hat allows you to use certain keys on the keyboard to perform numeric entry or to control cursor and page movement O OCR Optical Character Recognition reader A technique or device that uses laser or visible light to identify characters and input them into a storage device online state A functional state of a peripheral device when it is ready to receive or transmit data operating system A group of...

Page 230: ... electrical connection through which the computer sends and receives data to and from devices or other computers Power Saver Utility A TOSHIBA utility that lets you set the parameters for various power saving functions printed circuit board PCB A hardware component of a processor to which integrated circuits and other components are attached The board itself is typically flat and rectangular and c...

Page 231: ...s few as two interconnecting wires to send bits one after another serial interface Refers to a type of information exchange that transmits information sequentially one bit at a time Contrast Parallel interface SIO Serial Input Output The electronic methodology used in serial data transmission soft key Key combinations that emulate keys on the IBM keyboard change some configuration options stop pro...

Page 232: ...TL Transistor transistor logic A logic circuit design that uses switching transistors for gates and storage U Universal Serial Bus This serial interface lets you communicate with several devices connected in a chain to a single port on the computer V VGA Video Graphics Array is an industry standard video adaptor that lets you run any popular software volatile memory Random access memory RAM that s...

Page 233: ...Wireless Stereo 1 18 problems 9 19 Boot Priority 7 3 C Cleaning the computer 4 37 Cooling vents 2 4 D DC IN indicator 2 12 6 3 Display 1 6 automatic power off 1 11 brightness decrease 5 5 brightness increase 5 5 controller B 1 hinge 2 9 opening 3 4 screen 2 10 DLA for TOSHIBA 1 16 4 23 Docking interface 1 7 2 7 Documentation list 1 2 Dual Pointing Device 1 7 AccuPoint 1 7 2 10 4 2 AccuPoint contro...

Page 234: ...ting Device 5 6 Fn space LCD screen resolution selection 5 6 Fn Tab Optical media drive power icon 5 6 Function keys 5 2 G Graphics controller 1 6 H Hard disk drive 1 5 1 18 automatic power off 1 11 Installing 8 12 Removing 8 11 HDD indicator 2 12 HDD Protection 1 12 Heat dispersal 1 12 4 41 Hibernation 1 12 5 4 High capacity battery pack 1 17 6 5 Hot keys 1 10 display selection 5 5 instant securi...

Page 235: ...15 Modem 1 8 4 29 connecting 4 30 disconnecting 4 32 jack 2 5 problems 9 17 properties menu 4 30 region selection 4 29 Moving the computer 4 37 N NVIDIA Rotation Settings 1 15 P Password power on 1 11 problems 9 7 starting the computer by 6 15 Supervisor 6 15 user 6 13 PC card 1 8 8 2 inserting 8 2 location of slot 2 3 problems 9 12 removing 8 3 Ports Docking 1 7 external monitor 1 7 i LINK 1 7 in...

Page 236: ...8 5 indicator 2 12 inserting 8 5 location of slot 2 3 problems 9 11 removing 8 6 Security lock 1 17 attaching 8 21 location 2 3 Soft keys enhanced keyboard 5 2 Enter 5 3 right Ctrl key 5 3 ScrLock 5 3 Sound system 4 28 headphone jack 1 8 2 2 microphone 2 3 microphone jack 1 8 2 2 mute hot keys 5 3 problems 9 16 Stereo speakers 2 10 volume control 2 2 Standby 1 12 setting 3 6 System automatic 1 11 ...

Page 237: ... 5 2 6 problems 9 15 USB floppy disk drive problems 9 11 using 4 10 V Video modes B 1 Video RAM 1 4 Volume control 2 2 W Wireless communication 4 32 indicator 2 12 4 35 Wireless communication switch 1 10 2 2 4 34 Wireless LAN 1 9 4 32 problems 9 18 ...

Page 238: ...Index 6 User s Manual Index ...

Reviews: