MAINTENANCE MANUAL
192
STE 85357
!
CAUTION
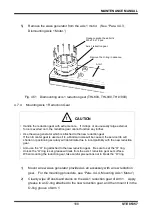
• Arm should always be mounted and dismounted by two (2) or more persons. When
removing Arm mounting bolts, take careful precautions because Arm will drop. Also, if an
excessively large impact is imposed on Arm, the robot will be damaged.
4.7.6
Mounting Axis 2 Reduction Gear
!
CAUTION
• Handle the reduction gear with extreme care. If it drops or an unusually large external
force is exerted on it, the reduction gear cannot function any further.
• Use the wave generator which is attached to the new reduction gear.
• Also use the “O” ring attached to the new reduction gear. Be sure to set the “O” ring.
Unless the “O” ring is set, grease will leak from the axis 2 reduction gear set surface.
When mounting
the reduction gear, take careful precautions not to break the “O” ring.
1)
Mount the wave generator attached to the new reduction gear to the axis 2
motor. (See
“Para. 4.4.6, Mounting Axis 2 Motor.”)
2)
Cleanly wipe off dusts and stains on the reduction gear of Arm 1.
Apply grease to an O-ring attached to the new reduction gear, and then mount it
in the O-ring groove of Arm 1.
3)
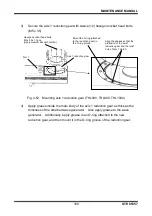
Secure the axis 2 reduction gear to Arm 1 with twelve (12) hexagon socket head
bolts (M4 x 30).
4)
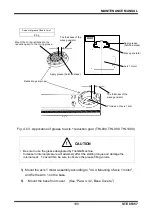
Apply grease to the axis 2 reduction gear. (See
“Para. 4.7.4, Mounting Axis 1
Reduction Gear.” However, the amount of grease filled is different from that for
the axis 1 reduction gear. Regarding the filled amount for the axis 2 reduction
gear, see the following.)
Amount of grease filled in Axis 2
40 g


