background image


- 29 -


6 F 3 H 1 0 0 1

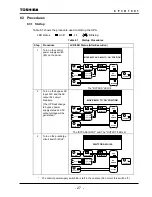
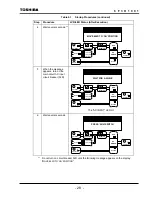
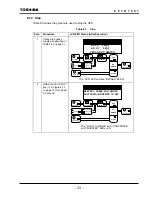
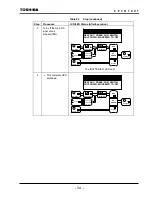
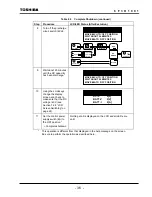
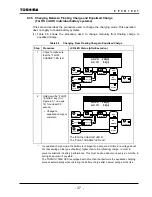
Table 8.1   Startup Procedures (continued) 

Step Procedure 

LCD/LED 

Status (After Execution) 

7 Hold 

down 

the 

"RUN" 

key (

d

 in Figure 6.3.1 

on page 14) for at least 
0.5 second. 

The "CONVERTER" and "INVERTER" LEDs blinking. 

Wait several seconds 
for the startup process 
to finish. 


The "CONVERTER" and "INVERTER" LEDs lit. 

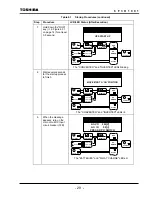
9 When 

the 

message 

appears, turn on the 
main circuit DC input 
circuit breaker (72B). 


The "BATTERIES" and "FLOAT CHARGE" LEDs lit. 


BYPASS


BYPASS


BYPASS


UPS START-UP


MOVE #72B TO ‘ON’ POSITION


            AC-VO      200[V] 
            AC-


I


O        50[

%

PRESS ‘UPS’ SWITCH 

BATTERIES


AC


SWITCH


UPS


BYPASS


DISCHARGE


FLOAT CHARGE


EQUAL CHARGE


AC INPUT

CONVERTER
 

INVERTER

AC OUTPUT

BYPASS INPUT

BATTERIES


AC


SWITCH


UPS


BYPASS


DISCHARGE


FLOAT CHARGE


EQUAL CHARGE


AC INPUT

CONVERTER
 

INVERTER

AC OUTPUT

BYPASS INPUT

BATTERIES


AC


SWITCH


UPS


BYPASS


DISCHARGE


FLOAT CHARGE


EQUAL CHARGE


AC INPUT

INVERTER

AC OUTPUT

BYPASS INPUT

CONVERTER


Summary of Contents for TOSNIC-7000S

Page 1: ...n Manual OPERATION This manual should be delivered to the persons who will ultimately use and maintain the UPS Read this manual carefully before operating the UPS Store the manual in a safe place so it can be referred to when needed ALL Rights Reserved REQUIREMENT July 1999 ...

Page 2: ...erational procedure and the status of the UPS unit e LED Light Emitting Diode Individual lamps located on the graphic display panel indicate the status of the UPS unit f Scroll buttons The and buttons are used to scroll through the LCD screens from the first screen to the last screen and then back to the first screen or backward from the last screen to the first screen and then back to the last sc...

Page 3: ...ording to customer specifications If this is the case remember that the term UPS in the manual is equivalent to CVCF 2 Safety Precautions This manual and the labels on the UPS main unit contain important information designed to ensure that the UPS unit is used correctly and safely and prevent property loss and injury to operators and maintenance personnel Operators and maintenance personnel should...

Page 4: ...incubators etc Noxious gas or smoke eliminators Equipment that must be provided under fire laws construction standards or other ordinances Equipment equivalent to the above Equipment used to supervise or control airways railways roads sea lanes or other transportation routes Equipment used to control nuclear power plants etc Equipment used to control communications Equipment equivalent to the abov...

Page 5: ...ave this done by a third party Electric shock injury or failure may result if persons other than specially trained Toshiba technicians attempt to modify or move the unit Be sure to contact Toshiba if you wish modifications to be made or if you wish to move the unit Only open the front panel when performing necessary operations Operating parts and high voltage areas inside the UPS have been provide...

Page 6: ...accordance with customer stipulations Make sure the air vents on the front and top of the unit are not blocked Blocking the vents will cause the temperature inside the unit to rise and may result in fire or unit failure Make sure you understand the meaning of the warning labels on the equipment and follow the precautions indicated Operating the equipment with an inadequate understanding of these m...

Page 7: ...he vicinity of the main circuit transformers and reactors that can be seen from the back of the panel Figure 2 1 Unit Interior Front with front panel open and Warning Labels Example Locations of the Warning Labels Example 300 kVA T Check having fixed completely with the screw of a unit when restoring this unit A WARNING Hazardous voltage can cause injury or death Do not touch primary side of MCCB ...

Page 8: ... the Toshiba Service Center Operate the unit within the ambient conditions noted in the specifications Operating the unit outside these ranges may result in failure During operation do not turn off the air conditioner for the UPS chamber and the battery chamber This will cause the temperature in these chambers to rise and may result in failure When starting or stopping the equipment monitor the op...

Page 9: ...it breakers are ON This may result in failure Certain units also have a control power source switch 8D This switch has the same functions as the switch 8A When operating the keys on the graphic display panel hold down the key for at least 0 5 second The operation may not be performed if the key is held down for shorter periods of time When operating the reset key on the graphic display panel hold ...

Page 10: ...el Resetting restarting the UPS without removing the memory card will delete the data needed to determine the cause of the failure Do not leave the unit for long periods of time 1 week with control power source switch 8A in the OFF position This can cause the backup capacitor on the control board to become discharged and result in incorrect time display and other problems PROHIBITED ...

Page 11: ...ation 25 8 1 Types of Operation 26 8 2 Pre operational check 26 8 3 Procedures 27 8 3 1 Startup 27 8 3 2 Switch Power Supply UPS Bypass 31 8 3 3 Stop 32 8 3 4 Complete Shutdown 34 8 3 5 Changing Between Floating Charge and Equalized Charge For HS or AHH individual battery systems 36 8 3 6 Changing to Floating Charge etc for MSE individual battery 38 8 3 7 Changing the Power Supply to Maintenance B...

Page 12: ...d inserting removing memory cards Do not open the rear door WARNIN G The parts inside carry high voltage Touching them may result in electric shock burns or failure CAUTION Make sure the air vents on the front and top of the unit are not blocked Blocking the vents will cause the temperature inside the unit to rise and may result in fire or unit failure Example 300 kVA Channel base Front air vent F...

Page 13: ...N when control power source switch 8A is OFF This may result in failure Do not turn the control power source switch 8A to the OFF position when the circuit breakers are ON This may result in failure Certain systems are also provided with a control power source switch 8D This switch has the same functions as the switch 8A If an MCCB with auxiliary handles is used as the circuit breaker use the auxi...

Page 14: ...ugh this circuit breaker ON f 52M Maintenance bypass AC circuit breaker When bypass power is supplied for UPS maintenance power is supplied to the load through this circuit breaker OFF g 52L AC output circuit breaker While UPS power or bypass power is supplied power is supplied to the load through this circuit breaker ON h 8A Control power source switch When AC input is normal pressing this switch...

Page 15: ...l are shown in Figure 6 3 1 For the functions of each of the controls see Section 6 3 1 Panel Key switch and Section 6 3 2 Panel Keys NOTE Figure 6 3 1 Panel Controls For individual battery systems For HS or AHH batteries Do not use the keypad on graphic display panel l This keypad is used to change the internal settings and should only be used by maintenance personnel It is not used during normal...

Page 16: ...t to the OPERATION position 6 3 2 Panel Keys Table 6 3 shows the functions of the keys on the graphic display panel NOTES When operating the keys on the graphic display panel hold down the key for at least 0 5 second When operating the reset key on the graphic display panel hold down the key for at least 5 seconds The operation may not be performed if the key is held down for shorter periods of ti...

Page 17: ...ets the Failure Data screen and Warning Data screen shown on the LCD For details see Section 9 2 4 Scrolling Through LCD Screens in the Event of Failure on Page 47 and Section 7 2 4 Changing the LCD Screen switching on page 24 Pressing this key when a power outage has occurred during DC operation causing a trip error and stopping the UPS For special systems in which a separate DC UPS is connected ...

Page 18: ...ery systems This will be the FLOAT key for MSE individual battery systems Figure 7 1 1 Graphic Display Panel Controls For HS or AHH battery 22 19 20 21 15 16 12 11 13 14 18 17 23 SCROLL UPS SUPPLY WARNING FAULT OPERATION OPERATION INHIBITED RUN STOP UPS EQUAL FLOAT CHARGE AC SWITCH FAULT BYPASS UPS RESET AC OUTPUT AC SWITCH AC INPUT CONVERTER INVERTER BATTERIES DISCHARGE FLOATCHARGE EQUALCHARGE UP...

Page 19: ...e equalized charge mode and the protection charge mode SCROLL UPS SUPPLY WARNING FAULT OPERATION OPERATION INHIBITED RUN STOP UPS AC SWITCH FAULT BYPASS UPS RESET AC OUTPUT AC SWITCH AC INPUT CONVERTER INVERTER BATTERIES DISCHARGE FLOATCHARGE UPS BYPASS BYPASS INPUT 22 19 20 15 16 12 11 13 14 18 17 23 24 25 ...

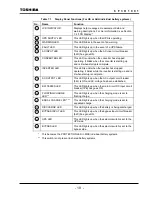
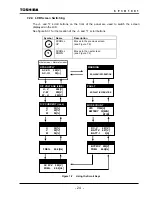
Page 20: ...operating It blinks while the inverter is starting up and is lit when startup is complete 18 AC OUTPUT LED This LED lights up when the AC output circuit breaker 52L is ON and AC voltage has been established 19 BATTERIES LED This LED lights up when the main circuit DC input circuit breaker 72B has goes ON 20 FLOATING CHARGE LED This LED lights up when the charging mode is set to floating charge 21 ...

Page 21: ...and measurement value display 2 Failure Data Display screen Displays detailed data when a failure occurs 3 Warning Data Display screen Displays detailed data when a warning occurs The operator can switch between these screens by pressing the scroll keys Normal Display screen Failure Data Display screen Warning Data Display screen Scroll up Scroll down ...

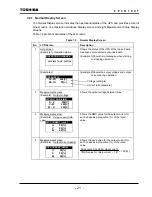
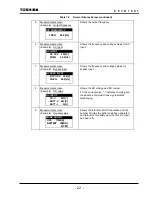
Page 22: ...xample 2 Shows the output voltage and output current during operation Voltage example Current ratio example 2 Measurement screen Example Output voltage Shows the output voltage between lines 3 Measurement screen Example Output current RMS value Shows the RMS value for the output current for each phase as a proportion of the rated value 4 Measurement screen Example Output current peak Shows the pea...

Page 23: ... Example DC value Shows the DC voltage and DC current For the current value indicates charging and the absence of a plus minus sign indicates discharging 9 Measurement screen Example Counter value Shows the total time of UPS operation and the number of times the battery has been operated and total time for battery use the time AC input has been off O P FREQUENCY FREQ 60 0 Hz AC INPUT AC I P V 200 ...

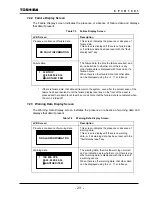
Page 24: ...l the failure display reset key on the front of the panel is pressed and held down for at least 5 seconds Note that the failure data is not deleted when the unit is turned off 7 2 3 Warning Data Display Screen The Warning Data Display screen indicates the presence or absence of warning data and displays that data if present Table 7 4 Warning Data Display Screen LCD Screen Description Presence or a...

Page 25: ...N Moves to the next screen see Figure 7 2 Initial screen Normal screen UPS SUPPLY AC VO 200 V AC I O 50 O P VOLTAGE LINE U V 200 V V W 200 V W U 200 V FAULT NO FAULT INFORMATION MODE COUNT UPS 17544 H BATTERY 32 MIN 0 TIM O P CURRENT r m s U 50 V 50 W 50 O P CURRENT PEAK U 50 V 50 W 50 DC INPUT DC V 401 V BATT V 401 V BATT I 0 A WARNING NO ALARM INFORMATION O P FREQUENCY FREQ 60 0 Hz AC INPUT AC I...

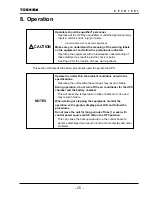
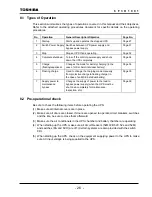
Page 26: ...the basic procedures used to operate the UPS Operate the unit within the ambient conditions noted in the specifications Operating the unit outside these ranges may result in failure During operation do not turn off the air conditioner for the UPS chamber and the battery chamber This will cause the temperature in these chambers to rise and may result in failure When starting or stopping the equipme...

Page 27: ...ode manually from protective charge to floating charge in the case of an MSE individual battery Page 39 7 Supply power to maintenance bypass Changes the supply of power to the load to bypass power supply when the UPS must be shut down completely for maintenance inspection etc Page 39 8 2 Pre operational check Be sure to check the following items before operating the UPS 1 Make sure all internal co...

Page 28: ... the precharge circuit switch 6CH The control power supply switch 8A is left in the on state Do not turn this switch off BYPASS MOVE 6CH TO ON POSITION BYPASS WAIT FOR A WHILE OPERATION GUIDANCE MOVE 52C AND 52L TO ON POSITION The BYPASS LED lit BATTERIES AC SWITCH UPS BYPASS DISCHARGE FLOAT CHARGE EQUAL CHARGE AC INPUT CONVERTER INVERTER AC OUTPUT BYPASS INPUT The BYPASS INPUT and The OUTPUT LEDs...

Page 29: ... following message appears on the display MOVE 52R TO ON POSITION BYPASS BYPASS BYPASS MOVE 52R TO ON POSITION WAIT FOR A WHILE PRESS RUN SWITCH BATTERIES AC SWITCH UPS BYPASS DISCHARGE FLOAT CHARGE EQUAL CHARGE AC INPUT CONVERTER INVERTER AC OUTPUT BYPASS INPUT BATTERIES AC SWITCH UPS BYPASS DISCHARGE FLOAT CHARGE EQUAL CHARGE AC INPUT CONVERTER INVERTER AC OUTPUT BYPASS INPUT BATTERIES AC SWITCH...

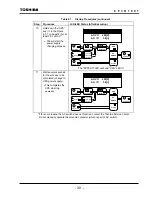
Page 30: ...turn on the main circuit DC input circuit breaker 72B The BATTERIES and FLOAT CHARGE LEDs lit BYPASS BYPASS BYPASS UPS START UP MOVE 72B TO ON POSITION AC VO 200 V AC I O 50 PRESS UPS SWITCH BATTERIES AC SWITCH UPS BYPASS DISCHARGE FLOAT CHARGE EQUAL CHARGE AC INPUT CONVERTER INVERTER AC OUTPUT BYPASS INPUT BATTERIES AC SWITCH UPS BYPASS DISCHARGE FLOAT CHARGE EQUAL CHARGE AC INPUT CONVERTER INVER...

Page 31: ...change to UPS power supply This completes the UPS staartup operation If for some reason the AC switch dose not function contact the Toshiba Service Center Do not manually operate the solenoid contactor which is part of AC switch UPS SUPPLY AC VO 200 V AC I O 50 UPS SUPPLY AC VO 200 V AC I O 50 BATTERIES AC SWITCH UPS BYPASS EQUAL CHARGE DISCHARGE FLOAT CHARGE AC INPUT CONVERTER INVERTER AC OUTPUT ...

Page 32: ...to be completed Change to bypass power supply is completed To change from bypass to UPS power supply use the procedure starting with Step 10 in Table 8 1 on page 30 If for some reason the AC switch dose not function contact the UPS SUPPLY BYPASS BYPASS AC VO 200 V AC I O 50 AC VO 200 V AC I O 50 PRESS UPS SWITCH AC VO 200 V AC I O 50 PRESS UPS SWITCH BATTERIES AC SWITCH UPS BYPASS DISCHARGE FLOAT ...

Page 33: ... 32 6 F 3 H 1 0 0 1 Toshiba Service Center Do not manually operate the solenoid contactor which is part of AC switch ...

Page 34: ... 14 for at least 0 5 second The FLOAT CHARGE and CONVERTER and INVERTER LEDs unlit BYPASS BYPASS AC VO 200 V AC I O 50 PRESS UPS SWITCH RESTART PRESS RUN SWITCH SHUTDOWN MOVE 72B TO OFF AC SWITCH UPS BYPASS BATTERIES DISCHARGE FLOAT CHARGE EQUAL CHARGE AC INPUT CONVERTER INVERTER AC OUTPUT BYPASS INPUT BATTERIES AC SWITCH UPS BYPASS DISCHARGE FLOAT CHARGE EQUAL CHARGE AC INPUT CONVERTER INVERTER A...

Page 35: ...YPASS RESTART PRESS RUN SWITCH SHUTDOWN MOVE 52R TO OFF BYPASS RESTART PRESS RUN SWITCH SHUTDOWN MOVE 52R TO OFF BATTERIES AC SWITCH UPS BYPASS DISCHARGE FLOAT CHARGE EQUAL CHARGE AC INPUT CONVERTER INVERTER AC OUTPUT BYPASS INPUT BATTERIES AC SWITCH UPS BYPASS DISCHARGE FLOAT CHARGE EQUAL CHARGE AC INPUT CONVERTER INVERTER AC OUTPUT BYPASS INPUT The BATTERIES LED unlit ...

Page 36: ... 52L 7 Turn off the Bypass input circuit breaker 52C BATTERIES AC SWITCH UPS BYPASS DISCHARGE FLOAT CHARGE EQUAL CHARGE AC INPUT CONVERTER INVERTER AC OUTPUT BYPASS INPUT BATTERIES AC SWITCH UPS BYPASS DISCHARGE FLOAT CHARGE EQUAL CHARGE AC INPUT CONVERTER INVERTER AC OUTPUT BYPASS INPUT BATTERIES AC SWITCH UPS BYPASS DISCHARGE FLOAT CHARGE EQUAL CHARGE AC INPUT CONVERTER INVERTER AC OUTPUT BYPASS...

Page 37: ...r supply switch 8A to the OFF position Complete shutdown Nothing at all is displayed on the LCD and all LEDs are unlit This operation is different from that displayed in the help message on the screen Be sure to perform the operation as described here BATTERIES AC SWITCH UPS BYPASS DISCHARGE FLOAT CHARGE EQUAL CHARGE AC INPUT CONVERTER INVERTER AC OUTPUT BYPASS INPUT OPERATION GUIDANCE MOVE 6CH TO...

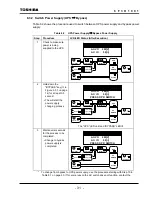
Page 38: ...te The EQUAL CHARGE LED lit The FLOAT CHARGE LED unlit In equalized charge mode the battery is charged for a set period of time at a voltage about 5 depending on the type of battery higher than normal floating charge in order to prevent variations in battery performance This must be done about once every six months in spring and autumn if possible The TOSNIC 7000S UPS is equipped with a function t...

Page 39: ...g From Equalized Charge to Floating Charge Step Procedure LCD LED Status After Execution 1 Check to make sure that the EQUAL CHARGE LED is lit 2 Hold down the FLOAT EQUAL key h in Figure 6 3 1 on page 14 for at least 0 5 second Change to floating charge is complete The FLOAT CHARGE LED lit The EQUAL CHARGE LED unlit UPS SUPPLY UPS SUPPLY AC VO 200 V AC I O 50 AC VO 200 V AC I O 50 BATTERIES AC SWI...

Page 40: ...e has elapsed about 6 hours if the BATT FAULT1 BATTERY OVER TEMP warning message has disappeared the mode will automatically change back to floating charge As a result it will not normally be necessary to change the mode manually as described below Table 8 7 Changing from Protective Charge to Floating Charge Step Procedure LCD LED Status After Execution 1 Check to make sure that the PROTECTION LED...

Page 41: ... Section 8 3 4 Stop 4 Turn ON maintenance bypass AC circuit breaker 52M 5 Perform steps 6 through 11 in Table 8 4 Complete Shutdown on page 34 to shut down the UPS completely Change to maintenance bypass power supply complete When the UPS is shutdown completely nothing at all will be displayed on the LCD screen and all LEDs will be unlit During load operation always operate the circuit breakers in...

Page 42: ...ON 52M OFF UPS power supply is disabled when the 52M circuit breaker is in the on state This operation is different from that displayed in the help message on the screen Be sure to perform the operation as described here BATTERIES AC SWITCH UPS BYPASS DISCHARGE FLOAT CHARGE EQUAL CHARGE AC INPUT CONVERTER INVERTER AC OUTPUT BYPASS INPUT BATTERIES AC SWITCH UPS BYPASS DISCHARGE FLOAT CHARGE EQUAL C...

Page 43: ... 1 Converter stop Input power error The converter has been stopped and power is being supplied from the battery When the warning has been corrected power is automatically supplied from AC input 3 Warning 2 Stop and restart The unit changes to bypass power supply and the UPS stops operating When the warning has been corrected the unit will automatically be restarted and revert to UPS power supply 4...

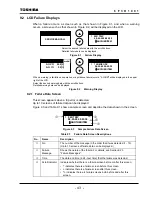
Page 44: ...mple screen and describe the data shown in the screen Figure 9 3 Sample Failure Data Screen Table 9 1 Failure Data Screen Descriptions No Name Description c No The number of the message in the order that it was detected 1 10 Up to 10 screens of failure data can be displayed d Failure Message Shows the nature of the failure For details see Section 9 2 3 Failure Messages e Time The date and time in ...

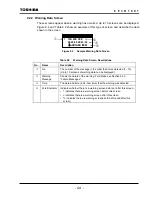
Page 45: ...der that it was detected 1 10 Up to 10 screens of warning data can be displayed d Warning Message Shows the nature of the warning For details see Section 9 2 3 Failure Messages e Time The date and time in 24 hour time that the warning was detected f Scroll indicator Indicates whether there is a warning screen before or after this screen indicates there is a warning screen before this screen indica...

Page 46: ... protective configuration shown in Figures 9 6 UPS units can be shipped with different protective configurations from the standard if this is specified by the customer See the protective configuration indicated on the elementary wiring diagram created for each UPS unit shipped Figure 9 6 Protective Detector Locations 95S 27S 59S 52RT 51CO 51C 52R 30MU 86MU 48S 76CH 76 72BO 72BT 80B1 80B2 CONVERTER...

Page 47: ...ndication Description 1 27S AC I P UV AC input voltage is low 2 59S AC I P OV AC input voltage is high 3 95S I P FREQ ERR AC input frequency error Table 9 6 Warning 2 Stop and restart Item LCD Message Indication Description 1 27I AC O P UV AC output voltage is low 2 59I AC O P OV AC output voltage is high 3 51L AC O P OL Load is too high 4 51I AC O P OC Load overcurrent 5 51IO INV OC Inverter over...

Page 48: ...2B has gone off during operation Including operation error 4 26B BATT FAULT1 Battery temperature has risen 5 33B BATT FAULT2 Battery fluid level has gone below prescribed level 6 80B2 BATT UV ALM Battery voltage is near discharged voltage 7 76CH BATT OC Charging current is high 8 47R AC PHASE ERR Phase ration of AC input is reserved 9 47C BYPASS ERR Phase ration of bypass input is reserved 10 48S ...

Page 49: ...e LCD screens when a failure has occurred in other words when Failure Data screens exist Figure 9 8 shows the locations of the scroll keys used to scroll through the LCD screens See Table 9 9 and Figure 9 9 for a discussion of the scroll keys and how they are used for screen scrolling Note that pressing the RESET key k will delete the waveform data stored on the memory card as well as the Failure ...

Page 50: ...letes the stored waveform and failure and warning data from the memory card Remarks See section 7 2 1 on page 21 Normal Display Screen for details on the content of the Normal Display screen i ii etc represent the order in which the failures occurred Normal Data Display screen Failure Data Display screen Warning Data Display screen ii i ii i Figure 9 9 Changing Screens with Scroll Keys ...

Page 51: ...fy that the memory card write LED shown in Figure 9 10 goes out 3 Insert a new memory card 4 Close the door 5 Give the memory cards that you have removed to the serviceman Table 9 10 Functions of the Memory Card Unit Name Description c Memory card Records failure data and waveforms This memory card can record the data for four events d Memory card eject button Pressing this button ejects the memor...

Page 52: ... if you wish to move the unit Only open the front panel when performing necessary operations Operating parts and high voltage areas inside the UPS have been provided with covers as a safety precaution Still touching areas other than those that must be touched to perform necessary operations may result in electric shock burns or other injuries In this case necessary operations means operating circu...

Page 53: ...low the directions given by Service Center personnel In the case of other failures as well restore by doing the following 1 Check the nature of the failure on the LCD screen 2 Contact the Toshiba Service Center 3 Follow the directions given by Service Center personnel Note Before removing the memory card always verify that the memory card write LED shown in figure 9 10 is not lit BATTERIES AC SWIT...

Reviews: