background image


1

Introduction

Congratulations on choosing the TS 921, which is customised 
for Vodafone live!

We hope that you will be pleased with this new wireless phone 
incorporating 3G technology, also known as UMTS. This phone 
provides advanced entertainment features including video telephony, 
video messaging and high-speed access to Vodafone live! 

The TS 921 has a sophisticated design, high-quality 260,000 colour 
display and 1.92 mega pixel camera. Furthermore, you can rotate the 
colour display to suit your needs.

Copyright©2005 TOSHIBA CORPORATION, All rights reserved.

Network services

To use the phone you must have service from a wireless service 
provider. Many of the features in this device depend on features in the 
wireless network to function. These Network Services may not be 
available on all networks or you may have to make specific 
arrangements with your service provider before you can utilize 
Network Services. Your service provider may need to give you 
additional instructions for their use and explain what charges will 
apply. Some networks may have limitations that affect how you can 
use Network Services. For instance, some networks may not support 
all language dependent characters and services.

This wireless device is a 3GPP GSM Release 99 terminal supporting 
GPRS service, and is designed to support also Release 97 GPRS 
networks. However, there may be some compatibility issues when 
used in some Release 97 GPRS networks. For more information, 
contact your service provider.

Summary of Contents for TS 921

Page 1: ...provider Many of the features in this device depend on features in the wireless network to function These Network Services may not be available on all networks or you may have to make specific arrangements with your service provider before you can utilize Network Services Your service provider may need to give you additional instructions for their use and explain what charges will apply Some netwo...

Page 2: ...d not sold You acknowledge that no title to the intellectual property in the Software is or will be transferred to you You further acknowledge that title and full ownership rights to the Software will remain the exclusive property of Toshiba Toshiba s affiliates and or their suppliers and you will not acquire any rights to the Software except as expressly set out in this EULA You may keep a back u...

Page 3: ...ANY THE ABOVE DISCLAIMER AND LIMITATION DOES NOT EXCLUDE OR LIMIT A LIABILITY FOR DEATH OR PERSONAL INJURY CAUSED BY NEGLIGENCE OR B ANY MANDATORY LEGAL RIGHT OR LIABILITY TO THE EXTENT THAT IT CANNOT BE LAWFULLY EXCLUDED OR LIMITED UNDER APPLICABLE LAW PLEASE MAKE AND RETAIN A COPY OF ALL DATA YOU HAVE INSERTED INTO YOUR PRODUCT FOR EXAMPLE NAMES ADDRESSES PHONE NUMBERS PICTURES RINGTONES ETC BEF...

Page 4: ...4 10 IF YOU ARE DEALING AS A CONSUMER IN THE UK THE SOFTWARE QUALIFIES AS GOODS YOUR STATUTORY RIGHTS UNDER APPLICABLE LAW ARE NOT AFFECTED ...

Page 5: ...FR IE IT NL PT ES SE GB and other patents pending Powered by Mascot Capsule Micro3D Edition Mascot Capsule is a registered trademark of HI Corporation 2002 2003 HI Corporation All Rights Reserved THIS PRODUCT IS LICENSED UNDER THE MPEG 4 VISUAL PATENT PORTFOLIO LICENSE FOR THE PERSONAL AND NON COMMERCIAL USE OF A CONSUMER FOR i ENCODING VIDEO IN COMPLIANCE WITH THE MPEG 4 VISUAL STANDARD MPEG 4 VI...

Page 6: ...RTICULAR PURPOSE ARE DISCLAIMED IN NO EVENT SHALL THE OpenSSL PROJECT ERIC YOUNG OR ITS CONTRIBUTORS BE LIABLE FOR ANY DIRECT INDIRECT INCIDENTAL SPECIAL EXEMPLARY OR CONSEQUENTIAL DAMAGES INCLUDING BUT NOT LIMITED TO PROCUREMENT OF SUBSTITUTE GOODS OR SERVICES LOSS OF USE DATA OR PROFITS OR BUSINESS INTERRUPTION HOWEVER CAUSED AND ON ANY THEORY OF LIABILITY WHETHER IN CONTRACT STRICT LIABILITY OR...

Page 7: ...7 ...

Page 8: ...rise with either of these items and allow their experts to handle the phone instead Do not mishandle or abuse the phone Dropping it knocking or shaking it can damage the internal circuits Do not use harsh chemicals strong detergents or cleaning solvents to clean the phone If you must clean it then use a soft clean dry lint free cloth Do not apply paint or other such substances to the phone This co...

Page 9: ...not occur in a particular installation if this equipment does cause harmful interference to radio or television reception which can be determined by turning the equipment off and on the user is encouraged to try to correct the interference by one or more of the following measures 1 Reorient relocate the receiving aerial 2 Increase the separation between the equipment and receiver 3 Connect the equ...

Page 10: ...phony 83 About Video Calls 84 Making a Video Call 85 Answering a Video Call 86 Convenient Functions for Video Calls 87 Video Call Settings 91 3 Camera Video Camera 97 Camera 98 Pictures 102 Videos 116 Picture Video Settings 120 4 Messaging 131 Messaging Capabilities 132 MMS 133 SMS 144 MMS SMS Common Operations 150 Email 157 Postcard 165 live Studio 169 5 Vodafone live 171 Accessing Vodafone live ...

Page 11: ...k Internet 254 8 Convenient Functions 261 SIM Tool Kit 262 Calendar 263 Alarms 267 Calculator 269 Converter 270 Voice Recorder 271 Countdown Timer 273 Notepad 274 World Clock 275 Multi Task 276 Barcode 278 Torch 281 9 File Transfer Synchronisation 283 File Transfer 284 File Synchronisation 300 10 Appendix 305 Troubleshooting 306 Specifications Accessories 308 EU Warranty 309 Index 310 Glossary 314...

Page 12: ...t s in the Box Your box contains the following items Phone AC Adapter SD Memory Card 32MB CD ROM Battery Pack Battery Cover User Guide Quick Start Guide Stereo Handsfree Headset Video Cable for TV Connection ...

Page 13: ... This Chapter Parts Functions Accessing Functions SIM Card Making a Call Emergency Calls Answering a Call Battery Pack Operations during Calls Memory Card Call Log Turning On Off the Power Optional Services System Mode Setting Character Input Language Setting Contacts List Date Time Settings ...

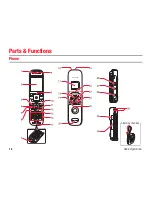
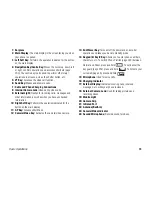
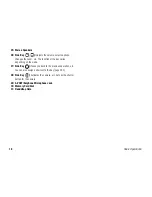
Page 14: ...14 Basic Operations Parts Functions Phone Attaching the Strap ...

Page 15: ...ked information 10 Right Soft Key Performs the operation indicated for the button on the main display 11 AP Key Accesses Multi Task 12 Camera Video Key Activates the camera video camera 13 End Power Key Turns on off the power and ends calls operations and takes you back to standby mode 14 Keypad Key Key Allows you to enter phone numbers characters etc To switch Phone Profiles page 222 between Norm...

Page 16: ...e function of the key varies depending on the mode 27 Side Key Takes you back to the previous operation etc You can also assign a shortcut to the key page 232 28 Side Key Activates the camera etc Acts as the shutter button for the camera 29 AV OUT Earphone Microphone Jack 30 Memory Card Slot 31 Handstrap Hole ...

Page 17: ...GPRS network GPRS Data Connection Established Indicates you can perform data communication on the GPRS network 4 Limited Service Indicates you are out of the service area of the service provider with which you have concluded a contract When this indicator is displayed only emergency services can be called 3G Network Connection Roaming Indicates a 3G network connection or roaming GSM Network Connec...

Page 18: ...used Java application page 184 7 Memory Card Inserted Write Protected Indicates the status of the memory card page 30 8 Playing Media File Indicates a media file is being played Silent Car Meeting Indicates the profile set for Phone Profiles page 222 9 MMS Priority Level Indicates the reception of a message with a high priority level Rights Object Indicates the reception of a rights object New or ...

Page 19: ...er Silent or Vibration is set page 225 15 Information Prompt Indicates a missed call unread message etc 16 Message Received Indicates a recorded message at the Voicemail Centre page 47 Missed Call Indicates a missed call 17 SMS and MMS Inbox Full Indicates the SMS page 147 and MMS page 138 Inbox is full 18 Call Diverting without Ringing Set for Voice Call Video Call Voice and Video Calls Indicates...

Page 20: ...ntifying GPRS Network Location Information Indicates you can establish a connection on the GPRS network GPRS Data Connection Established Indicates you can perform data communication on the GPRS network 5 Limited Service Indicates you are out of the service area of the service provider with which you have concluded a contract When this indicator is displayed only emergency services can be called 3G...

Page 21: ...icates the reception of a rights object New or Unread MMS SMS Indicates a new or unread MMS message page 138 or SMS message page 147 WAP Indicates a new or unread WAP Push message page 148 11 Playing Media File Indicates a media file is being played Silent Car Meeting Indicates the profile set for Phone Profiles page 222 12 Web SSL Indicates a connection to a Web page with security protection Exte...

Page 22: ...wing items Missed Calls Notifies of missed calls page 43 New SMS Notifies of new SMS page 147 New MMS Notifies of new MMS page 138 New WAP Push Notifies of new WAP Push page 148 New Notifications Notifies of new messages page 139 New Reports Notifies of unread report messages pages 142 149 Voicemail Notifies of new messages at the Voicemail Centre page 47 Stop Snooze Notifies of an activated alarm...

Page 23: ...sponding or Using the Navigation Key The navigation key allows you to perform various operations such as moving the cursor up down left or right With you can display the Main menu confirm the selected item perform the selected operation etc If you press in standby mode you can display the shortcut screen page 231 and use shortcuts ...

Page 24: ...in this manual assume that your phone is in the open style Tip If you switch to turnover style during a voice or video call the outgoing sound is muted Open your phone until the display is at an angle of 90 degrees to the keyboard Rotate the display 180 degrees clockwise Turnover Style Convenient for taking pictures and recording videos at high resolutions Open Style Open your phone until it reach...

Page 25: ...ard in a SIM card compatible phone If the SIM card is not inserted the phone cannot be used Inserting Removing the SIM Card Before inserting or removing the SIM card remove the battery pack For details on removing the battery pack see page 28 1 Open the battery cover and remove the battery pack 2 With the IC surface facing downwards insert the SIM card in the direction shown on the left while keep...

Page 26: ... to use your phone each time the power is turned on You can change the initial number set at the time of purchase page 247 PIN2 Code This is a four to eight digit security code that needs to be entered for operations such as modifying data saved to the SIM card You can change the initial number set at the time of purchase page 247 PUK Personal Unblocking Key Code If the PIN code or PIN2 code is in...

Page 27: ...service providers For details on services contact the service provider 1 While in a service area confirm that your phone is turned on 2 Dial the phone number for an emergency service 3 Press Note Most GSM Networks support the internationally recognized emergency numbers of 112 and 911 for the USA consult your service provider in the country you are in for the correct number to dial in an emergency...

Page 28: ... and slide it towards the bottom of your phone 2 Lift off the battery cover 3 Insert the battery pack while making sure the socket on the bottom of the battery pack is aligned with the connector in the battery compartment To remove the battery pack insert a fingernail beneath the side or bottom tab and lift out the battery pack 4 Place the battery cover on your phone and slide it until it clicks i...

Page 29: ...connector of the AC adapter 3 Insert the plug of the AC adapter into an AC outlet The charging indicator lights up and charging begins 4 After the charging indicator goes out remove the plug of the AC adapter from the AC outlet Remove the connector of the AC adapter from your phone while pressing the release buttons on the sides of the connector ...

Page 30: ... with a storage capacity of up to 1GB There is no guarantee that all memory cards will work with your phone because an operation check has not been performed for all memory cards Inserting Removing the Memory Card 1 Open the memory card slot cover 2 Gently push the memory card into the slot until it clicks into position To remove the memory card gently press the memory card When you let go the mem...

Page 31: ...and hold Turning Off the Power 1 In standby mode press and hold The Power Off screen appears and the power is turned off Note A screen for setting the date and time appears the first time you turn on the power of your phone Set the date and time while referring to Date Time Settings page 34 Touching the built in antenna part of your phone affects signal strength Avoid touching this part of your ph...

Page 32: ...ions System Mode Setting Your phone is UMTS 3G GSM dual mode compatible Before using your phone you can set which system mode your phone uses For details on setting the system mode see Setting the System Mode page 256 ...

Page 33: ...Basic Operations 33 Language Setting You can change the language displayed on your phone For details on setting the language see page 230 ...

Page 34: ...and press OK Tip You can enter a date from 2 1 2000 to 30 12 2099 Enter the time in accordance with the 24 hour system You can switch the clock display between the 12 hour and 24 hour system page 217 Note When you set the date and time displayed in standby mode to the summer time set the DST setting to On page 36 If the DST setting is left set to Off the correct reception date and time cannot be d...

Page 35: ...e City Alternate City 1 In standby mode press select Settings and press Select 2 Select Phone Settings and press Select 3 Select Date Time and press Select 4 Select World Clock and press Select 5 Select Set Home City or Set Alternate City and press Select 6 Use to select the city you want to set and press A green circle indicates your home city on the map A red circle indicates the alternate city ...

Page 36: ...nter the time difference and press twice Setting the Daylight Saving Time DST You can set the summer time 1 After Step 5 of Setting the Home City Alternate City page 35 press Options 2 Select DST On Off and press Select 3 Select On or Off and press Select Tip If the DST setting is set to On the indicator appears on the display when you set page 35 or display page 275 the world clock The indicator ...

Page 37: ...tions page 173 Media Player Allows you to play audio and video files page 187 Messaging Allows you to create MMS SMS email messages You can also check received and sent MMS SMS email messages page 131 Camera Allows you to take pictures and record videos page 97 My Items Allows you to check the pictures you took videos you recorded and other data stored in data folders page 195 Organiser Tools Allo...

Page 38: ...ract It is required to use functions and perform operations on your phone Centre Access Code Your centre access code is the four digit number you selected when you concluded your contract It is required to perform optional service operations from a fixed line phone Call Barring Service Code Your call barring service code is the four digit number you selected when you concluded your contract It is ...

Page 39: ...r If the other party s phone number begins with 0 omit the first 0 3 Press Sending Tones You can send DTMF tones by pressing digit keys during a call To disable the sending of DTMF tones press Options during a call and select DTMF Off Tip You can perform the following operations if you press Options after entering a phone number in standby mode Voice Call Makes a voice call Video Call Makes a vide...

Page 40: ...ll You can manually reject an incoming call To automatically reject calls from specific phone numbers add the phone numbers to the Rejection list page 243 1 A call is received 2 Press Tip To adjust the ringtone volume while a call is being received use or the side keys and To set the ringtone volume to mute press and hold the side key If you miss a call the information prompt page 22 appears You c...

Page 41: ...Contacts list page 78 Call Log Allows you to access the call log page 43 Voice Record Records the other party s voice page 42 My Details Displays the owner information page 81 DTMF Off On Allows you to disable or enable the sending of DTMF tones page 39 Tip You can receive messages during voice calls and receive voice calls while accessing the Web This function is only available while you are in a...

Page 42: ...cord the other party s voice during a call The maximum length of one recording during a call is 60 seconds 1 Press Options during a call 2 Select Voice Record and press Select After the maximum length of recording time elapses or the call ends recording stops and the recording data is saved to the Recordings folder automatically Tip To adjust the earpiece volume in standby mode press and hold or a...

Page 43: ...itch from the Dialled Numbers screen to the Missed Calls screen or Received Calls screen use Tip You can perform the following operations if you press Options while viewing dialled numbers missed calls or received calls View Displays the details Voice Call Makes a voice call Video Call Makes a video call page 85 Send Message Allows you to create an SMS MMS message pages 133 144 Save to Contacts Sa...

Page 44: ...ll Costs You can view the cost for the last call or the total costs for all calls Viewing Last Call All Calls 1 In standby mode press select Contacts and press Select 2 Select Call Log and press Select 3 Select Call Costs and press Select The Call Costs list appears 4 Select Last Call or All Calls and press Select To reset the call costs select Reset Costs Note For accurate information on call cos...

Page 45: ...he Call Costs list page 44 select Cost Unit and press Select The currency and rate appear Setting Call Cost Display You can set whether to display the call cost after a call ends 1 From the Call Costs list page 44 select Call Cost Display and press Select 2 Select On or Off and press Select ...

Page 46: ...the last session or all sessions Viewing Last Data All Data 1 In standby mode press select Contacts and press Select 2 Select Call Log and press Select 3 Select Data Counter and press Select 4 Select Last Data or All Data and press Select To reset the data transfer volume select Reset Data Counts ...

Page 47: ...oicemail Settings screen appears 5 Select Registration and press Select 6 Select the diverting condition you want to set and press Request Select All Calls Diverts a call without your phone ringing When Busy Allows you to press Busy to divert an incoming call Not Reachable Diverts a call when your phone is out of range or the power is off No Answer Diverts a call if you do not answer it within the...

Page 48: ...il and press Select 4 Select Call Voicemail and press Call Follow the voice prompts of the Voicemail Centre Stopping the Voicemail Service 1 From the Voicemail Settings screen page 47 select Deactivate and press Request After a network connection is established the settings complete screen appears Tip To listen to your voicemail from standby mode press and hold ...

Page 49: ...l Services Allows you to set the Call Divert services for all incoming calls Voice Call Allows you to set the Call Divert service for voice calls Video Call Allows you to set the Call Divert service for video calls Fax Allows you to set the Call Divert service for fax communication Data Call Allows you to set the Call Divert service for data communication Tip To confirm the status of all call dive...

Page 50: ...Diverts a call when your phone is out of range or the power is off All Conditional Diverts a call that meets any of the other conditions except All Calls 6 Select an input method for the phone number and press Select From Contacts Allows you to select a phone number from the Contacts list page 74 Set Number Allows you to directly enter a phone number for the divert destination From Call Log Allows...

Page 51: ...e page 49 select Deactivate All and press Request After a network connection is established the settings complete screen appears and all call divert services are stopped To stop call divert services individually select Deactivate after Step 4 of Starting the Call Divert Service page 49 and press Request ...

Page 52: ...g Calls and press Select 6 Select a barring condition and press Request All Calls Stops all outgoing and incoming calls International Stops all outgoing and incoming international calls Except Local Home Stops all outgoing international calls except those to your home network when you are abroad 7 Enter your call barring service code page 38 After a network connection is established the settings c...

Page 53: ...work connection is established the settings complete screen appears Changing Your Call Barring Service Code 1 From the Call Barring settings screen page 52 select Change Password and press Select 2 Enter your current call barring service code page 38 3 Enter your new call barring service code and press OK 4 Re enter your new call barring service code for confirmation and press OK After a network c...

Page 54: ...e caller s name and phone number are displayed Starting the Call Waiting Service 1 In standby mode press select Settings and press Select 2 Select Call Settings and press Select 3 Select Call Waiting and press Select The Call Waiting settings screen appears 4 Select Activate and press Request After a network connection is established the settings complete screen appears Tip To confirm the status o...

Page 55: ...t Answer and press Select or The original caller is placed on hold and a connection is established with the second caller Both names appear on the display 4 Press to switch between callers Stopping the Call Waiting Service 1 From the Call Waiting settings screen page 54 select Deactivate and press Request After a network connection is established the settings complete screen appears ...

Page 56: ...ss Options to perform one of the following operations Multiparty Allows you to perform the following operations Multiparty Allows you to talk to all parties simultaneously Private Allows you to talk to the selected party only private call Hold Places the selected party on hold Hold All Places all the parties on hold End Call Ends the call with the selected party End All Calls Ends the call with al...

Page 57: ...re the phone number dial if you want to notify the other party of your phone number and dial if you do not want to notify the other party of your phone number Call Costs Service This service allows you to set whether an estimate for the cost of a call is displayed on the display when the call ends 1 In standby mode press select Contacts and press Select 2 Select Call Log and press Select 3 Select ...

Page 58: ... in T9 mode page 59 abc Abc ABC Multi Tap mode Allows you to directly enter letters of the alphabet Each press of a digit key switches the letter to the next letter assigned to that key Select abc for all lowercase characters Abc for initial caps and ABC for all uppercase characters Symbols Symbol input mode Numeric Numeric input mode Tip You can perform the following operations in T9 mode or Mult...

Page 59: ...If you want to reconvert a word after it has been confirmed press highlight the word and press Entering Characters in Multi Tap Mode In Multi Tap mode you can enter a letter of the alphabet by pressing the digit key assigned to the letter as many times as necessary to display the letter 1 In a character input screen switch to Multi Tap mode page 58 2 Enter characters Example To enter toshiba press...

Page 60: ...er is assigned Text Editing Functions Copy Cut You can copy or cut a range of characters and store it in the clipboard You can store up to 20 data items excluding pictures in the clipboard 1 In a character input screen press Options select Copy or Cut and press Select 2 Use to move the cursor to the first character of the range you want to specify and press Start 3 Use to move the cursor to the la...

Page 61: ...ll as redo operations 1 In a character input screen enter characters 2 Press Options select Undo Redo and press Select Insert You can select information in the notepad page 274 Contacts list page 63 or My Details page 81 and insert it during character input 1 In a character input screen use to move the cursor to the position you want to insert an item 2 Press Options select Insert and press Select...

Page 62: ...se and press Select Adding a Word to the T9 Dictionary If you add an item to the T9 dictionary it will appear in the list of conversions when the matching characters are entered on future occasions 1 In a character input screen in T9 mode press Options select Add to Dictionary and press Select 2 Enter the word you want to add and press OK When you enter a word the mode switches automatically to Mu...

Page 63: ... page 43 Manage Category Displays the Category list for organising entries by category Manage Group Displays the Group list Groups allow you to send the same message simultaneously to multiple addresses Send My vCard Converts the owner information to vCard format and sends it to an external device Synchronise Synchronises the Contacts list My Details Displays the owner information and allows you t...

Page 64: ... phone number Email Allows you to enter up to three email addresses Add Info Allows you to enter additional address information Street Address Allows you to enter a street address City Allows you to enter a city name State Allows you to enter a state name Country Allows you to enter a country name Postcode Allows you to enter a postcode Job Title Allows you to enter a job title Create Contact Scre...

Page 65: ...ows you to set the ringtone and other settings for incoming calls Note Allows you to enter a reminder 4 Enter the item and press 5 Press Options 6 Select Save and press Select Adding an Entry from Standby Mode 1 In standby mode enter the phone number you want to add and press 2 Select Add New Contact and press Select To add the phone number to an existing Contacts list entry select Add to Existing...

Page 66: ...take a picture For details on taking pictures see page 102 After taking a picture press My Pictures Allows you to select a picture from My Items page 196 To select a file press 4 Press Options 5 Select Save and press Select Note Copyright protected picture files cannot be set If a video file is set as the ringtone the video is displayed for incoming calls and the picture set as the incoming pictur...

Page 67: ...e type select Set and set the volume Assign Ringtone Allows you to set the ringtone pattern for incoming calls or the ringtone duration for incoming messages Proceed from Step 4 of Personalising the Ringtone page 224 Vibration Allows you to set the vibration for incoming calls Select a ringtone type and select a vibration pattern 4 Press Back once or twice to return to the Create Contact screen 5 ...

Page 68: ...tegory you can set the incoming external light ringtone volume ringtone pattern and vibration Renaming a Category 1 In standby mode press select Contacts and press Select 2 Select Manage Category and press Select 3 Select a category and press 4 Press Options 5 Select Edit and press Select 6 Enter the category name and press 7 Select an icon and press Select 8 Press Options 9 Select Save and press ...

Page 69: ... are set to No Category Setting Options for a Category 1 After Step 3 of Renaming a Category page 68 select Category Options and press Options 2 Select Select and press Select 3 Proceed from Step 3 of Setting the Ringtone page 67 Note Preset categories cannot be deleted To set all Contacts list entries for a category to No Category select Reset after Step 1 Note The option settings for individual ...

Page 70: ...ge page 133 and Creating Sending an Email Message page 157 Adding a New Member to a Group 1 In standby mode press select Contacts and press Select 2 Select Manage Group and press Select 3 Select a group and press 4 Select Empty and press Options 5 Select Add and press Select 6 Select Name and press 7 Enter a name and press 8 Select Send to and press 9 Enter a phone number or email address and pres...

Page 71: ... the Contacts List 1 After Step 4 of Adding a New Member to a Group page 70 select Get Contacts and press Select 2 Select the member you want to add and press The details of the selected member appear 3 Select a phone number or email address and press ...

Page 72: ... you want to edit and press Options 2 Select Edit and press Select 3 Select the item you want to edit and press 4 Enter the item and press 5 Press Options 6 Select Save and press Select Tip You can perform the following operations after Step 1 View Displays the details of the member Delete Deletes the selected member ...

Page 73: ...Options 2 Select Rename and press Select 3 Enter the group name and press Resetting a Group 1 After Step 2 of Adding a New Member to a Group page 70 select the group you want to reset and press Options 2 Select Reset and press Select A confirmation screen appears 3 Press Yes The group name is reset and all members are deleted from the group ...

Page 74: ... the first name beginning with the letter of the alphabet entered Last Name Allows you to enter a letter of the alphabet The cursor moves to a Contacts list entry with the last name beginning with the letter of the alphabet entered Phone Number Displays the phone number input screen for entering a number After you enter a number press OK A list of Contacts list entries with phone numbers containin...

Page 75: ...Select SMS Allows you to create an SMS message page 144 MMS Allows you to create an MMS message page 133 Email Allows you to create an email message page 157 Tip To access the Web page select the URL in the details screen of the entry press Options and select Connect To display the Create Postcard screen page 166 select the postal address in the details screen of the entry press Options and select...

Page 76: ...4 Select Empty and press Add The Contacts list appears 5 Select the Contacts list entry to add to the Speed Calling list and press Using Speed Calling to Make Calls 1 In standby mode enter the speed calling number of the phone number you want to call 2 Press Note Only Contacts list entries in your phone can be added to the Speed Calling list Tip The speed calling number is indicated beside the ent...

Page 77: ...and press Select 3 Select a send method and press Select Via Infrared Sends the information by infrared page 293 Via Bluetooth Sends the information by Bluetooth page 289 Using Synchronise You can synchronise the Contacts list of your phone with a network server or data on a PC The supplied data management software My Mobile needs to be installed on the PC For details on the synchronisation proced...

Page 78: ...s a new entry Tip To edit the address category picture or settings press Options after Step 3 and select Edit Select the item you want to edit and press You can set the following options after Step 7 The options that are available vary depending on the item selected Edit Displays the input screen of the selected item Select Displays the screen for selecting the category ringtone and other options ...

Page 79: ...multiple Contacts list entries and you can perform each of the Delete Copy Move Send vCard View and Mark All operations on multiple Contacts list entries simultaneously Send vCard Converts a Contacts list entry to vCard format and sends it Memory Card Displays a list of Contacts list entries in the memory card Phone SIM Displays a list of Contacts list entries in the phone and SIM card Sort by All...

Page 80: ... 4 Select a default storage place and press Select Always Ask Asks you to select the storage place each time you save a new entry Phone Memory Saves all new entries to the Contacts list of your phone SIM Saves all new entries to the Contacts list of the SIM card Memory Card Saves all new entries to the Contacts list of the memory card Setting the Scroll Speed You can set the speed for scrolling up...

Page 81: ...lect 2 Select Memory Status and press Select Owner Information You can display and edit owner information such as the phone number and email address of your phone 1 In standby mode press select Contacts and press Select 2 Select My Details and press Select The owner information appears 3 Press Options 4 Select Edit and press Select Perform Steps 3 and 4 of Adding an Entry from the Main Menu page 6...

Page 82: ...82 Basic Operations ...

Page 83: ...ideo call allows both you and the other party to see each other s image during the call In This Chapter About Video Calls Making a Video Call Answering a Video Call Convenient Functions for Video Calls Video Call Settings ...

Page 84: ...e Mute My Voice Mute All Picture Quality Motion Prioritised Standard Mode Macro Mode Handsfree On Handsfree Handsfree Bluetooth connection Image Transfer Off Sending Picture Voice Connection Established Video Connection Established Note A video call is only possible in areas with 3G network coverage The video call function of your phone complies with the 3G 324M international standard for 3G mobil...

Page 85: ...lking The sound automatically switches from the earpiece to the speaker thus enabling you to begin a handsfree call When Appearance Check page 95 is set to On your image appears before the call is made After you have checked the image press OK 3 Press to end the call Note If a video call connection could not be established a message appears and a warning tone plays To make a voice call instead pre...

Page 86: ... handsfree call However if the phone profile page 222 is set to Silent when a video call is received the caller s voice is heard from the earpiece To switch the sound from the earpiece to the speaker press during a call To set image transfer from the camera to off so as you can answer the call as a voice call press instead of During the voice call the substitute picture set in the Outgoing Video s...

Page 87: ...esume a call placed on hold press Unhold Adjusting the Speaker Volume You can adjust the speaker volume during a call 1 Press the side key or during a call 2 Use or side keys and to adjust the volume Press or the side key to increase the volume level and press or the side key to decrease the volume level Turning On Off the Outgoing Voice You can turn on off the outgoing voice during a call To turn...

Page 88: ...eaker press or during a call Switching Cameras You can switch between the external camera and internal camera during a call To switch cameras press during a call Tip To cancel mute press Unmute If you switch to turnover style during a handsfree call only the output voice can be muted If you are using the supplied handsfree stereo headset or a Bluetooth device to input your voice the outgoing voice...

Page 89: ...and press Select Priority Incoming Displays a large incoming screen and a small outgoing screen Incoming Only Displays only the incoming screen Priority Outgoing Displays a small incoming screen and a large outgoing screen Outgoing Only Displays only the outgoing screen Turning On Off the Outgoing Video You can turn on off the sending of images recorded with the camera during a call To turn off th...

Page 90: ...the picture within the dotted line and press 7 Check the picture and press OK To cancel the sending of a picture press Stop Setting the Picture Quality You can set the quality and motion speed of the incoming video 1 Press Options during a call 2 Select Screen Settings and press Select 3 Select Picture Quality and press Select 4 Select the output format you want to set and press Select Motion Prio...

Page 91: ...tgoing Video and press Select 2 Select the item you want to set and press Select Camera Monitored Sends video images recorded during a call My Pictures Allows you to select a picture to send from the Pictures folder of My Items Select the picture you want to send press and then press Set No Picture Sends a preinstalled picture in your phone Note You can send pictures of QVGA W240 H320 size or smal...

Page 92: ...ss Select 2 Select Mode Setting and press Select 3 Select On or Off and press Select Note The Auto Answer function for incoming video calls is only available while your phone is open or turnover style Incoming video calls are received as usual when your phone is closed If a video call is received from a phone number in the Auto Answer list while Auto Answer is set to On the Auto Answer tone plays ...

Page 93: ... Select 3 Press Add 4 Enter your security code page 38 5 Select a phone number input method and press Select From Contacts Allows you to select a phone number from the Contacts list page 74 Set Number Allows you to directly enter a phone number From Call Log Allows you to select a phone number from the call log page 43 To add a second or subsequent phone number press Options after Step 2 Then sele...

Page 94: ...select Hold Guidance and press Select 2 Select the item you want to set and press Select Hold Answer Allows you to set the hold guidance for incoming calls Hold during Call Allows you to set the hold guidance for calls in progress 3 Select the image type you want to set and press Select Preset Picture Allows you to set the default picture My Pictures Allows you to select a picture from the Picture...

Page 95: ...etting Appearance Check This feature allows you to check the image to send to the other party before making a video call 1 In standby mode press select Appearance Check and press Select 2 Select On or Off and press Select ...

Page 96: ...96 Video Telephony ...

Page 97: ...Video Camera You can take pictures and record videos and then save them attach them to messages and display them on a TV You can also edit pictures In This Chapter Camera Pictures Videos Picture Video Settings ...

Page 98: ...GA size or smaller for use as wallpaper etc Scanner Allows you to scan QR code barcodes For details see Barcode page 278 Modes for Recording Videos Camcorder Allows you to record videos up to approximately 20 minutes long The recording time depends on the amount of available memory in the storage place For MMS Allows you to record videos for sending attached to MMS messages Turnover Style Style fo...

Page 99: ...icators Picture Mode Multi Shots Landscape Mode Portrait Mode Scanner Internal Camera in Use Multi Shots High Speed Normal Speed Low Speed Picture Size W1600 H1200 UXGA W1280 H1024 SXGA W1024 H768 XGA W640 H480 VGA W240 H320 QVGA W144 H176 QCIF W120 H160 QQVGA W112 H112 Caller ID W96 H128 Sub QCIF Picture Quality Fine Normal Economy Focus Mode Auto Macro Infinity Night Mode Auto Bracket Note Soft ...

Page 100: ...g Stopped Playing Paused Forward Rewind Frame Forward Slow Playback Frame Rewind Camera Video Camera Indicators Exposure Control 2 0 0 2 0 Storage Place Phone Memory Card Delay Timer 5 sec 10 sec 20 sec Guide Display White Balance Daylight Shade Cloudy Fluorescent Tungsten Self view Mobile Light Video Monitor Screen Tip To switch between the camera and video camera press and hold 15 16 17 18 19 4 ...

Page 101: ...tems supported by your phone are the NTSC and PAL systems The SECAM system is not supported For details see Displaying Files on a TV page 201 Confirming the Memory Status You can confirm the usage status of your phone and memory card 1 In standby mode press select Camera and press Select 2 Select Memory Status and press Select ...

Page 102: ... key The shutter sound is heard and the picture is saved automatically to the preset storage place page 125 Tip If the Preview setting page 128 is set to On the preview screen appears after the picture is saved automatically If the picture was taken in Landscape mode you can adjust the zoom in the preview screen To return to the monitor screen so as you can take another picture press Back or the s...

Page 103: ...tions You can adjust the exposure and zoom from the monitor screen To adjust the exposure press to make the picture darker and press to make the picture lighter To adjust the zoom press or the side key to zoom in and press or the side key to zoom out To adjust the exposure while in the turnover style press the side key select Advanced and press the side key Then select Exposure Control and press t...

Page 104: ...rait Mode Allows you to select a picture size from W240 H320 QVGA W144 H176 QCIF W120 H160 QQVGA W112 H112 Caller ID and W96 H128 Sub QCIF Viewing a Picture 1 Press Options from the monitor screen 2 Select My Pictures and press Select 3 Select the picture you want to view and press Deleting a Picture You can delete the picture displayed in the preview screen 1 Press Options from the preview screen...

Page 105: ...s the side key from the preview screen 2 Select As MMS and press the side key If the picture was taken in Landscape mode press the side key after the compressed picture appears Functions for Taking Pictures Switching Camera Modes For details on camera modes see Modes for Taking Pictures page 98 1 Press Options from the monitor screen select Camera Mode and press Select 2 Select Landscape Mode Port...

Page 106: ...ject that is very far away from you Night Mode You can use this mode for taking pictures of night scenes etc 1 Press Options from the monitor screen select Night Mode and press Select 2 Select On or Off and press Select Tip To adjust the focus when Auto is set press or half press the side key from the monitor screen After the focus is adjusted the complete sound is heard and the focus is locked No...

Page 107: ...press Select 2 Select High Speed Normal Speed Low Speed or Off and press Select Note If auto bracket is set multi shots is unavailable If multi shots is set the zoom cannot be adjusted Tip To delete a picture select the picture you want to delete after Step 2 of Deleting a Picture page 104 press to add a check mark press Options and select Delete ...

Page 108: ...tor screen select Add Frame and press Select 2 Select Preset Frames or My Pictures and press Select A list of frames appears 3 Select the frame you want to add from the list and press The frame appears in the monitor screen To display the previous or next frame of the list press or 4 Press OK Note When taking pictures in Landscape mode or at Sub QCIF size a frame cannot be set ...

Page 109: ... press Select Additional Functions for Taking Pictures Self view page 125 Storage Place page 125 Delay Timer page 126 Mobile Light page 126 White Balance page 127 Exposure Control page 127 Note When taking pictures in Landscape mode auto bracket cannot be set If multi shots is set auto bracket is unavailable If auto bracket is set the zoom cannot be adjusted Tip To delete a picture select the pict...

Page 110: ...lect The selected picture size is indicated by a dotted line If you selected Define enter a picture size W16 to 240 H16 to 320 and press OK 4 Use to adjust the position of the picture within the dotted line and press 5 Press OK and 6 Select a save method and press Select Save Overwrites the file of the original picture Save as Saves the picture as a new file Enter a file name and press Tip You can...

Page 111: ...Preset Frames or My Pictures and press Select If you selected Preset Frames select a frame size and press Select 4 Select the frame you want to add and press The framed picture appears If the frame size and picture size differ you can use to adjust the position of the frame To switch to another frame press or 5 Press OK and 6 Select a save method and press Select Save Overwrites the file of the or...

Page 112: ...3 Select Preset Stamps or My Pictures and press Select 4 Select the stamp you want to paste and press 5 Use to adjust the paste position and press 6 Press twice 7 Select a save method and press Select Save Overwrites the file of the original picture Save as Saves the picture as a new file Enter a file name and press Tip To paste the same stamp again press Options after Step 5 and select Continue T...

Page 113: ...ll Font and press Select 4 Select a font colour and press Select 5 Enter text and press You can enter up to 18 characters with the large font 24 characters with the standard font and 40 characters with the small font 6 Use to adjust the paste position and press Paste 7 Press 8 Select a save method and press Select Save Overwrites the file of the original picture Save as Saves the picture as a new ...

Page 114: ...ect the angle to which you want to rotate the picture and press Select 90 degrees Rotates the picture 90 degrees clockwise 180 degrees Rotates the picture 180 degrees 270 degrees Rotates the picture 270 degrees clockwise 90 degrees anticlockwise 4 Press OK and 5 Select a save method and press Select Save Overwrites the file of the original picture Save as Saves the picture as a new file Enter a fi...

Page 115: ...he incoming picture along with the name and phone number 1 After you take a picture at Caller ID size press Options from the preview screen select Assign to Contact and press Select 2 Select Add New Contact and press Select To add the picture to an existing Contacts list entry select Add to Existing 3 Proceed from Step 3 of Adding an Entry from the Main Menu page 64 ...

Page 116: ...side key The end sound is heard and the video is saved automatically to the preset storage place page 125 Note A video being recorded in For MMS cannot be paused Tip If the Preview setting page 128 is set to On the first frame of the video appears in the preview screen after the video is saved automatically To return to the monitor screen so as you can record another video press Back or the side k...

Page 117: ... key to zoom out To adjust the exposure while in the turnover style press the side key select Advanced and press the side key Then select Exposure Control and press the side key Press the side key to make the video darker and press the side key to make the video lighter Video Sizes Camcorder Records at the QVGA W320 H240 video size You can save up to approximately 20 minutes of video to your phone...

Page 118: ...press Select 3 Press Yes Default Recipient for MMS Immediately after you record a video in For MMS of turnover style you can send it attached to an MMS message to the address preset for the default recipient page 143 1 After you record a video in turnover style press the side key from the preview screen 2 Select As MMS and press the side key Note If a video was recorded in For MMS forward rewind f...

Page 119: ...s Select 2 Select Camcorder or For MMS and press Select Recording Sound You can set whether to record sound during recording 1 Press Options from the monitor screen select Voice Record and press Select 2 Select On or Off and press Select Additional Functions for Recording Videos Self view page 125 Storage Place page 125 Delay Timer page 126 Mobile Light page 126 White Balance page 127 Exposure Con...

Page 120: ... Select Camera Settings and press Select 4 Select Picture Settings and press Select 5 Select Picture Quality and press Select 6 Select Fine Normal or Economy and press Select Changing the Picture Size 1 After Step 4 of Changing the Picture Quality above select Picture Size and press Select 2 Select Landscape Mode or Portrait Mode and press Select 3 Select the picture size you want to set and press...

Page 121: ...a tone picture Black White Monochrome picture Negative Reverses the tones Emboss Emphasises the contours to give an emboss look None Normal colour picture Date Stamp You can add a date stamp to pictures 1 After Step 4 of Changing the Picture Quality page 120 select Date Stamp and press Select 2 Select On or Off and press Select 3 Select the date colour you want to set and press Select Note Date st...

Page 122: ...taking pictures 1 After Step 3 of Changing the Picture Quality page 120 select Screen Settings and press Select 2 Select Grid and press Select 3 Select On or Off and press Select Shutter Sound You can set the shutter sound 1 After Step 3 of Changing the Picture Quality page 120 select Shutter Sound and press Select 2 Select Pattern 1 Pattern 2 or Off and press ...

Page 123: ...uper Fine Fine or Normal and press Select Video Effects You can change the colour adjustment setting for recording videos 1 After Step 4 of Changing the Video Quality above select Effects and press Select 2 Select the colour adjustment you want to set and press Select Sepia Sepia tone video Black White Monochrome video Negative Reverses the tones Emboss Emphasises the contours to give an emboss lo...

Page 124: ...whether to display indicators during recording and playback 1 After Step 3 of Changing the Video Quality page 123 select Screen Settings and press Select 2 Select Controller Display and press Select 3 Select On or Off and press Select Start End Sounds You can set the start and end sounds 1 After Step 3 of Changing the Video Quality page 123 select Start End Sounds and press Select 2 Select Pattern...

Page 125: ...s from the monitor screen select Self view and press Select 2 Select Internal Camera External Camera or Off and press Select Storage Place You can set the storage places to which to automatically save pictures and videos 1 Press Options from the monitor screen select Save Image to or Save Video to and press Select 2 Select Phone Memory or Memory Card and press Select If more than one folder is ava...

Page 126: ...reen select Advanced and press Select 2 Select Delay Timer and press Select 3 Select 5 sec 10 sec 20 sec or Off and press Select Mobile Light You can turn on the mobile light while taking pictures or recording videos 1 Press Options from the monitor screen select Advanced and press Select 2 Select Mobile Light and press Select 3 Select On or Off and press Select ...

Page 127: ... mode you want to set and press Select Auto Adjusts the white balance automatically in order to obtain natural colours Daylight Suitable for outdoors under a clear sky Shade Suitable for in the shade Cloudy Suitable for outdoors under a cloudy sky Fluorescent Suitable for fluorescent lighting Tungsten Suitable for incandescent lighting Exposure Control You can adjust the brightness for pictures an...

Page 128: ...ra Settings or Video Settings and press Select 4 Select Picture Settings or Movie Settings and press Select 5 Select Preview and press Select 6 Select On or Off and press Select Flicker Adjustment You can reduce screen flicker by setting the correct frequency for the area 1 After Step 3 of Preview Setting above select Screen Settings and press Select 2 Select Flicker Adjustment and press Select 3 ...

Page 129: ... 128 select File Name and press Select 2 Select Date Time or Define and press Select If you selected Define enter the file name you want to set and press Setting Keypad Shortcuts You can set whether to use the keypad shortcuts for accessing functions while you are using the camera 1 After Step 3 of Preview Setting page 128 select Keypad Shortcut and press Select 2 Select On or Off and press Select...

Page 130: ...cording videos Taking Pictures Recording Videos Key Guide Key Guide Camera Mode Record Mode Delay Timer Delay Timer Picture Effects Effects Picture Quality Video Quality White Balance White Balance Focus Mode Voice Record Night Mode Picture Size Screen Display Mobile Light Mobile Light Self view Self view ...

Page 131: ...allows you to send and receive text messages pictures sounds vObjects and other data via the Vodafone live Service Centre In This Chapter Messaging Capabilities MMS SMS MMS SMS Common Operations Email Postcard live Studio ...

Page 132: ...o check received messages pages 138 147 Drafts Allows you to save created messages page 155 Sent Messages Allows you to check sent messages pages 140 149 Unsent Messages Stores messages that could not be sent page 156 Email Allows you to use email page 157 live Studio Allows you to upload MMS messages images and sounds to the live Studio album on the Web and organise uploaded data page 169 Templat...

Page 133: ...r and press Add Picture Allows you to attach a picture in My Pictures You can also activate the camera and take a picture to attach Add Text Allows you to enter a message To set the text colour or font size select the text you entered press Options and select Text Options Add Sound Allows you to attach a sound in Sounds Ringtones Add Video Allows you to attach a video in My Videos You can also act...

Page 134: ...pient Allows you directly enter an address You can enter up to 256 characters for the address From Group List Allows you to specify a group as the address from the Group list page 70 6 Specify an address and press The Recipient list appears 7 Select Send and press The message is sent and then saved to Sent Messages Tip Any message that could not be sent is saved to Unsent Messages Recipient List S...

Page 135: ...ntacts Allows you to save an address to the Contacts list Set as To Cc Bcc Allows you to switch To Cc Bcc for an address Save to Drafts Saves the message as a draft message to Drafts Preview Message Displays the message in the message preview screen Edit Subject Allows you to enter a subject You can enter up to 512 characters Sending Options Allows you to set the following sending options Delivery...

Page 136: ...ate MMS Message screen page 133 press Options 2 Select Add Page and press Select A page is added When there is more than one page you can perform the following operations if you select Page Control in Step 2 Add Page Adds a page Delete Page Deletes a page Previous Page Next Page Takes you to the previous or next page Move Page Moves a page to a specified position Tip If you press Options in Step 3...

Page 137: ...n page 133 select text or an attached file and press Options 2 Select Item Duration and press Select 3 Select Start Time and press Select 4 Enter the start time and press OK 5 Select Duration and press Select 6 Enter the display duration and press OK Note A start time and display duration that exceeds the page duration page 136 cannot be set ...

Page 138: ...on the operations you can perform from the Inbox list or a message see page 151 1 In standby mode press select Inbox and press Select The list appears The following indicators appear for MMS messages appears for unread messages MMS message high priority level low priority level MMS notification high priority level low priority level Delivery report message List Screen Note Some attached files cann...

Page 139: ...ettings page 141 If there is an attached video or other file the file icon is displayed Receiving Complete MMS Messages When Retrieve Mode of Receiving Settings page 141 is set to Deferred or Always Ask messages are not received automatically Notifications are received instead When a notification is received the indicator appears at the top of the display The complete MMS message is stored tempora...

Page 140: ...rform from the Sent Messages list or a message see page 153 1 In standby mode press select Sent Messages and press Select The list appears The following indicators appear for MMS messages MMS message high priority level low priority level Delivered MMS message Postcard 2 Select the message you want to check and press The message appears List Screen ...

Page 141: ... you to set whether to automatically retrieve messages received by the mail server There are two settings Home Network and Roaming Network For each of the settings you can select Immediate Deferred or Always Ask Auto extract File Allows you to set whether to automatically display play picture and sound files attached to messages Reply for Delivery Allows you to set whether to reply to requests for...

Page 142: ...elivery reports to confirm whether sent messages were delivered to recipients Delivery Time Allows you to specify a time up to seven days in the future for delivering messages from the service centre to recipients Read Report Allows you to receive read reports to confirm whether sent messages were read by recipients Expiry Time Allows you to set the length of time a sent message is stored on the m...

Page 143: ...ings page 141 select Default Recipient and press Select 2 Press 3 Select From Contacts or Enter Recipient and press Select From Contacts Allows you to specify an address from the Contacts list page 74 Enter Recipient Allows you directly enter an address You can enter up to 256 characters for the address 4 Specify an address and press 5 Press Options 6 Select Save and press Select ...

Page 144: ...s for one SMS message is 160 If you enter more than 160 characters the message is split into linking SMS messages when it is sent Up to ten linking SMS messages can be sent at one time equivalent to 1 530 characters 4 Select From Contacts or Enter Recipient and press Select From Contacts Allows you to specify a phone number from the Contacts list page 74 Enter Recipient Allows you directly enter a...

Page 145: ...llows you to delete the address Add Recipient Allows you to add an address You can enter up to ten addresses Edit Message Allows you to edit the message Save to Contacts Allows you to save an address to the Contacts list Save to Drafts Saves the message as a draft message to Drafts Sending Options Allows you to set the following sending options Delivery Report and Expiry Time You can preset these ...

Page 146: ... templates 1 In standby mode press select Templates and press Select 2 Select SMS Templates and press Select 3 Select a template and press For details on the following procedure see Creating Sending an SMS Message page 144 Tip To perform an operation such as editing and deleting a template except for a preset SMS template press Options in Step 3 ...

Page 147: ...ation prompt and press Select For details on the operations you can perform from the Inbox list or a message see page 151 1 In standby mode press select Inbox and press Select The list appears The following indicators appear for SMS messages appears for unread messages SMS Message SMS message in the SIM card Delivery report message WAP Push message 2 Select the message you want to check and press ...

Page 148: ...ceive notifications in real time from the Web server When you receive a message the indicator appears at the top of the display If Auto Launch page 180 of the browser settings is set to On your phone accesses the specified URL as soon as the message is received Some push messages are just saved to the Inbox ...

Page 149: ...e press select Settings and press Select 2 Select SMS Settings and press Select 3 Select the item you want to set and press Delivery Report Allows you to receive delivery reports to confirm whether sent messages were delivered to recipients Expiry Time Allows you to set an expiry time for messages Message Centre Allows you to edit the centre number for SMS The centre number is saved to the SIM car...

Page 150: ... Common Settings and press Select 3 Select the item you want to set and press Select Reply Settings Allows you to set whether to quote received messages when replying to them Font Size Allows you to select a message font size from Large Standard and Small Page Scroll Allows you to select the scroll unit of the message display screen from 1 Line Half Screen and Full Screen ...

Page 151: ...m Forward Allows you to forward the message Call Sender Makes a call to the sender of the message Send to live Studio Allows you to upload the MMS message to a media album on the Web page 169 Sort by Changes the order that messages appear You can select a sort option from Date from Latest Date from Oldest Sender Unread to Read and Message Type Delete All Deletes all messages in Inbox Extract Allow...

Page 152: ... as a template Copy Text Allows you specify a range of text in any part of the message and then copy the text Move to SIM Phone Allows you to move the SMS message to your SIM card or phone Details Displays the message details time stamp priority address size etc ...

Page 153: ...he message Extract Allows you to use a phone number email address URL or file MMS message only in the message Call Recipient Makes a call to the recipient of the message Send to live Studio Allows you to upload the MMS message to a media album on the Web page 169 Sort by Changes the order that messages appear You can select a sort option from Date from Latest Date from Oldest Recipient and Message...

Page 154: ... as a template Copy Text Allows you specify a range of text in any part of the message and then copy the text Move to SIM Phone Allows you to move the SMS message to your SIM card or phone Details Displays the message details time stamp priority address size etc ...

Page 155: ...u to edit the message Delete Allows you to select from One All or Select Multi for deleting messages Send Allows you to send the message Call Recipient Makes a call to the recipient of the message Send to live Studio Allows you to upload the MMS message to a media album on the Web page 169 Sort by Changes the order that messages appear You can select a sort option from Date from Latest Date from O...

Page 156: ... the message Delete Deletes the message Select Multi Allows you to specify multiple messages and then send or delete them Call Recipient Makes a call to the recipient of the message Send to live Studio Allows you to upload the MMS message to a media album on the Web page 169 Sort by Changes the order that messages appear You can select a sort option from Date from Latest Date from Oldest Recipient...

Page 157: ...to Inbox of Email 1 In standby mode press select Email and press Select 2 Select Sync New Emails and press Select Your phone connects to the email server and receives your email messages Creating Sending an Email Message You can send an email message up to 700 KB including the recipient address subject body text and attachment files 1 In standby mode press select Email and press Select 2 Select Cr...

Page 158: ...press twice 7 Select Subject and press 8 Enter a subject and press You can enter up to 512 characters 9 Select Attachments and press 10 Specify an attachment file and press The Attachment File list appears To add another file press Options and select Add File 11 Press and Options 12 Select Send and press Select The message is sent and then saved to Sent Messages Tip To save the email message you a...

Page 159: ...ress Select The list appears The following indicators appear in the list Unread Read 3 Select the message you want to check and press The View Message screen appears If Headers Only is set for Sync Option page 163 of the email settings only the header is received To download the message select Message and press After the message is downloaded it appears List Screen View Message Screen ...

Page 160: ...der that email messages appear You can select a sort option from Date from Latest Date from Oldest and Sender Move Allows you to move the email message to a my folder Extract URL Allows you display a URL of a link included in the email message To connect to the URL select the link and press Extract Numbers Allows you display a phone number included in the email message To make a call to the phone ...

Page 161: ...Sent Messages list or the Email Confirmation screen View Allows you to check the contents of the email message Reply Allows you to reply to the email message Reply All Allows you to reply to all senders of the email message Forward Allows you to forward the email message Save to Contacts Allows you to save the email address of the recipient to the Contacts list Delete Deletes the email message Sor...

Page 162: ...ect the item you want to set and press Select Email Accounts Allows you to add and edit an email account page 163 Vodafone Mail Allows you to connect to the Web to set Vodafone Mail settings You can also change your email address Follow the on screen instructions Note Some email settings are saved on the SIM card Replacing the SIM card may change your email settings ...

Page 163: ...ol type select Protocol and then select POP3 or IMAP4 To edit the server address port user name or password select Server Address Port Username or Password To set limits for receiving messages select Sync Option Sending Options Allows you to set and edit sending options To edit the server address port sender name or sender address select Server Address Port Sender Name or Sender Address Note You c...

Page 164: ...ected to the server select Authentication To set whether to add a signature automatically or edit the signature select Signature You can enter up to 256 characters for the signature To set sent messages to be saved automatically to Sent Messages select Auto Save ...

Page 165: ... the camera or a picture saved to My Items and then send it to the postal address of a specified recipient For details on the Postcard service contact your service provider Postcard and MMS SMS share the same Sent Messages Unsent Messages and Drafts folders Note The support conditions for this function vary depending on the SIM card ...

Page 166: ...icture and press 4 Select My Pictures or Take Picture and press Select My Pictures Allows you to select a picture from My Items Take Picture Activates the camera so as you can to take a new picture After you select a picture for the postcard press 5 Select Greeting Message and press 6 Enter a message and press You can enter up to 200 characters 7 Select Send to and press Create Postcard Screen ...

Page 167: ... to three addresses 10 Select Send and press 11 Select Send and press The postcard is sent and then saved to Sent Messages Add Recipient Screen Note The postcard cannot be sent if a picture was not selected or the necessary recipient information was not entered Tip You can also create a postcard if you select live Postcard from the following functions Camera page 103 Pictures folder page 196 Conta...

Page 168: ...eview Displays the postcard preview screen Save to Drafts Saves the postcard to Drafts Add Recipient Screen Operations You can perform the following operations if you press Options while the Add Recipient screen is displayed Edit Allows you to edit the address Send Confirms the address and displays the Recipient list Clear Clears the selected input item Clear All Fields Clears all address input it...

Page 169: ...r selecting a file to upload and press Options 2 Select Send and press Select 3 Select To live Studio and press Select 4 Select Move or Copy and press Select Uploading begins Checking live Studio Files 1 In standby mode press select live Studio and press Select The browser starts and the live Studio page appears Follow the on screen instructions Note The support conditions for this function vary d...

Page 170: ...170 Messaging ...

Page 171: ...allows you to use the Internet to access various genres of content You can browse information or download pictures melodies and applications In This Chapter Accessing Vodafone live Bookmarks Operations for Web Pages Browser Settings Games More Media Player ...

Page 172: ...ervice provider 1 In standby mode press select Vodafone live and press Select The Vodafone live menu appears 2 Select the item you want to use and press Select The indicator appears at the top of the display during communication 3 Press to end Vodafone live Note The network service is only available while or is displayed on the display Tip To display the Vodafone live home page press from standby ...

Page 173: ...w Allows you to obtain the latest information Games Allows you to download games and other applications Ringtones Allows you to download melodies and ringtones Pictures Allows you to download images animations and wallpaper News Allows you to obtain the latest news weather reports and other information Sport Allows you to obtain sports news results latest scores and other information History Displ...

Page 174: ...t Ends communication If your phone is not connected takes you back to standby mode to Acts as a shortcut to a link with a number and Acts as a shortcut to a link with or You can also use these keys to perform supported operations Side Key Increases the volume level Side Key Decreases the volume level To set the volume to mute press and hold the key In Turnover Style Side Key Scrolls up or down Sid...

Page 175: ...ss them quickly and easily Adding a Bookmark 1 Display the page you want to bookmark and press Options 2 Select Bookmarks and press Select 3 Select Add Bookmark and press Select 4 Select the title field and press 5 Edit the title and press 6 Press OK 7 Select Root Folder and press OK ...

Page 176: ...press Select Go to URL Allows you to enter a URL and display the Web page for the URL Send Allows you to send the URL as an SMS MMS or email message New Entry Allows you to enter a new URL to add as a bookmark You can also create a new folder Delete Deletes one or all bookmarks Move Moves a bookmark to another folder Select Multi Allows you to select multiple bookmarks and then delete or move them...

Page 177: ... Previous Page Takes you back to the previous page Next Page Takes you to the next page if one exists in cache Go to URL Allows you to enter a URL or select information to display from access history Send Page Allows you to send the displayed page as an SMS MMS or email message Reload Page Updates the information Object Select Mode Selects a file in the information Page Details Allows you to confi...

Page 178: ...le and press Options 4 Select the item you want to use and press Select Object Details Allows you to confirm details such as the file name file size save permission and transfer permission Save Object Saves the file to My Items Play View Plays or displays the file data Paging Mode Takes you back to paging mode Exit Browser Ends the browser Note Copy restrictions may prevent some files from being s...

Page 179: ...for which a link is set and press 2 Press Yes Downloading begins 3 Select the item you want to use and press Select Play Plays the file Save Saves the file to My Items Object Details Allows you to confirm details such as the file name file size and file type Note Copy restrictions may prevent some files from being saved Some downloaded files may not be able to be displayed played properly ...

Page 180: ...e item you want to set and press Select Memory Manager Clears the access history Cookies Web cache and DNS Domain Name Server cache You can also enable or disable the storing of cookies Certification Allows you to confirm details on a certificate issued from a certificate authority Auto Launch Allows you to set whether to start the browser automatically when WAP push message is received ...

Page 181: ... addition to ordinary applications that run solely on your phone some applications need to connect to the network Web Note When you use a network Java application a communication fee is charged each time the application connects to the network The communication fee is the same as that for using the Web When flight mode is set page 236 some network Java applications may not run properly ...

Page 182: ...lication Screensavers Stores standby mode Java applications downloaded from the Web You can also set which Java application runs in standby mode or switch the standby setting on or off page 184 To set the Java application start time or length of time the application runs before pausing select Set Time Settings Allows you to set various Java application settings page 185 Java Information Displays a...

Page 183: ...elect An application download site appears 4 Select the Java application you want to download and press The application details screen appears 5 Press Downld Downloading begins 6 Press Yes The Java application list appears Note If the battery level is low at the start of downloading the application may not be completely downloaded Charging the battery beforehand is recommended If you replace the S...

Page 184: ...a application stops 4 Press select Quit in the confirmation screen that appears and press to end the Java application Setting the Screensaver 1 In standby mode press select Games More and press Select 2 Select Screensavers and press Select 3 Select Screensavers and press Select To cancel the screensaver select Off 4 Select the Java application you want to set and press To download a screensaver se...

Page 185: ...va application is running If you select Blinking you can set whether to enable the preset backlight blinking operation of a Java application Volume Allows you to adjust the volume for when a Java application is running You can also set the volume to mute Vibration Allows you to set whether to enable the preset vibration operation of a Java application Reset Settings If you select Master Reset you ...

Page 186: ...nt to use and press Select Start Runs the Java application Delete Deletes the Java application Select Multi Allows you to select multiple Java applications and then delete them Details Allows you to confirm details on the Java application Security Settings Allows you to set the display method for the confirmation screen that appears when you attempt to use certain functions while a Java applicatio...

Page 187: ...nd press Select My Sounds Displays a list of audio files in My Items My Videos Displays a list of video files in My Items Playlist Allows you to create a playlist and play files page 190 Favourites Allows you to add up to ten files and streaming URLs to Favourites History Displays the history for file and streaming playback Enter URL Allows you to enter a URL for streaming playback or starting the...

Page 188: ...t the audio file you want to play and press The playback screen of Media Player appears and playback begins To stop playback press Stop Press to increase the playback volume level and press to decrease the playback volume level List name Bit rate Title Real logo Real Audio file playing Artist Progress bar Elapsed play time total play time Play status icon Play mode Volume level 1 6 2 7 3 8 4 9 5 1...

Page 189: ...d press Select 3 Select the video file you want to play and press The playback screen of Media Player appears and playback begins To stop playback press Stop Press to increase the playback volume level and press to decrease the playback volume level Title and elapsed play time total play time Progress bar Video display Play status icon Subtitles area Volume level Real logo Real Video file playing ...

Page 190: ... Select Playlist and press Select 3 Select Create Playlist and press Select 4 Enter the name of the playlist and press 5 Select My Sounds or My Videos and press Select 6 Press Options 7 Select Select Multi and press Select 8 Select a file you want to add to the list and press To add another file repeat Step 8 9 Press Options 10 Select Add Files and press Select Note A combination of audio and vide...

Page 191: ...lay Plays a file View List Displays a list of files in the playlist Send Allows you to send a file attached to an MMS message or send a file by infrared Delete Deletes a file or playlist Delete All Deletes all files Rename Allows you to change the name of a file or playlist Select Multi Allows you to select multiple files and then delete or play them or copy or move them to the memory card or phon...

Page 192: ...roller Memory Card Phone Memory Switches the file list display between your phone and memory card Thumbnail View List View Switches between thumbnails view and list view Sort by Changes the order that files appear You can select a sort option from Filename Size Date from Latest and Date from Oldest Add Allows you to add a file to Favourites or a playlist Add to Favourites Allows you to add a file ...

Page 193: ...ing and holding the key MP4 file only Jumps to the next file Jumps to the previous file Streaming Playback of Audio Video If you select a streaming URL from a Web page or body text of a message Media Player automatically starts and streams playback so as you can listen to the music or watch the video The indicator appears at the top of the display during streaming For details on the display indica...

Page 194: ...194 Vodafone live ...

Page 195: ...s stored in My Items You can move the data stored in the folders of My Items and edit it for use with other functions In This Chapter My Items Using Files Folders Displaying Files on a TV Using vObjects Using the Memory Card Using the SIM Card ...

Page 196: ...d the Recordings folder Recordings you record with the voice recorder are saved to the Recordings folder Games More Contains Java applications My Saved Pages Contains URLs and Web pages Templates Contains the SMS Templates folder to store templates for use with SMS messages and the MMS Templates folder to store templates for use with MMS messages Other Documents Contains vCard vCalendar SVG and te...

Page 197: ...ctures JPEG GIF WBMP PNG Digital Camera JPEG Videos MP4 Real Video Sounds Ringtones AMR MP3 MP4 Real Audio SMF SP MIDI SMAF XMF Recordings AMR Games More Java My Saved Pages HTML XHTML SMS MMS Templates Text Other Documents vCard vCalendar SVG Text Unknown File Types ...

Page 198: ...elected folder Connect Connects to the preset Web page Play Plays the selected file Start Runs the Java application Send Allows you to send the selected file as an MMS attachment or postcard You can also upload the file to a media album or send it by infrared or Bluetooth Some send functions are unavailable depending on the SIM card inserted Note Some items do not appear depending on the selected ...

Page 199: ...memory card Details Displays the properties of the selected file Thumbnail View List View Switches the display of files and folders between thumbnails view icons and images and list view text and guide Slideshow Displays the pictures within the folder in sequence automatically Manage Folder Allows you to create a new folder or edit the selected folder You can select from Create Folder Rename Folde...

Page 200: ...he screen display Hide Controller Show Controller Hides or shows the controller Zoom Enlarges or reduces the selected picture Advanced Allows you to edit the selected picture Expand Reduce Expands or reduces the picture attached to the selected file Save to Contacts Save to Calendar Allows you to save vObjects to the Contacts list or Calendar Rewind Returns the play position of the video being pla...

Page 201: ...as the display when you take pictures and record videos page 101 Switching TV Systems The TV systems supported by your phone are the NTSC and PAL systems The SECAM system is not supported 1 In standby mode press select Settings and press Select 2 Select Phone Settings and press Select 3 Select AV Output and press Select 4 Select NTSC or PAL and press Select Tip The use of a TV as a display for the...

Page 202: ...In the main display open the screen you want to display on the TV then press and hold A confirmation screen appears 3 Press Yes The screen display switches from the main display to the TV To switch the screen display from the TV back to the main display press and hold Note The screen display cannot be switched while you are recording a video or when the delay timer is activated Any of the followin...

Page 203: ...Objects to the memory card you can use them directly from other memory card compatible phones PCs and other devices Similarly vObjects saved to the memory card from other phones PCs and other devices can be used on your phone vObject compatible software is required to use the data of vObjects on a PC or other device Depending on the software used vObjects may not be able to be displayed properly D...

Page 204: ...aying Calendar see page 266 2 Press Options 3 Select Send vCard or Send vCalendar and press Select 4 Select a storage place and press Select To My Items Saves the data in vCard vCalendar format to the Other Documents folder in My Items of your phone To Memory Card Saves the data in vCard vCalendar format to the Other Documents folder in My Items of your memory card ...

Page 205: ...ur phone 1 In standby mode press select My Items and press Select 2 Select Other Documents and press Select 3 Select a vObject and press 4 Press Options 5 Select Save to Contacts or Save to Calendar and press Select Tip When importing a vObject that has a picture to the Contacts list the picture cannot be saved to the Contacts list if it exceeds W112 H112 ...

Page 206: ...while reading or writing data the data may be lost or the memory card may be damaged If the memory card is formatted by another device it may not work properly with your phone Be sure to use your phone to format the memory card Formatting the memory card deletes all data in the memory card 1 Insert the memory card in the slot of your phone 2 In standby mode press select Settings and press Select 3...

Page 207: ...g the Memory Card Usage Status You can confirm the volume label total memory size used memory size and available memory size 1 In standby mode press select Settings and press Select 2 Select Memory Settings and press Select 3 Select Memory Card and press Select 4 Select Card Details and press Select ...

Page 208: ...ntries is 250 Moving Contacts List Entries Moving Entries to the SIM Card You can move the name and default phone number page 78 of an entry 1 In standby mode press select Contacts and press Select 2 Select Contacts List and press Select 3 Press Options 4 Select Select Multi and press Select 5 Select the Contacts list entry with you want to move from your phone and press To select another Contacts...

Page 209: ... list of your phone To Memory Card Moves Contacts list entries with a check mark to the Contacts list of your memory card Moving Entries from the SIM Card 1 After Step 4 of Moving Entries to the SIM Card page 208 select the Contacts list entries with you want to move from the SIM card and then perform the rest of the Steps ...

Page 210: ...t to copy from your phone and press To select another Contacts list entry repeat Step 5 6 Press Options 7 Select Copy and press Select 8 Select To SIM and press Select To Phone Memory Copies Contacts list entries with a check mark to the Contacts list of your phone To Memory Card Copies Contacts list entries with a check mark to the Contacts list of your memory card Tip To copy Contacts list entri...

Page 211: ... 147 and Sent Messages page 149 of your phone and messages in your SIM card Although the number of messages you can save to the SIM card depends on the amount of available memory space the maximum number of sent and received messages is 50 Moving Messages to the SIM Card 1 In the Inbox or Sent Messages select the message you want to move from your phone and press 2 Press Options 3 Select Move to S...

Page 212: ...212 My Items Moving Messages from the SIM Card 1 In Step 1 of Moving Messages to the SIM Card page 211 select the messages with you want to move from the SIM card and then perform the rest of the Steps ...

Page 213: ...personalise your phone In This Chapter Display Settings Phone Profiles Language Setting Shortcut Menu Shortcut Keys External Light Settings Flight Mode Setting Call Settings Using the Stereo Handsfree Headset Security Settings Network Internet ...

Page 214: ...re you want to set and press You can set the part within the dotted line as the wallpaper Use to adjust the position of the picture within the dotted line You may also be able to perform the operations described on the right depending on the size of the picture Confirm the part within the dotted line press and press OK Off Sets no picture Tip If the picture you want to set as the wallpaper does no...

Page 215: ...to set from My Pictures pictures saved to the Pictures folder in My Items Caller Picture Allows you to display a picture associated with a caller in the Contacts list when a call is received from that caller Select On or Off and press Select If you want to also display the picture on the external display set Caller Info to On Caller Info Allows you to set the display of the name and phone number s...

Page 216: ...t 4 Select Clock Type Display and press Select 5 Select the type of display you want to set and press Select 1 line Digital Displays the time and date in one line digital view 2 line Digital Displays the time and date in two line digital view Analog Clock Displays an analog clock Digital Calendar Displays the calendar and time in digital view World Clock Displays the city name and the time and dat...

Page 217: ...lay and press Select 5 Select On or Off and press Select Switching between the 12 hour and 24 hour Clock 1 In standby mode press select Settings and press Select 2 Select Phone Settings and press Select 3 Select Date Time and press Select 4 Select 12 hour 24 hour and press Select 5 Select 12 hour or 24 hour and press Select Note You cannot switch the clock that appears in the upper right of the di...

Page 218: ...lect Setting the Display Power Saving You can save battery power by setting the phone to turn off the display after a specified time of inactivity elapses You can set the display time to 30 seconds 1 minute or 3 minutes 1 In standby mode press select Settings and press Select 2 Select Display Settings and press Select 3 Select Main Display or External Display and press Select 4 Select Power Saving...

Page 219: ...ct 2 Select Display Settings and press Select 3 Select Main Display or External Display and press Select 4 Select Backlight and press Select 5 Select the item you want to set and press Select Brightness Allows you to set the brightness Select Dark or Bright and press Select Lighting Time Allows you to set the lighting time Enter a time 0 to 60 seconds and press OK ...

Page 220: ...d in standby mode when you use your phone on a mobile phone network based on Micro Cellular Network MCN technology 1 In standby mode press select Settings and press Select 2 Select Display Settings and press Select 3 Select Main Display and press Select 4 Select Cell Information and press Select 5 Select On or Off and press Select ...

Page 221: ...In standby mode press select Settings and press Select 2 Select Display Settings and press Select 3 Select External Display and press Select 4 Select Contrast and press Select 5 Close your phone A screen for adjusting the contrast appears on the external display 6 Use the side keys and to adjust the contrast open your phone and press OK ...

Page 222: ...et and press If a profile other than Normal is set the indicator for the profile appears at the top of the display Note When your phone is connected to an in car device or a wireless headset via Bluetooth the incoming ringtone for Bluetooth plays and your phone does not vibrate for incoming calls regardless of the phone profile settings Tip To temporarily switch the phone profile to Silent press a...

Page 223: ...oice Call Video Call or Received Message and press Select 5 Use to adjust the volume and press OK Use or to increase the volume and use or to decrease the volume Tip Only the vibration and alarm settings can be changed for Silent profile When the ringtone and vibration are set for both individual Contacts list entries and Contacts list categories the settings for individual entries take priority o...

Page 224: ...f tone you want to set and press Select Preset Patterns Allows you to select from patterns preinstalled in your phone Preset Sounds Allows you to select from melodies and sound effects preinstalled in your phone My Sounds Allows you to select from sound and video files stored in My Items 6 Select the tone you want to set and press 7 Press Assign Note A video file cannot be set as the ringtone for ...

Page 225: ...elected Silent in Step 1 select On or Off and press Select 5 Select the vibration pattern you want to set and press Personalising the Keypad Tone Volume For any profile except Silent you can set the keypad tone volume 1 After Step 2 of Switching Profiles page 222 select Normal Car or Meeting and press Options 2 Select Personalise and press Select 3 Select Keypad Volume and press Select 4 Use to ad...

Page 226: ...Personalising the Sound Effects Volume For any profile except Silent you can set the volume level of each of the sound effects for turning on off the power opening closing your phone and errors 1 After Step 2 of Switching Profiles page 222 select Normal Car or Meeting and press Options 2 Select Personalise and press Select 3 Select Sound Effects Vol and press Select 4 Select the item you want to s...

Page 227: ...ess Select 3 Select Sound Effects and press Select 4 Select the item you want to set and press Select 5 Select the type of tone you want to set and press Select Preset Pattern Allows you to set the default sound effect Preset Sounds Allows you to select from melodies and sound effects preinstalled in your phone Select the sound you want to set press and then press Assign My Sounds Allows you to se...

Page 228: ...s Select 4 Use to adjust the volume and press OK Use or to increase the volume and use or to decrease the volume Personalising the Battery Alarm Tone When the battery level is very low and your phone is about to run out of power the battery alarm tone plays For any profile except Silent you can set whether to play the battery alarm tone 1 After Step 2 of Switching Profiles page 222 select Normal C...

Page 229: ...m and press Select 4 Select On or Off and press Select Resetting Profiles You can reset the settings of each profile 1 After Step 2 of Switching Profiles page 222 select the profile you want to reset and press Options 2 Select Set to Default and press Select 3 Enter your security code page 38 A confirmation screen appears 4 Press Yes Note Whether an alarm tone plays in Normal profile and Car profi...

Page 230: ...elect 3 Select Language and press Select 4 Select the language you want to set or Automatic and press Select Tip If the language is set to Automatic the language is set automatically in accordance with the language priority setting of the SIM card If your phone does not support the language set for the SIM card the default language of your phone is selected ...

Page 231: ...ss 3 Press Yes 4 Select the function you want to set and press Select If you selected My Items or Contacts List you can set a shortcut for a file folder or Contacts list entry Select the item you want to set Accessing a Function from the Shortcut Menu 1 In standby mode press 2 Select the function you want to access and press Tip To edit a name cancel a setting or switch the view Thumbnail View Lis...

Page 232: ... You can change the function accessed if you simply press and hold the side key from standby mode The functions you can set are Main menu page 37 Calendar page 263 Profile switch page 222 and Torch page 281 1 In standby mode press select Settings and press Select 2 Select Phone Settings and press Select 3 Select Shortcuts and press Select 4 Select Side Key and press Select 5 Select the function yo...

Page 233: ...ess Select 2 Select Phone Settings and press Select 3 Select Shortcuts and press Select 4 Select Navigation Keys and press Select 5 Press Options 6 Select Change and press Select 7 Select the function you want to assign to and press Select 8 Select the function you want to assign to and press Select 9 Select the function you want to assign to and press Select The remaining function is assigned aut...

Page 234: ...ou can select from three colours for the flashing of the external light or set the external light not to flash 1 In standby mode press select Settings and press Select 2 Select Phone Settings and press Select 3 Select External Light and press Select 4 Select Notification and press Select 5 Select Missed Calls or Unread Messages and press Select 6 Select the colour you want to set and press Select ...

Page 235: ...ings and press Select 2 Select Phone Settings and press Select 3 Select External Light and press Select 4 Select Incoming and press Select 5 Select Voice Calls Video Calls or Messages and press Select 6 Select the colour you want to set and press Select Tip When the incoming external light is set for both individual Contacts list entries and Contacts list categories the settings for individual ent...

Page 236: ...ing calls sending and receiving messages etc 1 In standby mode press select Settings and press Select 2 Select Phone Settings and press Select 3 Select Flight Mode and press Select 4 Select On and press Select The indicator appears at the top of the display Note You can cancel flight mode and make an emergency call if you dial the phone number of an emergency service page 27 while flight mode is s...

Page 237: ...set is connected You can also change the length of time before a call is answered When Auto Answer is set the auto answer tone plays regardless of the setting for the phone profile page 222 1 In standby mode press select Settings and press Select 2 Select Call Settings and press Select 3 Select Voice Call and press Select Note Regardless of this function setting or network setting you can still sh...

Page 238: ...and press Select 3 Select Voice Call or Video Call and press Select 4 Select Mute and press Select 5 Select Mute My Voice Mute All or Off and press Select Enabling Disabling Incoming Voice Calls during Data Communication You can set whether to receive incoming voice calls during data communication 1 In standby mode press select Settings and press Select 2 Select Call Settings and press Select 3 Se...

Page 239: ...tings and press Select 4 Select the volume you want to set and press Select Earpiece Volume Allows you to set the volume for sound heard from the earpiece Speaker Volume Allows you to set the volume for sound heard from the speaker 5 Use to adjust the volume and press OK Use or to increase the volume and use or to decrease the volume While you are adjusting the volume a confirmation tone is played...

Page 240: ... Open to Answer and press Select 5 Select On or Off and press Select Setting the Any Key Answer This feature allows you to answer incoming calls with any key If Any Key Answer is set to On you can also answer an incoming call if you press any of to and 1 In standby mode press select Settings and press Select 2 Select Call Settings and press Select 3 Select Common Settings and press Select 4 Select...

Page 241: ...the plug of the stereo handsfree headset into the earphone microphone jack Setting the Phone Number 1 In standby mode press select Settings and press Select 2 Select Call Settings and press Select 3 Select Voice Call and press Select 4 Select Earphone Call and press Select 5 Select On and press Select 6 Select the input method for the phone number and press Select Set Number Allows you to directly...

Page 242: ... from the earphone and the call ends Alternatively you can press to end the call One touch Answering 1 A call is received 2 Press and hold the switch of the stereo handsfree headset Short beeps are heard from the earphone and a connection is established If the caller made a video call the video call begins 3 Press and hold the switch of the stereo handsfree headset to end the call A beep is heard ...

Page 243: ...t 5 Select On and press Select 6 Enter your security code page 38 7 Press Add 8 Select an input method for the phone number and press Select From Contacts Allows you to select the phone number you want to add from the Contacts list page 74 Set Number Allows you to directly enter a phone number From Call Log Allows you to select a phone number from the call log page 43 To add a second or subsequent...

Page 244: ...curity Settings and press Select 3 Select Reject Calls and press Select 4 Select the type of call you want to reject and press Select Withheld Rejects calls with no caller ID calls for which the phone number cannot be displayed and calls from pay phones Unknown Rejects calls from phone numbers not in the Contacts list Select Contact Rejects calls from phone numbers in the Rejection list page 243 5...

Page 245: ...ect On and press Select 5 Enter your security code page 38 6 Press Add 7 Select an input method for the email address or phone number and press Select From Contacts Allows you to select the email address or phone number you want to add from the Contacts list page 74 Enter Address Allows you to directly enter an email address or phone number To add a second or subsequent email address or phone numb...

Page 246: ...perform verification each time a SIM card is inserted into the phone and the power is turned on 1 In standby mode press select Settings and press Select 2 Select Security Settings and press Select 3 Select PIN Code Request and press Select 4 Select On and press Select 5 Enter your PIN code and press OK Note This setting may not be able to be set for some types of SIM card ...

Page 247: ...ing a personal unblocking key code PUK PUK2 code For details on the personal unblocking key codes contact your service provider 1 Enter the PUK PUK2 code in the PUK PUK2 code input screen 2 Enter your new PIN code or PIN2 code and press OK 3 Re enter your new PIN code or PIN2 code for confirmation and press OK Note Set PIN Code Request to On before you change a PIN code page 246 Note If the PUK PU...

Page 248: ...l security code is 0000 or the four digit number you selected when you concluded your contract 1 In standby mode press select Settings and press Select 2 Select Security Settings and press Select 3 Select Change Password and press Select 4 Enter your current security code page 38 5 Enter your new security code 6 Re enter your new security code for confirmation ...

Page 249: ... Select The indicator appears on the display Cancelling the Phone Lock Temporarily 1 Enter your security code while the phone lock is set and press OK The indicator disappears To cancel the phone lock cancel the lock temporarily and then set it to Off Note When the phone lock is set the information prompt page 22 does not appear Tip When the phone lock is set you can still perform the following op...

Page 250: ...rs 1 In standby mode press select Settings and press Select 2 Select Security Settings and press Select 3 Select Fixed Dialling No and press Select 4 Select Setting and press Select 5 Enter your PIN2 code and press OK 6 Select On and press Select Note This function is unavailable for some SIM cards Tip When Fixed Dialling Numbers is set to On you can still make calls to emergency services page 27 ...

Page 251: ...ialling No and press Select 4 Select Edit Dial List and press Select 5 Select Empty and press Add 6 Enter your PIN2 code and press OK 7 Select Name or Dial Number and press Options 8 Select Edit and press Select 9 Enter a name or phone number and press 10 Press Options after setting the items 11 Select OK and press Select Note Before performing this operation set the Fixed Dialling Number setting ...

Page 252: ... guard is set the information prompt page 22 does not appear Tip When the key guard is set you can still perform the following operations Cancel the key guard Make calls to emergency services page 27 Answer voice calls and video calls Key operation is enabled when calls are received but the Any Key Answer page 240 function remains disabled Divert calls page 49 Reject calls page 40 Adjust the ringt...

Page 253: ...Select Phone Memory and press Select 4 Select Clear Memory and press Select 5 Enter your security code page 38 A confirmation screen appears 6 Press Yes Your phone is initialised and then automatically turned off and on Note This operation does not reset the data of the security code page 38 SIM card and memory card Tip To view an approximate indication of the memory status for Emails messages My ...

Page 254: ...le network automatically Manual Allows you to select a network from the displayed list and connect to the network An available network is indicated by the or indicator Adding a Network You can add up to five new networks 1 After Step 3 of Selecting the Network select Add New Network and press Select 2 Select Empty and press Options 3 Select Edit and press Select 4 Select the item you want to set a...

Page 255: ...in the SIM card 1 After Step 3 of Selecting the Network page 254 select Set Preferred and press Select 2 Press Options 3 Select the operation you want to perform and press Select Add Allows you to select the network you want to add from the Network list and add it to the bottom of the Preferred Network list Insert Allows you to select the network you want to add from the Network list and insert it...

Page 256: ...e to select UMTS or GSM automatically Select UMTS or GSM and press Select To change the GSM preferred area press Yes select Europe Asia etc or America and press Select UMTS Only Sets the system mode to UMTS only GSM Only Sets the system mode to GSM only To change the area press Yes select Europe Asia etc or America and press Select Note If you select UMTS Only or GSM Only you cannot make or receiv...

Page 257: ... to six connections per application 1 In standby mode press select Settings and press Select 2 Select Network Internet and press Select 3 Select Settings and press Select 4 Select the application you want to set and press Select 5 Select Empty and press Options 6 Select Edit and press Select 7 Select the item you want to set and press 8 Enter select information For each item press or OK and set th...

Page 258: ...cation you want to set and press 2 Select the connection information you want to set and press Tip To display edit copy or delete connection information select connection information after Step 1 and press Options However any profile indicated by cannot be displayed edited or copied Also a preset factory profile cannot be deleted ...

Page 259: ...rnet and press Select 4 Select Empty and press Add 5 Select the item you want to set and press 6 Enter select information For each item press or OK and set the information 7 Press Options after the settings the items 8 Select Save and press Select A confirmation screen appears 9 Press Yes Tip To display edit copy or delete NAP information select information after Step 3 and press Options However a...

Page 260: ...n from an external device such as a PC 1 In standby mode press select Settings and press Select 2 Select Network Internet and press Select 3 Select External Device and press Select 4 Select Empty and press Options 5 Select Edit and press Select 6 Enter the access point name and press Options 7 Select OK and press Select A confirmation screen appears 8 Press Yes ...

Page 261: ...nient Functions Your phone includes various convenient functions In This Chapter SIM Tool Kit Calendar Alarms Calculator Converter Voice Recorder Countdown Timer Notepad World Clock Multi Task Barcode Torch ...

Page 262: ...our phone For details on the services contact your service provider 1 In standby mode press select Organiser Tools and press Select 2 Select SIM Tool Kit and press Select A menu appears Follow the on screen instructions Note A name other than SIM Tool Kit may appear depending on the type of SIM card ...

Page 263: ...Weekly Monthly Yearly End of Month Allows you to set a repeat interval and period for the appointment If you set Monthly for the 29th 30th or 31st the repeat is only set for months that include that date If you set the start date to the last day of the month you can set the setting to End of Month Memo Allows you to enter the contents up to 128 characters of the appointment Month View Screen Note ...

Page 264: ...pointment 6 Press Options after setting the items 7 Select Save and press Select Alarm Date Time At the date and time set for an alarm the alarm plays and Appointment appears in the external display To stop the alarm press any key After the alarm stops press View to check the appointment details Tip If the time set for an alarm is reached during an incoming outgoing voice call or video call while ...

Page 265: ...rs Press to switch to the previous month and press to switch to the next month 3 Use to select a date and press A list of appointments for the selected date appears 4 Select the appointment you want to check and press The details of the appointment appear Tip To switch the view between month week day and all appointments press Options after Step 2 and select Calendar View ...

Page 266: ... Select Multi Allows you to select multiple appointments in all appointments view and then delete or export them To select or unselect appointments select an appointment with the cursor and press or press Options and select Mark Unmark or Mark all Unmark all Send vCalendar Allows you to convert the appointment to vCalendar format and then save it to My Items or attach it to a message page 133 Cale...

Page 267: ... Alarm Tone Allows you to set the following items Select an item and press Select After setting the items press Options and select Save Alarm Tone Allows you to set a sound preinstalled in your phone or a sound or video saved to My Items as the alarm tone For details on how to set a tone see from Step 5 of Personalising the Ringtone page 224 Alarm Volume Allows you to set the alarm volume Vibratio...

Page 268: ...is set to On the alarm plays in five minute intervals up to five times 6 Press Options after setting the items 7 Select Save and press Select The indicator appears in standby mode and the alarm is set Alarm Time At a time set for an alarm the alarm plays and the time up screen appears To stop the alarm press any key To stop the snooze function press any key while the alarm is playing and then pres...

Page 269: ...lculator screen Repeats the last arithmetic operation Clear All Deletes the input value and data stored in memory MS Saves the input value to memory M Adds the input value to the value stored in memory MR Displays the value stored in memory Calculates the percentage 1 X Calculates the reciprocal SQRT Calculates the square root Set Tax Rate Allows you to set the tax rate To change the tax rate ente...

Page 270: ...y mode press select Organiser Tools and press Select 2 Select Converter and press Select 3 Select the Exchange rate input field and enter the exchange rate To enter a decimal point press 4 Select the Amount input field and enter the amount you want to convert To enter a decimal point press 5 Press Result The conversion result appears ...

Page 271: ... screen appears 4 Press Options 5 Select Record and press Select Recording begins 6 Press Pause to pause recording To resume recording press To save the recording data press Save If the phone is in turnover style use the side key to start recording or stop recording and save the recording data automatically To cancel recording press the side key Note If a call is received during recording the call...

Page 272: ...corder and press Select 3 Select Recordings and press Select The contents of the Recordings folder in the Sounds Ringtones folder of My Items appear 4 Select the recording data you want to play and press Options 5 Select Play and press Select Tip To play recording data saved to the memory card select Memory Card after Step 4 ...

Page 273: ...arts To stop the timer press Stop To restart the timer press Restart To reset the timer press Reset while the timer is stopped When your phone is in turnover style you can also operate the timer with the side keys To start stop restart the timer press the side key To reset the timer press the side key while the timer is stopped Note The level of the alarm volume is that set for the Multimedia Volu...

Page 274: ... can enter up 256 characters for each memo and store up to 20 memos in the notepad 1 In standby mode press select Organiser Tools and press Select 2 Select Notepad and press Select 3 Select the position to which you want to save the memo and press 4 Enter the contents of the memo and press Note To edit or delete a memo select the memo after Step 2 and press Options ...

Page 275: ... and press Select World Clock Viewer appears 3 Use to select a city The date local time and time difference for the selected city appear A green circle indicates your home city on the map A red circle indicates the alternate city For details on changing the Home City and Alternate City settings see World Clock Setting page 35 Tip If you press DSTon after Step 3 the time switches to Daylight Saving...

Page 276: ...n is in use The Multi Task screen appears 2 Select Organiser Tools and press Select 3 Select the application you want to start and press Select The selected application starts Note This operation is not possible while the camera video camera is activated There may be insufficient memory to start a second application depending on the applications running An application may not be able to be switche...

Page 277: ...ress while an application is in use The Multi Task screen appears 2 Select the application to which you want to switch and press The application is switched to the selected application Tip To make a call press Options after Step 1 and select Dial Number ...

Page 278: ...d in the scanned information You can save up to ten scanned data items However this number depends on the amount of available memory space When a barcode has been divided into data areas you can scan up to 16 data areas consecutively QR Code Note Some barcodes have save forward restrictions and some barcodes cannot be scanned The camera may not be able to scan a barcode that is dirty or in a shado...

Page 279: ...canned data appears in the display If the barcode has been divided scan the other data areas To save the data press Options and select Save After Scanning Barcode Tip If the scanned data begins with MAILTO press after Step 4 to create an SMS MMS message If it begins with MEMORY you can save it to the Contacts list page 64 If you select the text of a link indicated by a blue underline and press you...

Page 280: ...ons 2 Select Scanned Data List and press Select 3 Select the scanned data you want to use and press The barcode data appears For details on the operations you can perform while barcode data is displayed see Scanning a Barcode page 279 Tip To rename or delete scanned data press Options after Step 2 ...

Page 281: ...hile you hold the side key Note Do not turn on the mobile light while it is close to anyone s eyes as doing so may damage the person s eyesight Also check the direction with which light will be emitted before turning on the mobile light If the side key is set to another function page 232 this function is unavailable While the phone lock is set page 249 the key guard is set page 252 or the countdow...

Page 282: ...282 Convenient Functions ...

Page 283: ...infrared a USB cable or a memory card to transfer data between your phone and other phones PCs and other devices These capabilities allow you to back up data and manage the same data on multiple devices In This Chapter File Transfer File Synchronisation ...

Page 284: ...Bluetooth 1 In standby mode press select Settings and press Select 2 Select Connectivity and press Select 3 Select Bluetooth and press Select 4 Select Switch On Off and press Select 5 Select On and press Select The indicator appears at the top of the display Note If a USB cable is connected to your phone while you are using Bluetooth the Bluetooth connection ends When Bluetooth is used to send rec...

Page 285: ... a Bluetooth Compatible Device as a Trusted Device If you set a registered Bluetooth compatible device as a trusted device a confirmation screen is not displayed and a connection is established when a connection request is received from that device 1 After Step 3 of Activating Bluetooth page 284 select Paired Devices and press Select 2 Select the Bluetooth compatible device you want to set as the ...

Page 286: ...press Select 2 Select the Bluetooth compatible device for which you want to display the details and press Select 3 Select Details and press Select Changing the Name of a Registered Bluetooth Compatible Device 1 After Step 3 of Activating Bluetooth page 284 select Paired Devices and press Select 2 Select the Bluetooth compatible device for which you want to change the name and press Select 3 Select...

Page 287: ...1 After Step 3 of Activating Bluetooth page 284 select My Phone ID and press Select 2 Select Visibility and press Select 3 Select Show My Phone or Hide My Phone and press Select Show My Phone Allows your phone to be recognised when it is detected during a search by a Bluetooth compatible device in the vicinity Hide My Phone Prevents your phone from being recognised when it is detected during a sea...

Page 288: ...and press Select 2 Select My Phone and press Select 3 Select Details and press Select Changing the Name of Your Phone You can change the name displayed on another Bluetooth compatible device when your phone is detected 1 After Step 3 of Activating Bluetooth page 284 select My Phone ID and press Select 2 Select My Phone and press Select 3 Select Rename and press Select 4 Enter your security code pa...

Page 289: ... up the other Bluetooth compatible device to receive data 2 Select Via Bluetooth from the Options menu of a function and press Select 3 Press OK to switch to flight mode 4 Select the destination Bluetooth compatible device and press Select Note Copyright protected files cannot be sent Tip To send the owner information of the Contacts list select Send My vCard from the Contacts menu page 63 and the...

Page 290: ...ceive However if there are multiple data items to receive the confirmation screen for the next data item appears Connecting to a Handsfree Compatible Device 1 After Step 3 of Activating Bluetooth page 284 select Paired Devices and press Select 2 Select the handsfree compatible device and press Select 3 Select Connect and press Select Tip The received Contacts list and Calendar data is saved to the...

Page 291: ...s while a handsfree compatible device is connected 1 After Step 3 of Activating Bluetooth page 284 select My Phone ID and press Select 2 Select Handsfree Setting and press Select 3 Select the mode you want to set and press Select Handsfree Mode Allows you to make and receive handsfree calls from your phone Private Mode Allows you to make and receive regular calls from your phone Note The other par...

Page 292: ...he top of the display during transfer To transfer data between your phone and a PC the supplied PC management software My Mobile needs to be installed on the PC The infrared function of your phone complies with IrMC 1 1 As shown in the illustration on the right bring your phone and an infrared compatible device to within 30 centimetres of each other and point both infrared ports directly towards e...

Page 293: ...Select 3 Select Infrared and press Select 4 Select Incoming Data and press Select 5 Enter your security code page 38 6 Press OK to switch to flight mode 7 Select Save and press Select If you select Reject the connection ends if there is only one data item to receive However if there are multiple data items to receive the confirmation screen for the next data item appears Note The following files c...

Page 294: ...r Documents of My Items saved on a PC to your phone 1 After Step 6 of Using Infrared for Receiving Data page 293 follow the instructions on the PC to restore data from the PC to your phone Using Infrared for Dial up Connections 1 In standby mode press select Settings and press Select 2 Select Connectivity and press Select 3 Select Infrared and press Select 4 Select Dial up Connection and press Sel...

Page 295: ...your phone need to be installed on the PC This function supports USB 1 1 and USB 2 0 For details on the PC operating environment required to use this function refer to My Mobile Using a USB Cable for Sending Data You can send the data of the Contacts list Calendar and My Items 1 Follow the procedure below to connect your phone and a PC with a USB cable 1 Open the external connector cover of your p...

Page 296: ...follow the instructions on the PC to send data from the PC to your phone Using a USB Cable for Backing Up Data You can back up files and folders in Pictures Videos Sounds Ringtones and Other Documents of My Items 1 After Step 6 of Using a USB Cable for Sending Data page 295 follow the instructions on the PC to back up data from your phone to the PC 2 Enter your security code page 38 Note When you ...

Page 297: ...B Cable for Sending Data page 295 select Battery Charge and press Select 2 Select On and press Select Using the Memory Card for Transferring Data You can transfer Contacts list and Calendar data between your phone and memory card We recommend using the memory card for backing up personal data The memory card needs to be formatted before it is used for the first time For details on formatting see F...

Page 298: ... screen appears 9 Press Yes A confirmation screen appears 10 Press Yes or No in accordance with the confirmation screen Press Yes to include pictures or press No to not include pictures when backing up the Contacts list and press Yes to include past appointments or press No to not include past appointments when backing up the Calendar 11 Press OK to switch to flight mode A backup file is created i...

Page 299: ...list of Contacts list backup files Calendar Displays a list of Calendar backup files 6 Select the backup file you want to restore and press 7 Enter your security code page 38 A confirmation screen appears 8 Press Yes A confirmation screen appears 9 Press Yes or No in accordance with the confirmation screen Press Yes to overwrite all the data in the restore destination and press No to add the data ...

Page 300: ...to be installed Using a Network for Synchronisation You can register a server on your phone to synchronise the Contacts list via the network of a service provider Creating a Server Profile You can create up to five server profiles 1 In standby mode press select Settings and press Select 2 Select Connectivity and press Select 3 Select Synchronise and press Select 4 Select Server Profile and press S...

Page 301: ...ach other any data that has been updated since the last synchronisation Client Update Updates the data on the server Your phone sends to the server any data that has been updated on your phone since the last synchronisation Server Update Updates the data on your phone The server sends to your phone any data that has been updated on the server since the last synchronisation Backup Backs up the Cont...

Page 302: ...n Allows you to set Enable or Disable Network Settings Allows you to set the network connection information network access point proxy of the selected network 10 Press Options 11 Select Save and press Select Synchronising the Contacts List 1 In standby mode press select Contacts and press Select 2 Select Synchronise and press Select 3 Select Server Profile and press Select 4 Select a server and pr...

Page 303: ...chronise data on a PC with the Contacts list and Calendar of your phone 1 After Step 6 of Using Infrared for Receiving Data page 293 follow the instructions on the PC to synchronise data from the PC Using a USB Cable for Synchronisation You can use a USB cable to synchronise data on a PC with the Contacts list and Calendar of your phone 1 After Step 6 of Using a USB Cable for Sending Data page 295...

Page 304: ...304 File Transfer Synchronisation ...

Page 305: ...Appendix In This Chapter Troubleshooting Specifications Accessories EU Warranty Index Glossary Health and Safety Information Menu Structure ...

Page 306: ...de in an area with 3G coverage Make sure the indicator for indicating you are in an area with 3G coverage appears on the display in standby mode If a PIN code is incorrectly entered three times in a row the PIN lock is set and a call cannot be made because access to the SIM card is blocked Enter the PUK code to cancel the PIN lock page 26 If the indicator appears on the display enter your security...

Page 307: ... details on the network settings contact your service provider Cannot use SMS and MMS If the indicator appears on the display cancel flight mode page 236 If the indicator appears on the display a message cannot be received because memory is full Delete messages no longer required page 151 Check your subscription status Contact your service provider Make sure the service centre number page 149 is c...

Page 308: ...hin PCS 1900 1850 1990 MHz Continuous Talk Time Within 3G UMTS area Approx 180 min Video Call Approx 100 min Within GSM area Approx 320 min Continuous Standby Time Within 3G UMTS area Approx 350 hrs Within GSM area Approx 270 hrs Charging Time Approx 140 min Dimensions W H D Approx 50 111 25 mm Maximum Output Within 3G UMTS 2100 Class 3 0 25 W Within GSM 900 Class 4 2 W Within DCS 1800 Class 1 1 W...

Page 309: ...Appendix 309 EU Warranty Your Toshiba mobile telephone contains no user serviceable parts For further information on service please contact your retailer or service provider ...

Page 310: ... Making an international call 39 Open to answer 240 Call barring service 52 Changing your call barring service code 53 Call costs 44 57 Call costs service 57 Call diverting service 49 Call logs 43 Dialled numbers 43 Missed calls 43 Received calls 43 Call time 44 Call waiting service 54 Caller ID service 57 237 Camera 98 Car phone profiles 222 Cell information display 220 Certification 180 Characte...

Page 311: ...g voice calls during data communication 238 Indicators Camera 99 External display 20 Main display 17 Video camera 100 Video telephony 84 Information prompt 22 Infrared 292 303 Transferring data 292 Input language 62 Input modes 58 Internet settings 259 J Java application 181 Downloading 183 Reset settings 185 Settings 185 K Key guard 252 L Language 33 62 230 live Studio 169 Locks Key guard 252 Pho...

Page 312: ...ncoming calls 243 Rejection list 243 245 Restoring data 294 297 299 Ringtone 67 224 Ringtone volume 67 223 S Screensaver 184 Self portrait style 24 Sending my number 57 237 Sent messages 140 149 153 161 Shortcut keys 16 232 Navigation keys 15 23 233 Side shortcut key 16 232 281 Shortcut menu 231 Silent phone profiles 222 SIM card 25 208 Inserting removing 25 SIM tool kit 262 SMS 144 Creating sendi...

Page 313: ... 95 Auto answer 92 Video camera 116 vObject 203 Vodafone live 172 Accessing Vodafone live 172 Vodafone live menu 173 Voice recorder 271 During a call 42 Recording 271 Voicemail 47 W Wallpaper 214 WAP push 147 148 Warranty 309 World clock 35 216 275 ...

Page 314: ...ata such as text sounds pictures and videos to be exchanged between mobile phones PIN Personal Identification Number A number used for SIM card security The number is provided by your service provider If the PIN code is incorrectly entered three times in a row the PIN code lock is set PIN2 Personal Identification Number A number used for modifying Fixed Dialling Numbers and other data saved to the...

Page 315: ... phone The initial security code is 0000 or the four digit number you selected when you concluded your contract Service Provider A company that provides services for mobile phone users SIM Subscriber Identity Module A smart card that stores subscriber information Use your phone with the card inserted The SIM card is provided by your service provider SMS Short Message Service This service allows sh...

Page 316: ...ure the phone is securely in its holder Switch your phone off if you are entering a hospital or other such institution Medical equipment may be affected by the phone so you should observe any building regulation governing phone usage Switch your phone off when on an aircraft The aircraft s systems may be affected by the phone signal You are legally obliged to comply with this recommendation Switch...

Page 317: ...er and power source for longer then necessary as overcharging it will shorten its life Do not short circuit the battery Accidental short circulating can occur when a metallic object causes a direct connection between the and terminals of the battery Do not leave the battery in a cold for example a fridge or hot place for example in a car exposed to direct sunlight as this will effect its performan...

Page 318: ...W kg and when worn on the body as described in this user guide is 0 652W kg Body worn Operation This device was tested for typical body worn operations with the back of the handset kept 1 5cm from the body To maintain compliance with FCC RF exposure requirements use accessories that maintain a 1 5cm separation distance between the user s body and the back of the handset The use of beltclips holste...

Page 319: ...ase the highest tested SAR value is 0 708 W kg As SAR is measured utilizing the devices highest transmitting power the actual SAR of this device while operating is typically below that indicated above This is due to automatic changes to the power level of the device to ensure it only uses the minimum level required to reach the network The World Health Organization has stated that present scientif...

Page 320: ...ettings 5 Camera Take Picture Record Video Scan Data Settings Memory Status 6 My Items Pictures Videos Sounds Ringtones Games More My Saved Pages live Studio Templates Other Documents Memory Status 7 Organiser Tools SIM Tool Kit Calendar Alarms Calculator Converter Voice Recorder Countdown Timer Notepad World Clock Backup 8 Contacts Contacts List Create Contact Call Log Manage Category Manage Grou...

Page 321: ...rd For your future reference we recommend that you fill in your purchase details in the form below The serial number is printed on the bottom of the battery compartment Serial Number Dealer Name Purchase Date 05 05 ...

Reviews: