TOSHIBA PJTV
Digital Convergence Alignment
Module No. TV-GEN-03
Page 5 of 20
3. User convergence and magnetic centering
a. Disconnect any input to Video 1.
b. Enter the user convergence area.
c. Vertically and horizontally center all 3 colors in all adjustable areas.
d. Exit the user convergence area.
e. Enter the convergence alignment service mode.
f. Mechanically center all 3 colors.
i. Stretch 2 pieces of string diagonally across the screen
ii. Rotate the centering rings on each CRTs neck
g. Lock the centering rings with adhesive.
h. Exit the service mode.
4. Electrical centering
a. Use a signal generator.
i. Crosshatch
pattern
b. Enter service mode.
c. Adjust HPOS to center horizontally.
d. Adjust VPOS to center vertically.
5. Green geometry
a. Enter the convergence alignment service mode.
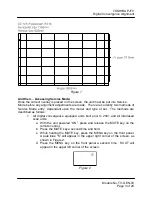
b. Secure the appropriate overlay to the screen.
c. Adjust the green geometry to match the overlay.
i. Start in the center of the screen
ii. Work clockwise around the screen
6. Red convergence
a. Align to green.
7. Blue convergence
a. Align to green.
8. HD convergence
a. Progressive scan 4:3 units only.
b. Component video signal to HD 1 input.
c. 1080i picture on or HD image shape compressed.
9. White balance
a. Set white balance according to the appropriate Service Manual.
b. Check picture quality using a live video signal.
10. Width, height, and vertical linearity
a. Adjust if the memory IC (QA02) has been replaced.
b. Adjust if the crosshatch pattern is not reasonably close to the overlay
pattern.
Readme:
The convergence alignment may not be complete at this point.
Depending on the year of production and the type of unit being adjusted, there
could be several different picture size modes that require adjustment.


