140
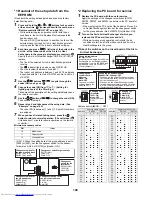
*1 Readout of the setup data from the
EEPROM
(Read both the setting data adjusted locally and the factory
default setting data.)
1
Press and hold the
+
+
buttons for 4 seconds
at the same time.
(corresponds with the numbers on
“Remote controller NRC-01HE” on page 141)
• While performing group operation control with the air
conditioners, the unit No. displayed first represents the
header indoor unit.
The code (DN)
is displayed. In addition, the fans of the
selected indoor unit and Air to Air Heat Exchanger start
running and the flap of the indoor unit starts swinging.
2
Each time you press
(left side of the button), the
unit No. of the indoor units or the Air to Air Heat
Exchangers in the group are displayed successively.
Specify the Air to Air Heat Exchanger UNIT No. (31-OO) to
replace.
• The fan of the selected Air to Air Heat Exchanger starts
running.
• The
indicator lights up when using NRC-01HE.
• The Line (system) address is fixed as 31.
• The Indoor unit address is between 1 and 64. The address
is specified with No.1 to No.4 of SW702 and No.1 and No.2
of SW703.
3
Use the
buttons
/
to cycle through the
codes (DN) one by one.
4
Change the code (DN) from
to
. (Setting for
lighting-up hours of the Filter Sign)
Take notes of the description of the setting data displayed on
the remote controller.
5
Use the
buttons
/
to change the code (DN).
Take notes as in step
4
.
6
Repeat step
5
and take notes of the setup data. (See
“Example” on page 142.)
• The code (DN) is between
and
. Some DN numbers
are skipped.
7
When you have finished taking notes, press the
button to return to normal operation. (The unit stops.)
(It takes about 1 minute to resume operation on the remote
controller.)
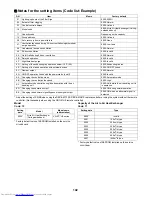
Minimum necessary codes
• (DN) 14: When the setting data of the group address is set to
[0000] or [0001], set the changeover switch for the header/
follower unit (No.4 of SW703) to [Header: ON].
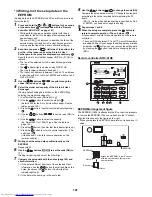
*2 Replacing the PC board for service
1
Replace the PC board with the one for service.
Apply the settings of the changeover switches (SW701,
SW702, SW703, and SW301) as before to the PC board for
service.
• When replacing the PC board of the header unit for an Air
to Air Heat Exchanger system, set the changeover switch
for the group address (No.4 of SW703) to [Header: ON].
2
Turn on the Air to Air Heat Exchanger of which you
replaced the PC board, then proceed to *3.
• While performing group operation control with the air
conditioners, turn on all of the indoor units and Air to Air
Heat Exchangers in the group.
▼
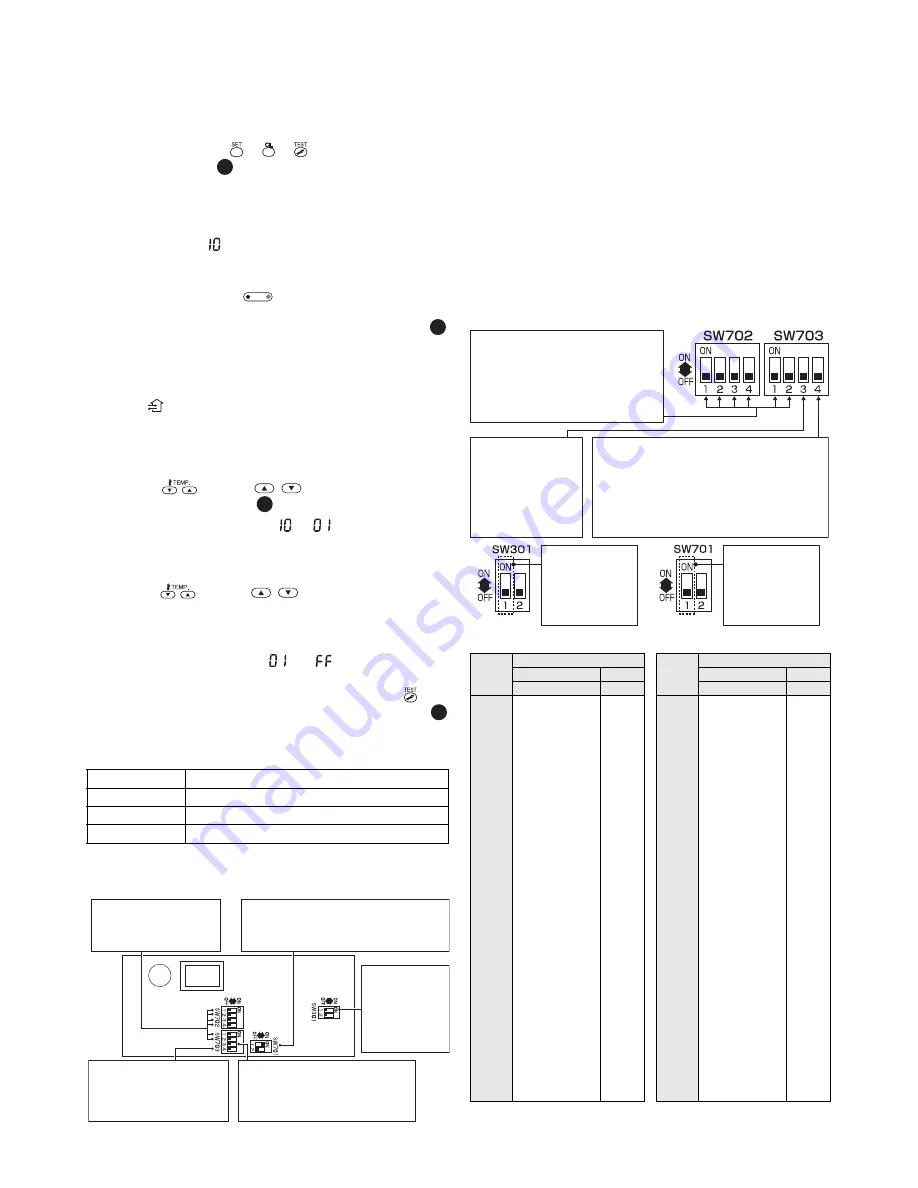
About the switches on the circuit board of the Air to
Air Heat Exchanger
Address switch (
●
: ON, –: OFF)
DN
Item
10
Model code
11
Capacity code
14
Group address
1
UNIT
LOUVER
2
3
6
Changeover switch for pulse/static
SW701 (No.1)
Pulse: ON
Static: OFF
Changeover switch for
the Indoor unit address
SW702 (No.1 to 4),
SW703 (No.1 and 2)
Changeover switch for
the group address
SW703 (No.4)
Header: ON
Follows: OFF
Changeover switch for the
central control address
SW703 (No.3)
Fix: ON
Auto: OFF
Changeover
switch for the
terminator
SW301 (No.1)
100
ȍ
: ON
None: OFF
Changing the address
●
: ON, –: OFF
When there are multiple Air to Air Heat
Exchangers, do not duplicate values
between No.1 to No.4 of SW702 and
between No.1 and No.2 of SW703.
(Factory default: 1)
Changing the header/follower
Header: ON, Follower: OFF
• When an Air to Air Heat Exchanger system
(include multiple units) is used, set only one
unit as the header unit.
• When an Air to Air Heat Exchanger system
linked with air conditioners is used, set all the
Air to Air Heat Exchangers as follower units.
(Factory default: Follower)
Changing the
terminator
100
ȍ
: ON
None: OFF
(Factory default:
OFF)
Changing the
pulse/static
Pulse: ON
Static: OFF
(Factory default:
static)
Changing the
central control
address
Fixed: ON
Auto: OFF
You need not adjust
settings. (Leave the
value as OFF.)
Address
Address switch number
SW702
SW703
1
2
3
4
1
2
1
–
–
–
–
–
–
2
●
–
–
–
–
–
3
–
●
–
–
–
–
4
●
●
–
–
–
–
5
–
–
●
–
–
–
6
●
–
●
–
–
–
7
–
●
●
–
–
–
8
●
●
●
–
–
–
9
–
–
–
●
–
–
10
●
–
–
●
–
–
11
–
●
–
●
–
–
12
●
●
–
●
–
–
13
–
–
●
●
–
–
14
●
–
●
●
–
–
15
–
●
●
●
–
–
16
●
●
●
●
–
–
17
–
–
–
–
●
–
18
●
–
–
–
●
–
19
–
●
–
–
●
–
20
●
●
–
–
●
–
21
–
–
●
–
●
–
22
●
–
●
–
●
–
23
–
●
●
–
●
–
24
●
●
●
–
●
–
25
–
–
–
●
●
–
26
●
–
–
●
●
–
27
–
●
–
●
●
–
28
●
●
–
●
●
–
29
–
–
●
●
●
–
30
●
–
●
●
●
–
31
–
●
●
●
●
–
32
●
●
●
●
●
–
Address
Address switch number
SW702
SW703
1
2
3
4
1
2
33
–
–
–
–
–
●
34
●
–
–
–
–
●
35
–
●
–
–
–
●
36
●
●
–
–
–
●
37
–
–
●
–
–
●
38
●
–
●
–
–
●
39
–
●
●
–
–
●
40
●
●
●
–
–
●
41
–
–
–
●
–
●
42
●
–
–
●
–
●
43
–
●
–
●
–
●
44
●
●
–
●
–
●
45
–
–
●
●
–
●
46
●
–
●
●
–
●
47
–
●
●
●
–
●
48
●
●
●
●
–
●
49
–
–
–
–
●
●
50
●
–
–
–
●
●
51
–
●
–
–
●
●
52
●
●
–
–
●
●
53
–
–
●
–
●
●
54
●
–
●
–
●
●
55
–
●
●
–
●
●
56
●
●
●
–
●
●
57
–
–
–
●
●
●
58
●
–
–
●
●
●
59
–
●
–
●
●
●
60
●
●
–
●
●
●
61
–
–
●
●
●
●
62
●
–
●
●
●
●
63
–
●
●
●
●
●
64
●
●
●
●
●
●
Summary of Contents for VN-M1000HE
Page 150: ......


