background image

P. 6

Installation Type

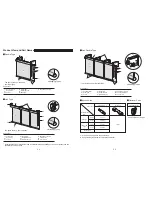
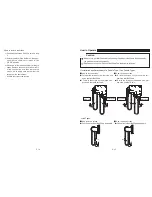
Installation and Detachment of a Double Type

(1)Determine the installation locations of the 

brackets so that the distance between the 

brackets is the same as the width of the prod-

uct that you ordered.

(2)Mount Double Brackets with screws.

(3)Install the screen.

*   The method of lowering the roll screen differs depending upon whether 

it is installed on the window side or the room side.

*   The figure shows an one-sided operation (right).

Use fixing screws that are suitable for 

the strength and the material of the wall 

or window frame to which the brackets 

are to be fixed.

Caution

< Ceiling Attachment>

Install inside of a window frame.

<Wall Attachment>

Install on a wall or outside of a window frame.

Window

frame

Wall Attachment

Ceiling 

Attachment

Product Width

Window

frame

Wall

Ceiling

P. 7

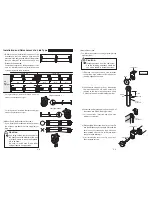
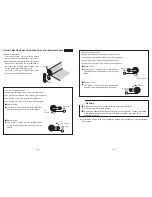
2)Insert the dowel (transparent) at the end of 

the screen into Side Holder on the chain 

side.

*   Do not install the both screens at once.
*   The position of Side Holder on the chain side 

differs depending upon the operating position.

3) Install the black knob on the roll screen body 

onto Side Holder on the opposite side the 

chain as the red part can be seen at the front. 

Once the screen is correctly in place, turn the 

dial in the “CLOSE” direction until it clicks.

*   Install the screens one at a time, and check to 

see if they are parallel to each other.

1) Pull down the screen 5 to 10 cm, then set the 

chain as the position of Chain Connector is 

located on the rear side, then attach Chain 

Connector is about 3 cm below Bottom Bar. 

The direction of the chain which of the screen 

installed on the room side is the opposite of 

the above.

About 3cm

Chain 

Connector

5-10cm

About 3cm

5-10cm

Chain 

Connector

Bottom Bar

Side Holder on the 

chain side

After inserting the dowel, 

rotate the dial.

(4)Finally, open and close the screen two or three 

times, and check their operation.

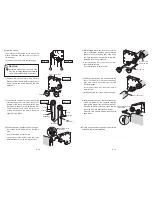
(5)How to remove the screen

1) Pull down the screen 5 and 10 cm and stop 

it.

2) Rotate the dial of Side Holder on the opposite 

side the chain until it stops in the “OPEN” 

direction.

3)Remove a roll screen body slowly with both 

hands. Also, take care that the chain does 

not drop.

*   Do not remove the both screens at once.

Room side

Window side

Summary of Contents for Mytec 01 Loop Double Type

Page 1: ...tractors This manual contains information for a user to safely operate this product Please provide this manual to a customer First edition Caution 2 Product View and Part Names 4 Installation Type 6 Installation and Detachment of a Double Type 6 Installation and Detachment of a Link Type 8 Installation and Detachment of a Link Double Type 11 How to Operate 15 How to Adjust the Screen Operation For...

Page 2: ...as where water may leak should be avoided Make sure to install this product horizontally Do not grab the set bar to carry or lift this product It may cause damage to the product When there is a strong wind either close the window or have the Screen completely rolled up Please do not dismantle the mechanical assembly nor lubricate the moving parts of this product This will ensure physical damage or...

Page 3: ... Bracket Link Joint Pin 7 8 9 Component Product View and Part Names 3 4 6 7 9 8 5 1 1 2 3 4 7 6 3 5 2 1 8 Accessories Optional Parts P 5 Link Joint Pin 1 Winder 2 1 Used with a link type or a link double type 2 Keep carefully together with the instruction manual Side Holder Cover Used only with a link type Link Double Type Wrapping Type Double Bracket Roller Pipe Screen 1 2 3 Weight Bar Weight Bar...

Page 4: ...ending upon the operating position 3 Install the black knob on the roll screen body onto Side Holder on the opposite side the chain as the red part can be seen at the front Once the screen is correctly in place turn the dial in the CLOSE direction until it clicks Install the screens one at a time and check to see if they are parallel to each other 1 Pull down the screen 5 to 10 cm then set the cha...

Page 5: ... to install each Side Holder using at least two fixing screws Caution W2 W1 P 9 3 Install the screen The illustration applies to a ceiling attachment type right operation Install the screen from the chain side Use the following sequence otherwise you will be unable to install the screen Caution 2 Pull down the screen 5 to 10 cm then set the chain as the position of Chain Connector is located on th...

Page 6: ...ite side the chain until it stops in the OPEN direction 3 Remove a roll screen body slowly with both hands Remove the cover and Link Joint Pin of the link section and then remove the screen while taking care that neither the screen nor the chain drops Push this tab to the opposite side the screen and while keeping it pressed turn the cover through 90 P 11 1 Determine the installation locations of ...

Page 7: ...n Connector About 3cm 5 10cm Cover Room side Room side Window side Window side Chain side Side Holder on the chain side Bottom Bar P 1 3 4 While holding the screen insert Link Joint Pin into Link Bracket and then pass it through the hole in the roll screen body side Once you have inserted Link Joint Pin to the rear install the cover while rotating it After installing the cover check to see if it h...

Page 8: ...ll the front side of Ball Chain downward How to Operate Installation and Detachment of a Double Type Link Double Type Caution Make sure to pull Ball Chain slowly when using the product If Ball Chain is pulled quickly the product may not roll up properly Please do not hang from Screen or Ball Chain The product may fall down How to close a screen To lower the screen on the room side pull down the fr...

Page 9: ...n Winder 1 2 times counter clockwise while pulling Winder as directed and unlocking the speed While pulling Turn counter clockwise P 1 7 Lighter roll up Turn Winder 1 2 times counter clockwise while pulling Winder as directed and unlocking the speed 3 To install the screen refer to the installation method that corresponds to the specifications of the screen While pulling Turn counter clockwise Hea...

Page 10: ...tions Refer to P 6 P 8 and P 11 Troubleshooting Cleaning For regular care dust with a feather duster or a hand mop To avoid discoloration avoid cleaning the screen with water or using it in a location susceptible to splashing water Do not disassemble or modify the mechanism inside Roller Pipe Caution Phenomenon Actions When the screen does not stop at the desired height and rolls down When the scr...

Reviews: