background image

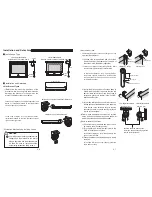
P. 8

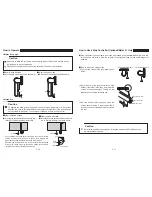
Use mounting screws that are suitable for the 

strength and the material of the wall or window 

frame to which the brackets are to be fixed.

Caution

4-7 cm

Bracket

4-7 cm

Set Bar

Set Bar

Bracket

Set Bar

Set Bar

Bracket

Hook

Hook

(1)The optimum mounting position for the brackets 

is between about 4 and 7 cm inward of both 

ends. If three brackets are used, install them at 

equal intervals.

(2)Install Brackets on the window frame or wall. 

You can temporarily fix the brackets by using 

the tape for temporary positioning provided.

(3)Attach Set Bar to the temporary fixing hook, 

then push it to fix it in place.

(4)In the case of Mytec 01 Loop, set the screen 

so that the position of the ball chain cover is at 

the top.

*   Push the tab on the ball chain to the side opposite 

the screen, and while keeping it pressed, turn the 
cover through 90°.

(5)Finally, open and close the screen two or three 

times, and check the operation and speed at 

which the screen ascends and descends.

(6)To remove Set Bar, push the tab on the 

bracket 1), and while holding it pressed, pull 

the set bar toward you 2).

*   Before removing the screen, refer to P.7 (5) How 

to remove the screen.

<Set Bar Type>

1)

2)

1)

2)

<Ceiling Attachment> <Wall Attachment>

<Ceiling Attachment> <Wall Attachment>

Ball chain cover

Ball chain cover

Push this tab to the side opposite 

the screen, and while keeping it pressed, 

turn the cover through 90°.

Bracket

Bracket

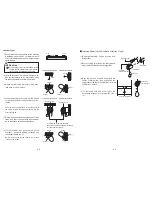
P. 9

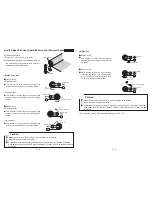
Installing/Removing the Pull Ball Set (Mytec 01 only)

(1)Remove Weight Bar Cap on one side from 

Weight Bar.

(2)With the fixing lever facing the rear (window 

side), insert Pull Ball Set into Weight Bar.

(3)Align the position of Pull Ball Set with the 

center of Weight Bar, then push down the 

fixing lever at the rear of Pull Ball Set to fix the 

Pull Ball Set in place.

(4)To remove Pull Ball Set, carry out the 

installation procedure in reverse((3)

(2)

(1)).


Center of Weight Bar

Pull Ball Set

Pull ball

Weight Bar

Weight Bar Cap

Fixing lever

* Rear (window side)

Push down 

the fixing lever

Summary of Contents for Mytec 01

Page 1: ...orce and the Ascent Speed 12 Fixing Improper Rolled up Screen 14 Troubleshooting 15 Cleaning 15 Roller Blind Mytec 01 Loop Mytec 01 Thank you for purchasing TOSO products To ensure safe use of this product please read the following thoroughly and keep this manual stored Guide for Distributors and Installation Contractors This manual contains information for a user to safely operate this product Pl...

Page 2: ...angers of serious injuries or possible fatal accidents Illustrates that if this product is misused there are dangers of casualties or possible physical damage of the product P 2 When there is a strong wind either close the window or have the Screen completely rolled up Please do not dismantle the mechanical assembly nor lubricate the moving parts of this product This will ensure physical damage or...

Page 3: ... 6 2 2 10 4 5 1 8 9 8 9 Accessories Optional Parts P 5 Bracket For Set Bar type 1 Double sided Tape for Temporary Positioning of Bracket 1 Component Winder 3 300 1400 1410 2700 2 pieces 3 pieces 2 sheets 3 sheets 2 screws 3 screws Product Width mm Fixing Screw Bindφ3 5 16 1 winder Side Holder Cover Pull Grip Set Flat Grip Set Mytec 01 Loop Mytec 01 ー ー 1 Provided only with Set Bar Type 2 Set Bar B...

Page 4: ...ob on roll screen body to Side Holder left side to ensure that the red part is visible at the front Once the screen is correctly in place turn the dial in the CLOSE direction until it clicks 3 In the case of Mytec 01 Loop set the screen so that the position of the ball chain cover is at the top Push the tab on the ball chain cover to the side opposite the screen and while keeping it pressed turn t...

Page 5: ...ree times and check the operation and speed at which the screen ascends and descends 6 To remove Set Bar push the tab on the bracket 1 and while holding it pressed pull the set bar toward you 2 Before removing the screen refer to P 7 5 How to remove the screen Set Bar Type 1 2 1 2 Ceiling Attachment Wall Attachment Ceiling Attachment Wall Attachment Ball chain cover Ball chain cover Push this tab ...

Page 6: ...ly when using the product If Ball Chain is pulled quickly the product may not roll up properly Please do not hang from the screen or the ball chain The product may fall down How to close a screen Pull the back side of Ball Chain downward How to open a screen Pull the front side of Ball Chain downward Fixing over run Pull ball Pull ball Pull Pull P 11 How to adjust the stop position 1 First set the...

Page 7: ...lockwise Winder does not turn if not pulled to unlock direction as illustrated Do not turn more than twice at once Caution Hold Winder securely especially while pulling to unlock direction If Winder is released while pulled to unlock direction Roller Pipe blows off Winder and it may cause accidents or injuries P 1 3 Mytec 01 Faster roll up Turn Winder 1 2 times clockwise while pulling Winder as di...

Page 8: ...t positions Refer to P 9 3 Set the pull ball at the center of the weight bar Refer to P 8 P 1 5 Troubleshooting Cleaning For regular care dust with a feather duster or a hand mop To avoid discoloration avoid cleaning the screen with water or using it in a location susceptible to splashing water Mytec 01 Loop Mytec 01 Common Do not disassemble or modify the mechanism inside Roller Pipe Caution Phen...

Reviews: