


7
ELEVATE
®
PULL-UP
TM
OWNER’S GUIDE
ELEVATE
®
PULL-UP
TM
OWNER’S GUIDE
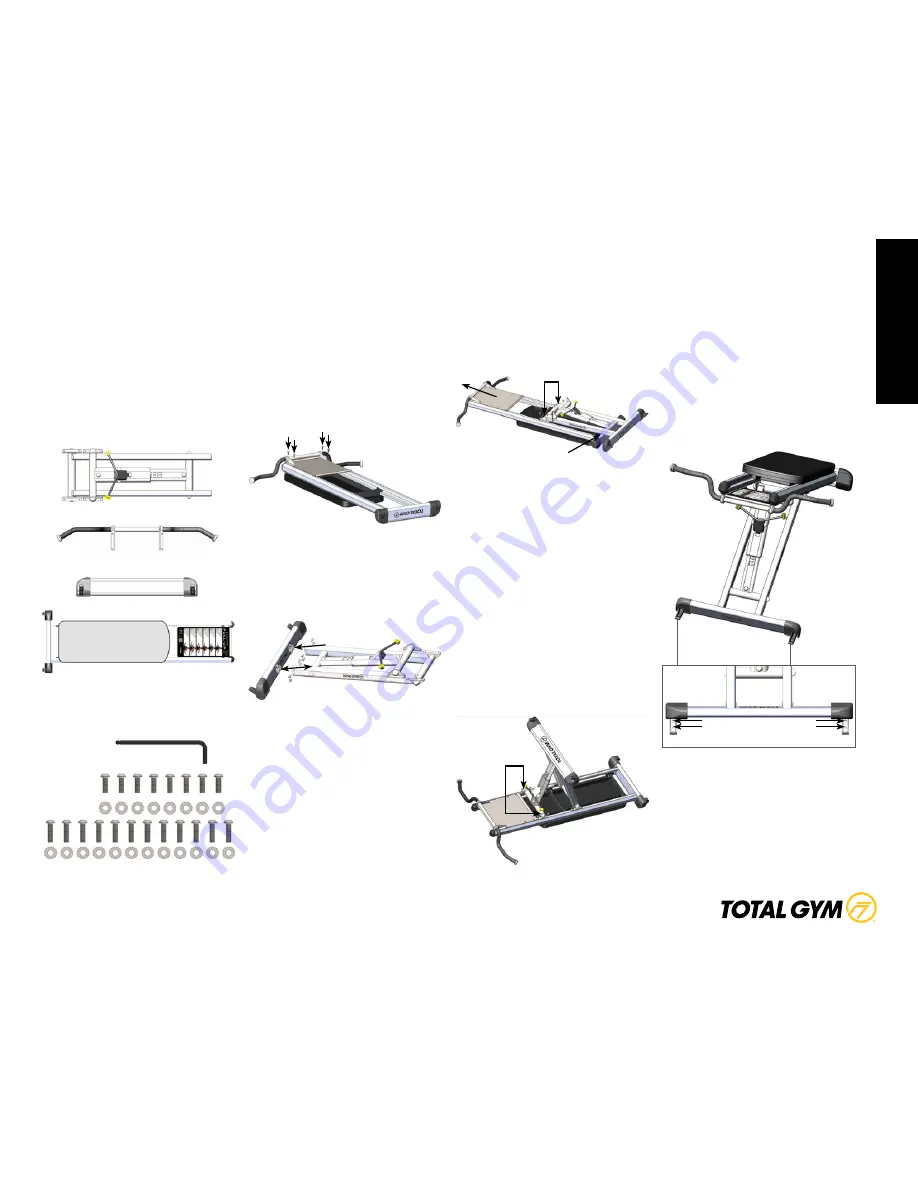
ASSEMBLY
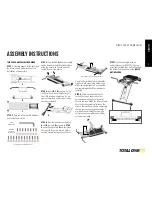
ASSEMBLY INSTRUCTIONS
TWO PERSON ASSEMBLY REQUIRED.
STEP 1.
Carefully unpack all the parts and
the Information & Hardware box at the
installation site if possible.
A
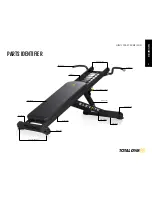
Handle Bars
B
C
STEP 2.
Open the Information & Hardware
box. Inside there will be:
Long M8 Screws & Washers (12)
5 mm
Hex Wrench
Short M8
Screws &
Washers (8)
STEP 3.
Turn Rail & Glideboard assembly
upside down and install the Handle Bars
using the 5 mm Hex Wrench and four
Long M8 screws & washers.
STEP 4.
Attach
B
to
A
as shown. Using
the 5 mm Hex Wrench install all eight
Short M8 screws with washers. Do not
tighten completely until all eight screws
have been installed.
D
STEP 5.
Now that you have assembled
A
and
B
to create
D
as shown in
STEP
4
, you will need to take
D
and lay it over
the top of
C
. Be sure to place a cloth or
packing material between the surfaces.
Place cloth or packing materials here
Hinges
Using the 5 mm Hex Wrench, attach the
hinges on to
C
assembly with four Long
M8 screws and washers. Do not tighten
any completely until all four screws are
installed.
STEP 6.
While one person holds the
Incline Strut up as shown, the other
person aligns the hinges to the set of
holes in the rails. Match the letters at each
hole to the corresponding letters on the
strut so that you know you are connecting
the two pieces correctly, and using the 5
mm Hex Wrench install the screws. Do
not tighten any completely until all four
screws are installed.
Hinges
STEP 7.
Turn the unit right-side up
and position your ELEVATE Pull-Up in a
permanent location then bolt to floor from
the Anchor Feet as shown below.
BOLTS
NOT INCLUDED.
Bolt to floor from Anchor Feet


