Congratulations on purchasing your
new Total Gym
®
1100.
With this product in your home, you have everything you need to start your
own workout program, to tone and strengthen the important muscle groups
of your upper and lower body. This is vital for all of us, regardless of age,
sex, or fitness level, and regardless of whether your primary goal is body
sculpting, weight control, health maintenance, or more energy for
daily activities.
Strength training not only tones and conditions the muscles we use every
day to stand, walk, lift, and turn; it can actually transform our body
composition. By reducing body fat and increasing the proportion of lean
muscle in our bodies, strength training can effectively turn up our metabolic
thermostat, so that we burn calories all the time, no matter what we’re
doing.
It’s easy—all you have to do is spend 15 to 20 minutes a day, 3 to 4 days
per week on your Total Gym 1100 to start realizing the benefits.
Be sure to read through this Owner’s Manual carefully.
It is the authoritative source of information about your
Total Gym 1100.
If you have questions about your Total Gym 1100, please call
Customer Service at 1-800-321-9236,
Monday through Friday, 9:00 AM to 5:00 PM, Eastern Standard Time.
TABLE OF CONTENTS
Safety Instructions & Warnings . . . . . . . . . . . . . . . .4
Product Specifications . . . . . . . . . . . . . . . . . . . . . .5
Set Up . . . . . . . . . . . . . . . . . . . . . . . . . . . . . . . . . . .6-7
Accessories . . . . . . . . . . . . . . . . . . . . . . . . . . . . . . .8-10
Starting Out . . . . . . . . . . . . . . . . . . . . . . . . . . . . . . .11
Inspection, Maintenance & Storage . . . . . . . . . . . . .12-13
Parts List and Exploded Drawing . . . . . . . . . . . . . . .14
— 3 —
9/1/04
TOTAL GYM
®
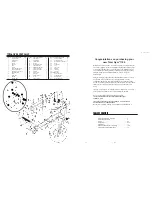
PARTS LIST
24
23
22
28
27
29
21
27
24
26
26
25
PART #
PART DESCRIPTION
QTY.
1
Vertical Column
1
2
Tube Rollers
2
3
Stoppers
4
4
Screws
3
5
Washers
14
6
Nuts
7
7
Screws
4
8
Upper Rail (right & left)
1
9
Center Support Rail
1
10
Rectangular Tube Caps
6
11
Plastic Bushings
4
12
Shaft
1
13
Lower Rail
1
14
Platform
1
15
Platform Rail
1
PART #
PART DESCRIPTION
QTY.
16
Left Fender
2
17
Right Fender
2
18
Fender Bolts
4
19
Wheels
4
20
Wheel Spacer Tube
4
21
Adjustment Tube
1
22
Plastic Slide Bushing
1
23
Square Tube Cap
1
24
Round Tube Caps
6
25
Eyebolts
2
26
Eyebolt Nuts
2
27
Nut Caps
2
28
Spring Loaded Pin
1
29
“C” Pin
1
30
Cable Assembly
1
PART #
PART DESCRIPTION
QTY.
31
Pulley Assembly
4
32
Handle Assembly
2
33
Multi Function Attachment
1
34
Grips
2
35
Foam Pads
2
36
Pins
3
37
Leg Pulley
1
38
Bracket
1
39
“D” Ring
1
40
Harness
1
LITERATURE PACK
41
Owner’s Manual
1
42
Exercise Booklet
1
43 Warranty
Card
1
50
Safety Hitch Pin
1
A
Meijer.com


