English
- for more material, turn to the right (Figure 7)
Spraying Techniques
- To ensure optimum results, the surface to be spra-
yed must be completely clean and smooth before
being sprayed. We recommend carefully preparing
the surface beforehand.
- Cover all surfaces that you do not want to spray,
including screws and nuts.
- Perform a spray test on a piece of cardboard or on
a similar surface before starting to use the product;
this will allow you safely adjust the spray gun. You
should also begin spraying away from the surface
and avoid breaks while spraying on the surface to
be sprayed.
- The spraying movement should be from the arm
rather than from the wrist in order to ensure a cons-
tant distance between the spray gun and the sur-
face. Choose a distance of between 5 and 15 cm,
depending on the desired width of the spray stream.
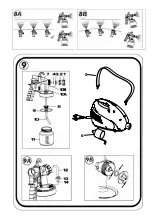
Figure 8A shows the correct position, in which the
distance to the object is constant; Figure 8B shows
the incorrect position, as the irregular distance pro-
duces an uneven spray.
- Move the spray gun evenly from side to side or up
and down, depending on the spray-pattern setting.
- Even movement of the spray gun will produce a
surface with uniform quality.
- If the spray material accumulates in the nozzle and
the air cap, clean both parts with solvent or water.
BREAKS
If you need to stop using the device for 4 hours or
less:
- Turn off the device.
- When using two-component lacquers, the device
must be cleaned immediately.
AFTER USE
For the device to work correctly, it must be cleaned
properly. We recommend the following:
- Unplug the device. During long breaks and after
finishing work, release the air from the tanks. Do this
by opening the tank for a short period of time and
closing it again or by pressing the trigger of the spray
gun and emptying the paint into its original container.
- Disassemble the spray gun.
- Unscrew the tank. Empty the remaining spray ma-
terial back into its container.
- Clean the tank and the fluid hose using a brush.
- Fill the tank with solvent or water and screw it to
the spray gun. Only solvents with a flash point above
21ºC can be used.
- Reassemble the spray gun (Figure 9).
- Plug the power cord into the mains, turn on the
device and spray the solvent or water into a con-
tainer or cloth.
- Turn off and unplug the device.
- Unscrew the tank and empty it. Remove the fluid
hose and tank seal.
- Pull the air hose (Figure 9A-12) above the spray-
gun body. Unscrew the valve cover (Figure 9A-13)
and remove the membrane (Figure 9A-14). Carefully
clean all the parts.
- Unscrew the nozzle adjuster ring and remove the
air cap and the nozzle. Clean the air cap, the nozzle
seal and the nozzle with a brush and solvent or
water. Do not use sharp metal objects to clean the
seals, the membrane and the nozzle orifices or air-
drain valves of the spray gun.
- Clean the outside of the spray gun using a cloth
soaked in solvent or water.
- Reassemble the parts.
Maintenance
Air cap/nozzle - Remove the air cap and the nozzle
from the spray gun and submerge in clean solvent.
Dry using compressed air. If the small orifices beco-
me blocked, also submerge the air cap in solvent. If
it is necessary to scrape the orifices, use a toothpick
or straw or any other material that is not too hard.
Do not clean the orifices using wire, nails or other
hard objects. Failure to follow these instructions
may cause permanent damage to the cap, produ-
cing larger spray streams and resulting in defective
spraying results.
The set includes a cleaning pin. This tool can be
used to clean and eliminate paint remains from
the small orifices on the spray gun. If you cannot
completely eliminate paint remains, use this tool
by following the detailed maintenance instructions
provided.
Storage
Store the spray gun with a little solvent in the air cap
and nozzle to prevent the gun needle from drying
out or breaking, thereby causing potential loss of air
or liquid.
ASSEMBLY
The device should only be used with the membrane
intact (Figure 9A-14). Place the membrane with the
stem facing up on the lower part of the valve. See
also the mark on the body of the spray gun. Place
the valve cover carefully and screw tightly. Insert
the air hose into the valve cover and the connector
10


