102
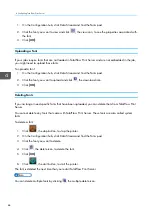
. This hotfix corrects an access problem. Without it, Windows 7 asks you for
authentication, but does not pass your credentials to the printer.
When you submit a job from removable media (DVD or USB), you cannot do other tasks at the console
until the job is completely spooled or cancelled.
Submitting a Print Job from the Console
You can submit a job from the console.
To submit a print job from the console:
1.
Edit the virtual printer where you want to submit the job and make sure that the values of [[JJoob
b
ssuub
bm
miissssiioonn m
meetthhood
d]] include [[C
Coonnssoollee]].
See
Changing a Virtual Printer, p. 73
for instructions.
2.
In the printer control bar, click [[SSuub
bm
miitt JJoob
b]].
3.
Select a virtual printer.
4.
If you want to submit multiple jobs, select [[M
Muullttiip
pllee jjoob
bss]].
5.
If you want to set properties for a single job, select [[O
Op
peenn JJoob
b PPrroop
peerrttiieess]].
You cannot set properties for multiple jobs.
6.
Click [[O
OK
K]].
7.
Select the jobs that you want to print and click [[FFiillee U
Up
pllooa
ad
d]].
The jobs can be on a USB storage device, a CD or DVD, or a mapped network drive.
8.
If you selected [[O
Op
peenn JJoob
b PPrroop
peerrttiieess]], set properties for the job and click [[O
OK
K]].
Submitting a Job from a Windows Hot Folder
In order to submit jobs from a remote Windows system to a virtual printer using a hot folder, you must
map a network drive to the
Printer
folder, which contains all the virtual printer hot folders.
This procedure explains how to map a network drive on Windows 7. Other versions of Windows might
be different.
1.
In TotalFlow Print Server, make sure that the [[H
Hoott ffoolld
deerrss]] network protocol is enabled.
See
for instructions.
2.
Edit the virtual printer and make sure that the values of [[JJoob
b ssuub
bm
miissssiioonn m
meetthhood
d]] include [[H
Hoott
ffoolld
deerrss]].
See
Changing a Virtual Printer, p. 73
for instructions.
3.
On the Windows [[SStta
arrtt]] menu, right-click [[C
Coom
mp
puutteerr]], then click [[M
Ma
ap
p nneettw
woorrkk d
drriivvee......]].
4.
Select a drive letter.
Summary of Contents for Print Server R-60
Page 2: ......
Page 14: ......
Page 56: ......
Page 62: ...2 60 ...
Page 102: ...4 100 ...
Page 150: ...5 148 ...
Page 162: ...6 160 ...
Page 172: ...7 170 ...
Page 178: ...8 176 ...
Page 198: ...10 196 ...
Page 208: ...206 ...
Page 218: ...Copyright 2015 2015 Ricoh Company Ltd All rights reserved ...
Page 219: ......

