38
GB
Cleaning the drain valve with built-in water
¿
lter
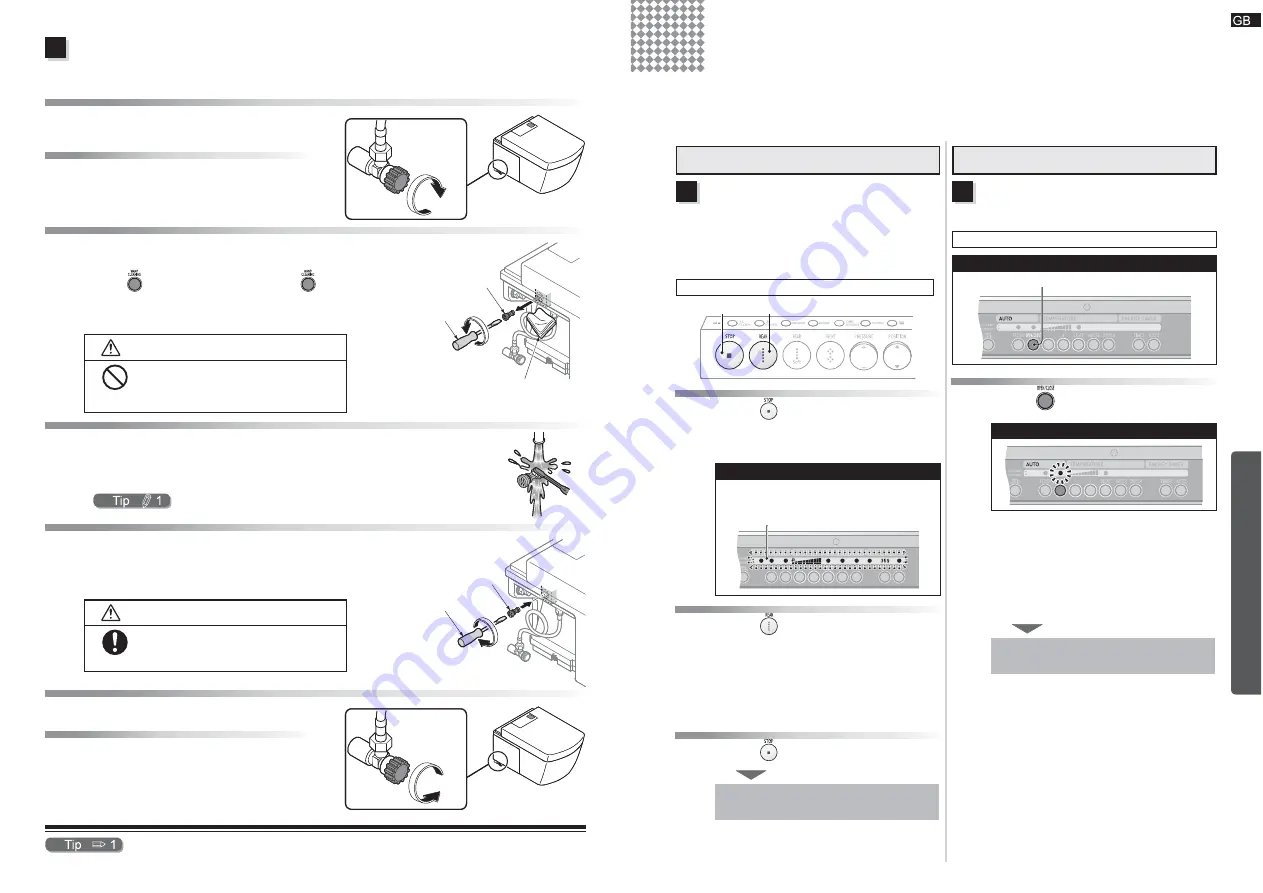
Clean the drain valve with built-in water
¿
lter if the water pressure during rear or front washing seems
to have weakened.
1
1
Remove the cover panel (left).
Removing the cover panel
Ź
See page 16.
2
2
Close the water shut-off valve and
stop the water supply.
3
3
Detach the drain valve with built-in
water
¿
lter.
(1) Press
and extend the wand, and then press
again.
(This removes the pressure in the water pipes.)
(2) Use a
À
at-blade screwdriver to loosen the drain
valve with built-in water
¿
lter and then pull it out.
CAUTION
Prohibited
Do not detach the drain valve with built-
in water
¿
lter while the water shut-off
valve is still open.
Doing so will cause water to spill.
Ɣ
4
4
Clean the drain valve with built-in water
¿
lter.
Thoroughly remove the debris on the
¿
lter with a toothbrush or similar tool.
Use a cotton swab or similar to remove debris from inside the attachment hole for the
drain valve with built-in water
¿
lter.
5
5
Reattach the drain valve with built-in
water
¿
lter.
Insert the drain valve with built-in water
¿
lter and use a
À
at-blade screwdriver to tighten it thoroughly.
CAUTION
Required
Thoroughly tighten the drain valve with
built-in water
¿
lter.
Failure to do so could cause a water leak.
Ɣ
6
6
Open the water shut-off valve.
7
7
Reattach the cover panel (left).
Attaching the cover panel
Ź
See page 16.
Cleaning the water
¿
lter
Do not use cleanser. Wash with plain water.
Do not break the water supply
¿
lter or detach it from the drain valve.
Ɣ
Ɣ
Ɣ
Ɣ
Ɣ
Ɣ
Turn clockwise
to close
Turn clockwise
to close
Drain valve with built-in
water
¿
lter
Drain valve with built-in
water
¿
lter
Flat-blade screwdriver
Flat-blade screwdriver
Turn anticlockwise
Turn anticlockwise
Rag or other cloth
Rag or other cloth
Drain valve with built-in
water
¿
lter
Drain valve with built-in
water
¿
lter
Flat-blade screwdriver
Flat-blade screwdriver
Turn clockwise
Turn clockwise
Turn
anticlockwise
to open
Turn
anticlockwise
to open
39
Settings
GB
&KDQJLQJVHWWLQJV
Before changing other settings, follow the instructions in the next section, "Setting whether or
not the remote control makes sound" to turn the sound on if it is currently off. You will use this
sound to con
¿
rm changes to other settings.
Remote control sound
Setting whether or not the
remote control makes sound
By default, when you press a remote control button,
you will hear a sound when the main unit receives the
signal.
You can choose to turn this con
¿
rmation sound off.
Default setting:
Sound on
STOP button
REAR button
1
1
Press
for at least 10
seconds.
Hold the button down until the whole remote
control display blinks.
Back of the remote control
Check
All the indicators on the remote control display
section blink
2
2
Press
for at least 5 seconds.
The setting changes every time the button is
pressed for at least 5 seconds.
To turn the sound ON:
Press the button until you hear a short beep.
To turn the sound OFF:
Press the button until you hear a long beep.
3
3
Press
again.
This completes the change to the
settings.
Ɣ
Ɣ
Automatic opening and closing
Setting whether or not automatically
open and close the lid
Default setting:
on (opens and closes automatically)
Back of the remote control
OPEN/CLOSE button
1
1
Press
.
Back of the remote control
Each time you press the setting changes
between ON and OFF.
To turn automatic opening and closing on:
Make the "
Ɣ
" appear in the display section
on the back of the remote control.
To turn automatic opening and closing off:
Turn "
Ɣ
" off on the remote control display.
This completes the change to the
settings.
Ɣ
Summary of Contents for NEOREST SE
Page 1: ......


