background image

3

EN

Safety Precautions

Be sure to carefully read this “Safety Precautions” document before beginning installation.  
Please comply with all safety warnings and precautions.

Symbol

Meaning

 WARNING

This symbol indicates misuse may result in death or serious injury.

 CAUTION

This symbol indicates misuse may result in injury or physical damage.

 WARNING

Do not use this product with any power supply other than 

the one specified. (AC220-240 V, 50 Hz)

Doing so may result in heat or fire.

Confirm that the power source connection is connected 

correctly.

Doing so may result in electrical shock or fire.

Do not use the product when the power cord or power 

source connection is damaged or the power source con-

nection is loose.

Doing so may result in electrical shock or fire.

Do not install a power connecting part directly beneath a 

water supply location. Do not allow the water supply hose 

to touch the power connecting part.

Doing so may cause condensation resulting in a fire, electrical 

shock, heat or a short.

Do not use other water then allowed by the laws and 

ordinances of the region of use.

Only use potable water. Do not use seawater or recycled 

water.

Doing so may cause irritation to the skin and malfunction.

Do not install the product on moving vehicles such as 

wheeled vehicles or boats.

Doing so may cause fire, electric shock, short circuit or mal-

function.

The toilet seat, toilet lid, main unit, or other parts may come 

loose and fall off, resulting in injury.

Do not do anything that may damage the power cord or 

power source connection.

Do not strike, yank, twist, excessively bend, damage, alter, 

or heat any power cord or power source connection. Also, 

do not place anything heavy on, bind or pinch them.

Using a damaged power cord may result in a fire, electrical 

shock, heat or a short circuit.

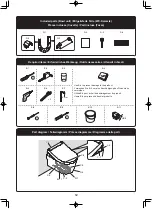
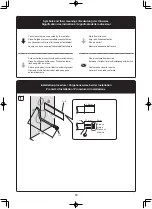
Do not dismount and mount the main unit while power is 

on or water is flowing to the main unit.

Otherwise, electric shock or trouble may occur.

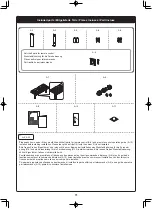
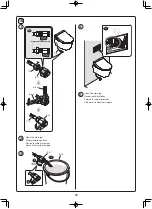
Do not cut the string (C-9-1) that connects the main unit 

(C-1) and base plate.

Doing so may cause fire, electrical shock, overheating, short 

circuit or breakdown.

This is an electrical product. Do not locate it anywhere 

water is likely to get on it. Do not locate the product in a 

humid environment where water may form on the surface 

of the product.

When using the product in a bathroom, install a ventilation 

fan or opening, so that the bathroom has sufficient airflow 

to avoid extreme humidity.

Failure to do so may result in electrical shock or fire.

Always connect the product to the cold water supply.

Connecting to hot water supply may result in burns and equip-

ment damage.

Confirm that wiring is connected correctly (L terminal: Live, 

N terminal: Neutral).

Incorrect wiring may cause mechanical failure.

Always connect to a ground fault circuit interrupter (30 mA 

or less).

If the power cord is damaged, avoid danger by having the 

manufacturer's repair department or equivalent specialist 

replace it.

When installing this product, comply with the regional 

codes and standards on installation work and electrical 

work.

All-pole disconnection incorporated in the fixed wiring 

shall be provided.

Summary of Contents for WASHLET RG

Page 1: ...stallation Montez correctement les pi ces conform ment aux instructions zPrima dell installazione assicurarsi di leggere questo manuale di installazione Montare le parti correttamente a seconda delle...

Page 2: ...Keramik Pi ces incluses Cuvette Parti incluse Tazza 12 Required items Erforderliches Werkzeug Outils n cessaires Utensili richiesti 12 Part diagram Teilediagramm Pi ces diagramme Diagramma delle parti...

Page 3: ...y Do not do anything that may damage the power cord or power source connection Do not strike yank twist excessively bend damage alter or heat any power cord or power source connection Also do not plac...

Page 4: ...turn on the electricity and water supply for the prod uct until installation work is complete y y Do not damage the connection components on the water supply hose C 2 y y The water supply pressure ran...

Page 5: ...ahr oder es k nnen andere Defekte verursacht werden Der Toilettensitz der Deckel der Hauptk rper des Produkts oder andere Teile k nnten sich lockern abfallen und Verlet zungen verursachen Achten Sie d...

Page 6: ...werden Dieses Produkt ist als Ger t der Klasse I klassifiziert und muss geerdet werden Installieren Sie dieses Produkt in der N he des Leistungsschalters Verwenden Sie den neuen Schlauchsatz der dem...

Page 7: ...ie un choc lectrique un court circuit ou un dysfonctionnement Le si ge des toilettes l abattant des toilettes le corps principal du produit ou d autres pi ces pourraient se desserrer et tom ber entra...

Page 8: ...de telle mani re que son coupe circuit soit accessible Utilisez le nouveau flexible d alimentation en eau fourni avec le produit Ne r tilisez pas d anciens flexibles Avant d installer le Washlet y y N...

Page 9: ...e causare un incendio shock elettrico corto circuito o altre avarie La seduta il coperchio il corpo principale del prodotto o altre parti del vaso potrebbero allentarsi e cadere provocando delle lesio...

Page 10: ...tore di corrente Utilizzare il nuovo set di tubi flessibili in dotazione con la presente apparecchiatura Non riutilizzare un set di tubi flessibili Precauzioni prima dell installazione y y Non attivar...

Page 11: ...cht installiert wird Veuillez demander au propri taire s il d sire que des pi ces antivol pour la commande distance A 6 et qu un guide de fonctionnement pour la commande distance A 10 soient install s...

Page 12: ...Erforderliches Werkzeug Outils n cessaires Utensili richiesti D 1 D 2 D 3 D 4 D 5 D 6 B 1 B 2 B 3 B 4 Use B 4 to prevent damage to the product Verwenden Sie B 4 um eine Besch digung des Produkts zu v...

Page 13: ...en Les t ches doivent tre effectu es par l installateur Lavoro che deve essere effettuato dall installatore Work flow direction Zeigt den Arbeitsablauf an Flux de travail Mostra la sequenza del lavoro...

Page 14: ...amik siehe Installationsanleitung der WC Keramik Installation de la cuvette voir le guide d installation de la cuvette Installazione della tazza consultare la guida per l installazione della tazza 1 2...

Page 15: ...lst ndig angezogen wird sich C 1 seitlich verschieben Ne pas serrer compl tement la vis A 7 1 entra nera un d placement lat ral de C 1 Il mancato serraggio completo della vite A 7 1 causa uno spostame...

Page 16: ...icken einrastet Stellen Sie nach der Anbringung sicher dass sich C 9 1 nicht l sen l sst selbst wenn Sie daran ziehen Ins rez l l ment C 9 dans l l ment A 7 jusqu ce qu un d clic se fasse entendre Apr...

Page 17: ...r ckt und fahren Sie mit Schritt 4 fort Maintenez enfonc et passez l tape 4 Premere tenere e procedere al passaggio 4 WARNING ACHTUNG AVERTISSEMENT PERICOLO Do not dismount and mount the main unit whi...

Page 18: ...tap Wasserzuleitung ffnen Ouvrez le robinet principal Aprire il rubinetto principale Close the main tap Absperrventil schlie en Fermez le robinet principal Chiudere il rubinetto principale 10 1 4 3 2...

Page 19: ...ez le robinet principal Chiudere il rubinetto principale B 11 8 9 1 2 3 1 2 3 1 2 3 C 3 A 8 C 6 11 C 2 1 C 5 C 2 B 6 1 B 6 2 C 2 C 2 1 C 2 C 5 1 2 Open the main tap Wasserzuleitung ffnen Ouvrez le rob...

Page 20: ...20 D 1 C 5 C 2 B 11 D 3 D 2 D 1 C 3 C 6 1 2 3 4 5 D 4 Be sure to confirm D 4 Achten Sie darauf D 4 zu best tigen Assurez vous de confirmer D 4 Assicurarsi di verificare D 4 12...

Page 21: ...dass sie von der Seite nicht sichtbar sind Binden Sie C 6 und C 3 mit D 6 zusammen Poussez C 6 et C 5 dans la cuvette de fa on ce qu ils ne soient pas visibles sur le c t Reliez C 6 et C 3 ensemble l...

Page 22: ...A 11 22 Peel off the tape Klebeband abziehen Enlevez la bande de protection Staccare il nastro 15 16...

Page 23: ...ontaggio del telecomando Switch the breaker on the distribution board to ON Den Schutzschalter am Verteiler einschalten Activez le disjoncteur sur panneau de r partition Attivare l interruttore sul qu...

Page 24: ...orarily place the remote control in the position determined in 20 and confirm the signal reception of A 1 Platzieren Sie die Fernbedienung provisorisch in der in 20 bestimmten Position und best tigen...

Page 25: ...eschlossen Installation termin e Installazione completata 1 B 4 B 3 Hold down Gedr ckt halten Maintenez appuy Mantenere premuto 3 4 Open the main tap Wasserzuleitung ffnen Ouvrez le robinet principal...

Page 26: ...n board yTo avoid leakage remove the batteries from the remote control Wenn das Produkt f r l ngere Zeit nicht verwendet wird zum Beispiel wenn es in einem noch unbewohnten neu errichteten Geb ude ins...

Page 27: ...27 MEMO...

Page 28: ...2021 3 15 D07B39...

Reviews: