

4
EN
Safety Precautions (Continued)
CAUTION
Install the Washlet properly according to the Installation
Guide.
Improper installation may result in water leakage, electric
shock or fire.
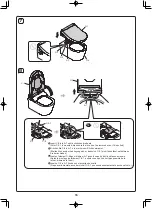
Do not lift the product by the toilet seat or toilet lid.
Doing so may result in the product main body dislodging, falling
and causing injury.
Do not fold or crush the water supply hose; do not dam-
age by cutting with a sharp object.
Doing so may result in water leakage.
Do not remove the water filter drain valve while the shutoff
valve is open.
Doing so will result in water leakage.
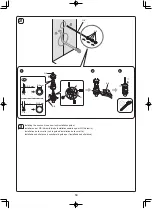
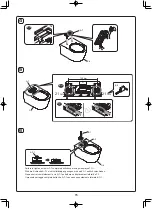
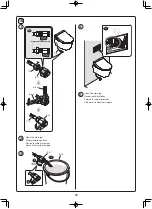
Push the product main body securely onto the base plate.
After pushing the product main body until a click sound is
heard, pull it slightly toward you to make sure that the
product does not detach.
Not doing so may result in the product main body dislodging,
falling and causing injury.
Make sure the plus and minus signs on the batteries are
aligned correctly before inserting them.
Otherwise, the batteries may leak fluid, generate heat, rupture,
or ignite.
When the product will not be used for a long time, remove
the batteries from the remote control.
Failure to do so may cause the batteries to leak fluid.
This product is classified as Class I Equipment and must be grounded.
Install this equipment so that its power breaker is accessible.
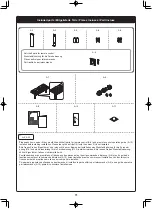
Use the new hose set included with this equipment. Do not reuse an old hose set.
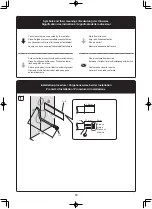
Precautions before installation
y
y
Do not turn on the electricity and water supply for the prod-
uct until installation work is complete.
y
y
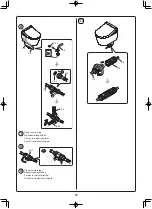
Do not damage the connection components on the water
supply hose (C-2).
y
y
The water supply pressure ranges from 0.1 MPa <dynamic> -
1.0 MPa <static>.
Use the unit within the said pressure range.
y
y
The temperature of the water supply should be within a
range of 0 to 35 °C. Make sure the temperature is within this
range.
y
y
Working ambient temperature is within the range of 0 to
40 °C. Make sure the temperature is within this range.
y
y
Do not use water supply hoses (C-2) other than those sup-
plied with the product.
*Because a water flow test is conducted on each product at
the factory, water may remain inside the product. This water
does not indicate a problem with the product.
y
y
The packing bag on the end of the water supply hose (C-2) is
to protect from damage, so do not remove it until step
8
-
6
.
y
y
Perform wiring correctly according to this product's specifica
-
tions (rated power 7 A or more, 220-240 VAC (50 Hz)).
*Power supply, rated power consumption is indicated on the
label of this product.
y
y
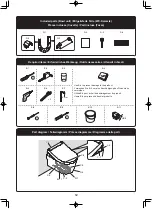
Connect the 60227 IEC 53 cord to the connector (A-8).
y
y
The following conditions may affect the reception perfor
-
mance of the remote control, resulting in it not being able to
operate the main unit.
y
- When the room size, the layout of fixtures etc. inteferes
y
- When the color of the ceiling or walls is too dark, or their
shape or material inteferes
y
- When there is a rack or cabinet installed on the wall behind
the main unit
y
- When an inverter lighting system is used
Change the position of the remote control or try from the
opposite wall.
Summary of Contents for WASHLET RG
Page 27: ...27 MEMO...
Page 28: ...2021 3 15 D07B39...


