SYSTEM DESCRIPTION
The CPDS
™
Series 2 from Touch ‘n Seal
®
is a cost-effective,
easy-to-use dispensing system for Class 1 fire retardant
2-component polyurethane spray foam. A self-contained,
portable unit, the CPDS Series 2 combines dual-valve
disposable chemical cylinders with a unique air compressor
to deliver a consistent flow of insulating foam up to 150’ (46
meters) away. Ideal as a bulk system substitute for small
to medium-sized projects, the CPDS Series 2 is lightweight,
easy to transport and fits easily through standard doors and
entrances.
INSTALLATION & SET UP
Depending upon the potential for exposure, some or all
of the following personal protective equipment may be
required: Safety glasses, chemical respirator, face shields,
gloves, aprons or coveralls, footwear, chemical protective
jackets and/or pants. Refer to safety precautions.
Position the CPDS
1.
Series 2 on a level surface and lock
the front casters (K) to prevent accidental movement.
Ensure the CPDS Series 2 control panel Pressure Sup-
ply On/Off switch (B) is in the “Off” position, the CPDS
Series 2 electrical cord is unplugged and the external
power supply quick coupler (Q) is not connected to any
external air supply. Open the retention gate (E) by first
removing both retention pins (F), then placing
one foot
on the bottom frame
and lifting the gate with both
hands
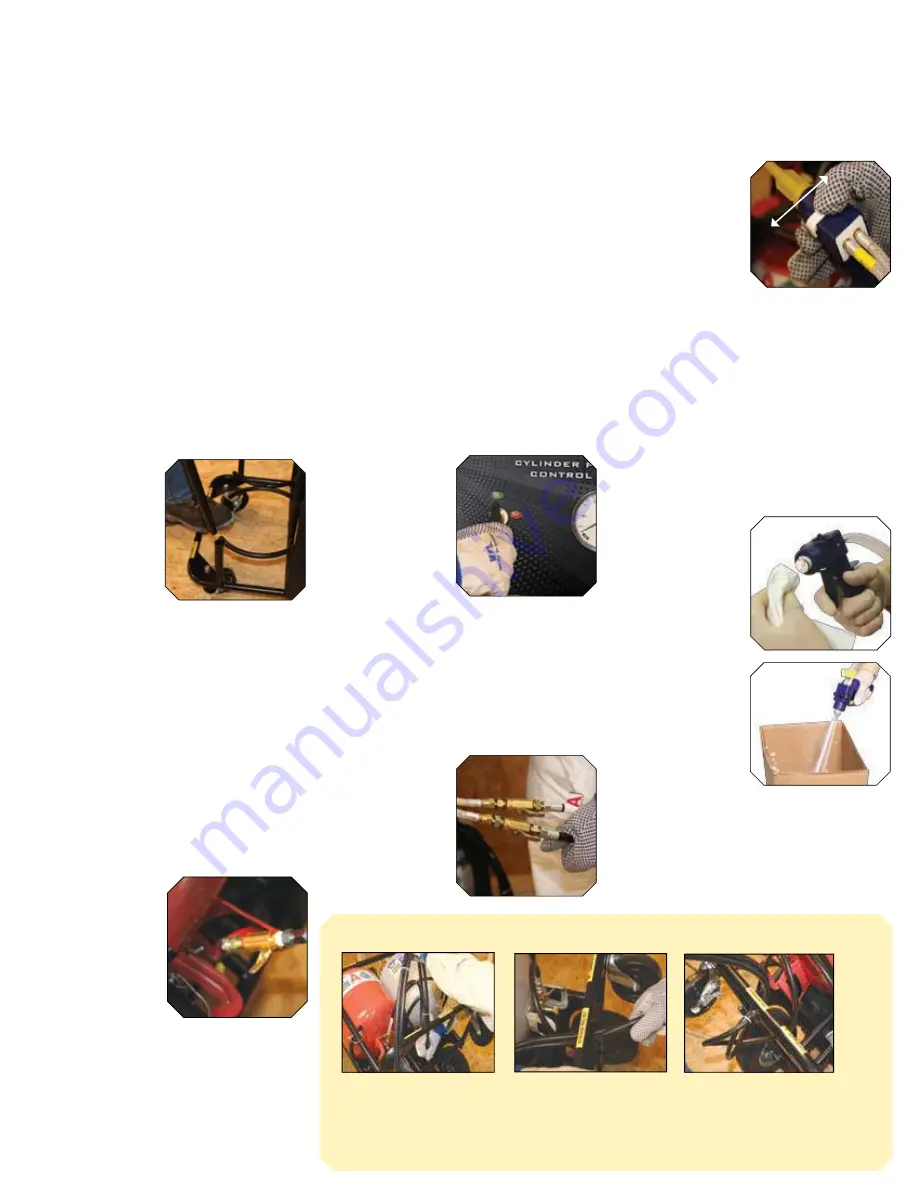
(Photo 1)
. Fac-
ing the unit, place the
“A” cylinder in the left
position and the “B”
cylinder in the right
position ensuring the
labels are positioned
upright and facing for-
ward. Reinstall reten-
tion gate, securing with
retention pins.
Attach one of the clear air pressurization hoses
2.
(M) to each of the yellow chemical cylinder
valves (L) on top of the chemical cylinders. It
does not matter which air pressurization hose is
attached to which chemical cylinder. Tighten both
connections with an adjustable wrench. Do not open
yellow chemical cylinder valves at this time.
Ensuring that the toolbox (A) is closed and the retention
3.
gate is secured, carefully tilt the CPDS Series 2 on its
back to access the bottom of the chemical cylinders.
Uncoil the hose sets (J).
4.
Connect the “A” labeled hose to the yellow chemical valve
5.
on the bottom of cylinder “A” (I). Repeat for cylinder “B” (I).
Ensure all chemical hose valves are in the “Off” position by
moving valve handles perpendicular to the valve
(Photo 2)
.
Feed the chemical
6.
hoses through the hose
strain relief (T). Leave
at least a 12” loop
to prevent excessive
strain or hose kinks.
If properly installed,
pulling the chemical
hoses will not move the
chemical cylinders.
See
Hose Strain Relief section for additional instructions.
NOTE: Over tightening of any connections/fittings
(hoses, valves, etc.) may result in product leakage
and failure. Tighten all connections/fittings only as
necessary to prevent leaks.
Engage the safety on the spray foam applicator.
7.
Slowly open both cylinders by turning the bottom yellow
8.
chemical outflow valves counter-clockwise.
Slowly open the tank-to-hose valves (G) of each cylinder
9.
until the valve handles are parallel to the chemical
hoses. Inspect all connections for leaks and tighten
connections as needed.
Carefully lift the CPDS
10.
Series 2 into an upright position.
Wind the chemical hose assembly around the chemical
hose storage hooks (D).
Disengage the front caster locks and move the CPDS
11.
Series 2 to the work area. Lock front casters.
SYSTEM OPERATION
IMPORTANT:
Refer to Safety Precautions for proper personal
protection equipment prior to use.
Verify that the foam applicator safety is engaged
1.
(Photo 5)
.
Connect air compressor electrical cord to single phase,
2.
120V electrical supply using minimum 12 gauge grounded
(3 prong) extension cord up to 50’ (15 meters) long. Longer
extension cords must be heavier gauge.
Turn on the compressor (S). The air compressor is pre-
3.
set and pre-tested at the factory. Do not adjust. Allow
the air compressor to cycle until it stops running; usually
less than 1 minute. This indicates that the proper starting
pressure has been reached.
Turn the Pressure Supply On/Off switch (B) to the “On”
4.
position
(Photo 3)
.
Tighten any leak-
ing connections.
Recommended oper-
ating pressures are
between 150-200
psi. Operating at
pressures outside of
these recommenda-
tions will affect the
output and quality of
the foam produced.
Operating pressure greater than 200 psi may dam-
age the CPDS Series 2 and will void the warranty.
Pull out and turn the Pressure Adjustment Control knob (C)
to obtain the desired operating pressure. Push in to lock.
Slowly open the yellow air pressure intake valves (L) on top
of the chemical cylinders by turning counter-clockwise.
Open the hose-to-applicator on/off valves (H) until
5.
the valve handles
are parallel to the
chemical hoses
(Photo
4)
.
NOTE: Verify that
ALL connections are
tight and that no
chemical leaks are
present. Tighten any
loose connections.
Do not overtighten.
Purg
6.
e air from the chemical hoses by disengag-
ing the foam applicator safety, remove the nozzle,
if any, and while aiming the foam applicator into
a waste receptacle, depress the trigger until two
roughly equal chemical streams exit the spray foam
applicator barrel. This may take 5-15 seconds de-
pending upon the length of the chemical hose set.
Engage the spray foam applicator safety
(Photo 5)
.
Clean any chemical
7.
from the front of the
foam spray applicator
barrel by wiping with a
clean rag.
Place an unused
8.
spray nozzle on the
barrel of the foam
applicator.
Disengage the safety on the spray foam applicator. The
9.
Touch ’n Seal CPDS Series 2 is now ready for opera-
tion.
FOAM APPLICATOR OPERATION &
TROUBLESHOOTING
The spray foam applicator meters chemical flow, providing
greater control and minimizing waste when used properly.
The following operating instructions ensure maximum
efficiency and performance of the spray foam applicator.
Spray 1/2” (12 mm) of cured foam (appx. 1/4” of wet chemical
prior to expansion) for the first application layer, followed
by 1” (25 mm) maximum
thickness (appx. 1/2”
of wet chemical prior to
expansion) additional
layers to obtain desired
total thickness. Allow
foam to cool between
applications to avoid
spontaneous combustion
and to obtain maximum
expansion.
If foam quality is suspect at
any time during dispensing,
check the following:
Ensure there is power
•
to the air compressor
and the reset button is
depressed.
Ensure all the valves are
•
fully open.
Ensure chemical hoses are not kinked.
•
Remove nozzle and clean residue from spray foam
•
applicator orifices
(Photo 6)
. Dispense without a nozzle
into a waste container, checking for two chemical streams
(Photo 7)
. If you see two streams, attach clean, unused
Photo 2
Photo 1
STRAIN RELIEF INSTRUCTIONS
Facing the front of the unit, push chemical hoses down and tuck into the hose strain relief (T).
1.
Leave at least a 12” loop to prevent excessive strain or hose kinks.
2.
Gently tug on the chemical hoses, confirming the hoses are not straining the chemical hose connections.
Leave hoses facing forward.
3.
Step 1
Step 2
Step 3
Photo 3
Photo 6
Photo 7
Photo 4
Photo 5
Safety OFF
Safety ON


