background image

MicroQ 


APANTAC LLC, 7556 SW BRIDGEPORT ROAD, PORTLAND, OR 97224 

INFO@APANTAC.COM

, TEL:    +1 503 968 3000, FAX:    +1 503 389 7921 

This hardware warranty shall not apply to any defect, failure or damage:


a)


Caused by improper use of the Product or inadequate maintenance and care of the 
Product;


b)


Resulting from attempts by those other than Apantac representatives to install, repair, or 
service the Product;


c)


Caused by installation of the Product in a hostile operating environment or connection of 
the Product to incompatible equipment; 


Summary of Contents for MicroQ

Page 1: ...HDMI 8x8 APANTAC LLC 7556 SW BRIDGEPORT ROAD PORTLAND OR 97224 INFO APANTAC COM TEL 1 503 968 3000 FAX 1 503 389 7921 MicroQ User Manual ...

Page 2: ...antac s sole obligation under this warranty is expressly limited at Apantac s sole option to a repair the defective Product without charge for parts and labor or b provide a replacement in exchange for the defective Product or c if after a reasonable time is unable to correct the defect or provide a replacement Product in good working order then the purchaser shall be entitled to recover damages s...

Page 3: ... any defect failure or damage a Caused by improper use of the Product or inadequate maintenance and care of the Product b Resulting from attempts by those other than Apantac representatives to install repair or service the Product c Caused by installation of the Product in a hostile operating environment or connection of the Product to incompatible equipment ...

Page 4: ...l 7 4 3 Installation 7 5 0 MicroQ_Lite_Controller Software 10 5 1 Getting Started 10 5 2 Running the MicroQ_Lite_Controller 10 5 3 Connecting to the MicroQ 10 5 4 Configuring the Output 14 5 5 Configuring the On Screen Elements 15 5 5 1 Labels 15 5 5 2 Audio Meters 20 5 5 3 Border 23 5 5 4 Alarm Tags 25 5 5 5 Auto Aspect Ratio 26 5 5 6 Tally 27 5 5 7 Safe Area 31 5 5 8 Presets 33 5 5 9 Front Panel...

Page 5: ...n Accepts 4 x auto detect 3G SDI HD SDI SD SDI and Composite video signals Simultaneous HDMI and SDI outputs Decode display up to 8 embedded audio per SDI input Ethernet port for Configuration Dynamic Labels Tallies interface TSL One 32 characters labels per Window Up to 32 characters Text and Background Colors Transparency are adjustable Borders can be turned ON or OFF Visual Alarms Tags 0 to 8 E...

Page 6: ...Display Border Tally Audio meters Alarm tags Safe area marker Equalization 120m at 2 97 Gbps 140 m at 1 48 Gbps 400m at 270 Mbps with Belden 1694A GPI 8 for tally or AXP ASCII commands Return Loss 15db up to 1 485 Gbps 10db up to 3G IP 100 Base Tx TSL AXP_Lite Embedded Audio SMPTE 272M A Electrical 12 W 90 250V 50 60Hz Composite NTSC SMPTE 170M PAL ITU624 2 EMI RFI Complies with FCC Part 15 Class ...

Page 7: ...MicroQ APANTAC LLC 7556 SW BRIDGEPORT ROAD PORTLAND OR 97224 INFO APANTAC COM TEL 1 503 968 3000 FAX 1 503 389 7921 6 4 0 Hardware and Installation 4 1 Front Panel Figure 4 1 MicroQ Front Panel ...

Page 8: ...0 39 4 2 Rear Panel Figure 4 2 MicroQ Rear Panel 4 3 Installation 4 3 1 The MicroQ is a fan less device therefore it is very important the heating vents on the sides are not blocked Figure 4 3 MicroQ Venting ...

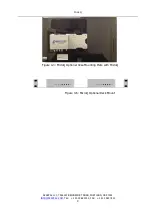
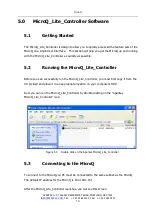
Page 9: ... 8 4 3 2 The MicroQ can be mounted 3 different ways Using the standard magnetic mounting plate Using the optiona VESA plate for mounting on the back of the monitors Using the optional rack mount to mount 2 MicroQ s side by side Figure 4 4 MicroQ Standard Mounting Plate Figure 4 5 MicroQ Optional Vesa Mounting Plate ...

Page 10: ... APANTAC LLC 7556 SW BRIDGEPORT ROAD PORTLAND OR 97224 INFO APANTAC COM TEL 1 503 968 3000 FAX 1 503 389 7921 9 Figure 4 3 MicroQ Optional Vesa Mounting Plate with MicroQ Figure 4 6 MicroQ Optional Rack Mount ...

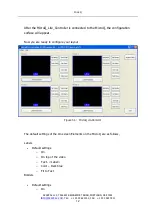
Page 11: ...ssible 5 2 Running the MicroQ_Lite_Controller Before you can successfully run the MicroQ_Lite_Controller you must first copy it from the CD prvided and place it in an appropriate location on your computer s HDD Now you can run the MicroQ_Lite_Controller by double clicking on the Apantac MicroQ_Lite_Controller icon Figure 5 1 Double click on the Apantac MicroQ_Lite_Controller 5 3 Connecting to the ...

Page 12: ...968 3000 FAX 1 503 389 7921 11 Figure 5 2 Connect dialog Click on the IP address box if the desired IP address is not already entered Figure 5 3 Save folder will create automatically Once the MicroQ_Lite_Controller connects to the MicroQ a Save folder will be created in the same directory ...

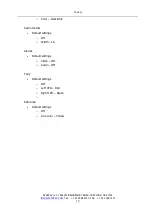
Page 13: ...roller is connected to the MicroQ the configuration surface will appear Now you are ready to configure your layout Figure 5 4 MicroQ control GUI The default settings of the On screen Elements on the MicroQ are as follows Labels Default settings o On o On top of the video o Text Label o Color Dark blue o Fit to Text Borders Default settings o On ...

Page 14: ... COM TEL 1 503 968 3000 FAX 1 503 389 7921 13 o Color Dark Blue Audio meters Default settings o Off o Width 16 Alarms Default settings o Video Off o Audio Off Tally Default settings o Off o Left LED Red o Right LED Green o Safe area Default settings o Off o Line color Yellow ...

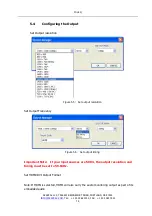
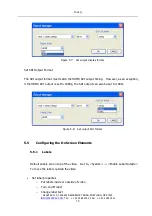
Page 15: ...tput Set Output resolution Figure 5 5 Set output resolution Set Output Frequency Figure 5 6 Set output timing Important Note If your input sources are 59 94 the output resolution and timing must be set to 59 94Hz Set HDMI DVI Output Format Note If HDMI is selected HDMI will also carry the audio monitoring output as part of its embedded audio ...

Page 16: ...I DVI output timing However as an exception if the HDMI DVI output is set to 1080p the SDI output can also be set to 1080i Figure 5 8 Set output SDI format 5 5 Configuring the On Screen Elements 5 5 1 Labels Default Labels are on top of the video Got to System Enable Label Outside To move the labels outside the video Set label properties o Put labels inside or outside of video o Turn on off label ...

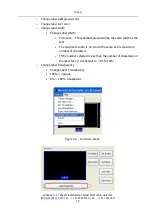
Page 17: ...l width Change Label Width Fit to text The label background will be the same width as the text The maximum width is 32 which the same as the maximum number of characters If the number selected is less than the number of characters on the label text it will default to Fit to Text o Change label transparency Change Label Transparency 100 opaque 0 100 transparent Figure 5 9 Put labels outside ...

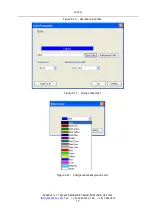
Page 18: ...TAC LLC 7556 SW BRIDGEPORT ROAD PORTLAND OR 97224 INFO APANTAC COM TEL 1 503 968 3000 FAX 1 503 389 7921 17 Figure 5 10 Set label properties Figure 5 11 Change label text Figure 5 12 Change label background color ...

Page 19: ...MicroQ APANTAC LLC 7556 SW BRIDGEPORT ROAD PORTLAND OR 97224 INFO APANTAC COM TEL 1 503 968 3000 FAX 1 503 389 7921 18 Figure 5 13 Change label width ...

Page 20: ...MicroQ APANTAC LLC 7556 SW BRIDGEPORT ROAD PORTLAND OR 97224 INFO APANTAC COM TEL 1 503 968 3000 FAX 1 503 389 7921 19 Figure 5 14 Connect label transparency ...

Page 21: ...dio Meters Figure 5 15 Set meters Set Meters o 0 8 meters can be turned on off o Meter width can be set to 4 16 pixels o SDI embedded audio channels can be assigned to individual meters o One pair of audio meters can be selected as monitor output to go to the analog audio output or the HDMI output Figure 5 16 Diso ay 0 8 meters ...

Page 22: ...MicroQ APANTAC LLC 7556 SW BRIDGEPORT ROAD PORTLAND OR 97224 INFO APANTAC COM TEL 1 503 968 3000 FAX 1 503 389 7921 21 Figure 5 17 Set meter width ...

Page 23: ...MicroQ APANTAC LLC 7556 SW BRIDGEPORT ROAD PORTLAND OR 97224 INFO APANTAC COM TEL 1 503 968 3000 FAX 1 503 389 7921 22 Figure 5 18 Set SDI audio channels ...

Page 24: ...BRIDGEPORT ROAD PORTLAND OR 97224 INFO APANTAC COM TEL 1 503 968 3000 FAX 1 503 389 7921 23 Figure 5 19 Set audio monitor output 5 5 3 Border Figure xx Set borders Set Borders o Border can be turn on off o Border color can be set ...

Page 25: ...MicroQ APANTAC LLC 7556 SW BRIDGEPORT ROAD PORTLAND OR 97224 INFO APANTAC COM TEL 1 503 968 3000 FAX 1 503 389 7921 24 Figure 5 20 Turn border on off Figure 5 21 Set border color ...

Page 26: ...gs o Video Format and Audio Status alarm tags can be turned on off o Video Alarm Tags shows the following While video signal is present Displays video format NTSC PAL 525 626 720p 1080i p 50 60 While video signal is lost No Video o Audio Alarm Tags shows the following While audio signal is present No tag While audio signal is lost No Audio Figure 5 23 Turn Alarm tags on off ...

Page 27: ...1 503 968 3000 FAX 1 503 389 7921 26 Figure 5 24 Result after the alarm tags turned on 5 5 5 Auto Aspect Ratio Set Auto Aspect Ratio o Auto Ratio can be turn on off o Aspect Ratio can be set by the user to any ratio o Default is 4x3 for SD and 16x9 for HD Figure 5 25 Set Aspect Ratio ...

Page 28: ...igure 5 26 Set Tally Set Tally o Tally 1 left and Tally 2 right can be turned on off o Border UMD Label Text and UMD Label Backgruond can be assigned to be associated with the tally o Tally LED colors can be set o GPI can be assigned to the tallies or AXP ASCII protocol o TSL can be assigned to the dynamic tallies Figure 5 27 Turn on off LED and tally options ...

Page 29: ...roQ APANTAC LLC 7556 SW BRIDGEPORT ROAD PORTLAND OR 97224 INFO APANTAC COM TEL 1 503 968 3000 FAX 1 503 389 7921 28 Figure 5 28 The result have the tally LEDs are turned on Figure 5 29 Assign border tally ...

Page 30: ...56 SW BRIDGEPORT ROAD PORTLAND OR 97224 INFO APANTAC COM TEL 1 503 968 3000 FAX 1 503 389 7921 29 Figure 5 30 Assign UMD text tally text tally Figure 5 31 Assign UMD Background tally Label tally Figure 5 32 Set tally colors ...

Page 31: ...MicroQ APANTAC LLC 7556 SW BRIDGEPORT ROAD PORTLAND OR 97224 INFO APANTAC COM TEL 1 503 968 3000 FAX 1 503 389 7921 30 Figure 5 33 Set GPI Figure 5 34 Set GPI to trigger Tally ...

Page 32: ...APANTAC LLC 7556 SW BRIDGEPORT ROAD PORTLAND OR 97224 INFO APANTAC COM TEL 1 503 968 3000 FAX 1 503 389 7921 31 Figure 5 35 Set TSL address Figure 5 36 Set TSL address 5 5 7 Safe Area Figure 5 37 Set Safe Area ...

Page 33: ...NFO APANTAC COM TEL 1 503 968 3000 FAX 1 503 389 7921 32 Set Safe Area o Safe Area can be turn on off With a mask With a line Or with both mask and line o The safe area line color can be changed o The safe area can be freely assigned Figure 5 38 Turn on safe area ...

Page 34: ...MicroQ APANTAC LLC 7556 SW BRIDGEPORT ROAD PORTLAND OR 97224 INFO APANTAC COM TEL 1 503 968 3000 FAX 1 503 389 7921 33 5 5 8 Presets Figure 5 39 Save Preset Figure 5 40 Recall Presets ...

Page 35: ...gure 5 41 Set Front Panel buttons 1 Default Fullscreen Quad 2 Off Disable the buttons so no one accidentally triggers them 3 Fast Load Preset As long as the preset names are set to 1 pt 2 pt 3 pt and 4 pt buttons 1 will recall 1 pt button 2 will recall 2 pt button 3 will recall 3 pt and button 4 will recall 4 pt Figure 5 42 Select front panel settings ...

Page 36: ...RIDGEPORT ROAD PORTLAND OR 97224 INFO APANTAC COM TEL 1 503 968 3000 FAX 1 503 389 7921 35 5 5 10 Write to Flash It is a good idea to write to flash occasionally just in case your PC experience problems Figure 5 43 Write to flash ...

Page 37: ...MicroQ APANTAC LLC 7556 SW BRIDGEPORT ROAD PORTLAND OR 97224 INFO APANTAC COM TEL 1 503 968 3000 FAX 1 503 389 7921 36 5 5 11 Quit and Exit Figure 5 44 Quit Figure 5 45 Confirm and write to flash again ...

Page 38: ...e Overview audio Set audio monitoring output Exit Exit from text command mode ledumd Turn on off tally and set label text Load Load presets AXP Lite command sets Audio Set audio monitoring output Note MicroQ only supports 2 groups of embedded audio 8 channels audio monitoring must be done in pairs therefore when you choose meter 1 you will get a stereo pair of 1 and 2 when you choose 3 you will ge...

Page 39: ...TEXT Parameters Values Description WIN_ID 0 4 LED1 on off 1 0 Turn on off Tally LED 1 LED 2 on off 1 0 Turn on off Tally LED 2 LED 3 on off 1 0 Turn on off Tally LED 3 LED 4 on off 1 0 Turn on off Tally LED 4 TEXT Text Label text Must be bracketed with Load Load FILE_NAME Parameters Values Description file_name The preset file name The file name must be bracketed with Example Command Description L...

Reviews: