background image

BD4603

9

TLGS625

ASSEMBL

Y INSTR

UCTIONS

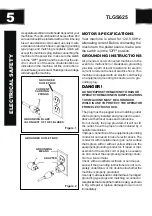
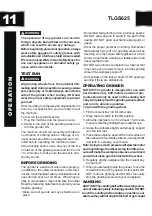
The tool rest attaches to the inward side of 

the guard and provides a surface that must 

be used to support the workpiece during 

operation. Certain types of grinding/sanding

may require jigs or accessories that will be 

used with the tool rests to assure the proper

angle of the workpiece against the wheel. 

Failure to install and use the tool rest can lead

to serious personal injury.

To install the tool rests:

1.Loosely attach the tool rests perpendicular 

   to the belt or wheel surface with the knob 

   bolts, 5 mm washers and hex nuts.
2.To adjust the angle of the sanding belt 

   tool rest, use a square or a protractor to 

   set the angle of the tool rest in relation 

   to the sanding belt.
3.Adjust both tool rests approximately 1/16 

   to 1/8 in. from the grinding wheel and the 

   sanding belt and tighten the knob bolts. 


(

in Fig. 3

 shows the correct adjustment 

   for the tool rest at the grinding wheel.

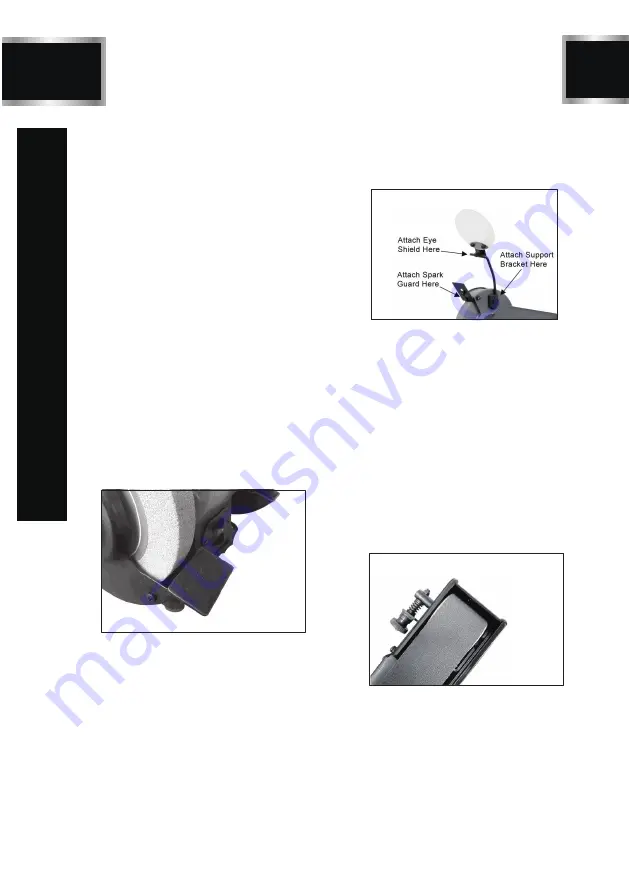
INSTALLATION TOOL RESTS

Figure 3

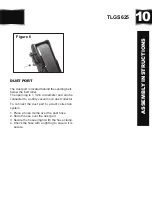
The spark guard must be installed and posi-

tioned 1/8 in. from the grinding wheel to minimize 

sparks flying towards the operator. The eye 

shield must be positioned between the grinding 

wheel and the operator's face to protect the 

operator from flying debris. This is not a rep-

lacement for safety glasses!

To install the spark guard and eye shield:

1.Using the included 5 mm screw and washer, 

   install the spark guard as shown

(

in Fig. 4

.

SPARK GUARD & EYE SHIELD

2. Attach the eye shield to the support bracket 

    with the included 6 mm carriage bolt and hex 

    nut. Use the 8 mm hex bolt and washer to attach

    the support bracket to the grinder.

Figure 4

BELT TRACKING

Tracking the sanding belt means to center the 

belt on its rollers, so that it runs balanced and 

does not make contact with the sides of the 

belt cover.

To track the sanding belt:

1. Disconnect the machine from the power 

    supply.
2. Rotate the grinding wheel.

3. As you rotate the grinding wheel, watch how 

    the sanding belt rides on the upper roller. If 

    the belt is tracking properly, the sanding belt 

    should be centered between the sides of the

    belt cover as shown (in Fig. 5).

4. While spinning the wheel, turn the tracking 

    control knob counterclockwise to make the 

    belt move to the left, or turn the tracking 

    control knob clockwise to make the belt move 

    to the right (in Fig. 6).
5. After the belt is centered, spin the grinding

    wheel approximately ten times to ensure 

    that the belt continues to track properly.

Figure 5

Summary of Contents for TLGS625

Page 1: ...STRUCTION MANUAL IMPORTANT For your own safety read and follow all of the Safety Guidelines and Operating Instructions before operating this product TLGS625 2 X 28 BELT AND 6 WHEEL BENCH GRINDER SANDE...

Page 2: ...x 28 Wheel size TABLE OF CONTENTS TABLE OF CONTENTS 2 SAFETY GUIDELINES 4 PACKAGE CONTENTS 7 KEY PARTS DIAGRAN 8 ASSEMBLY INSTRUCTIONS 10 OPERATION 12 MAINTENANCE 15 TROUBLESHOOTING GUIDE 17 EXPLONED...

Page 3: ...uently Do not start the tool if the grinding wheel is in contact with the workpiece Always ensure the safety guards are attached correctly and do not operate the bench grinder without the guards attac...

Page 4: ...ly tightened 18 Remove adjusting keys and wrenches before turning the tool on A wrench or a key that is left attached to a rotating part of the tool increases the risk of personal injury 19 Never forc...

Page 5: ...ll grounded cord connected machines In the event of a malfunction or breakdown grounding provides a path of least resistance for electric current to reduce the risk of electric shock This machine is e...

Page 6: ...An undersized cord will cause a drop in line voltage resulting in loss of power and overheating The table shows the correct gauge to use depending on the cord length If in doubt use the next heavier...

Page 7: ...tor 1 Hex column screw M5x12 1 Flat washer D5 2 Coolant tray Philips screw flat washer spring washer M5X10 2 1 1 1 Spark deflector 2 2 1 Pressing block 1 2 3 4 5 6 7 8 9 10 11 12 13 14 15 No 1 2 3 4 E...

Page 8: ...PARTS DIAGRAN TLGS625 1 2 4 3 5 6 7 8 No Description Qty 1 LED work light 1 2 Sanding belt Work table deflector 1 3 ON OFF switch 1 4 Coolant tray 1 5 Tool rest 1 6 Grinding wheel 1 7 Eyeshield assy...

Page 9: ...t be positioned between the grinding wheel and the operator s face to protect the operator from flying debris This is not a rep lacement for safety glasses To install the spark guard and eye shield 1...

Page 10: ...operning is 1 1 2in in diameter and can be connected to a utility vacuum or a dust collector To connect the dust port to a dust collection system 1 Place a hose clamp over the dust hose 2 Slide th ho...

Page 11: ...n produces sparks DO NOT allow anyone to stand in the path of the sparks DO NOT grind near flammable liquids or gases Wear the proper protective clothing Remember that particles flying off of a grindi...

Page 12: ...the ON position Figure 7 3 Allow the machine to run for at least 1 full mi nute to make sure that the grinding wheel is not going to fly apart and injure you then move to the front of the machine 4 G...

Page 13: ...rly care for your wheel follow these tips Always transport store and handle wheels with care Wheels may be damaged if they are dro pped or if heavy objects are stacked on them Select the right grindin...

Page 14: ...LACING WHEELS The wheel guard assembly must be re moved in order to mount or dismount a grinding wheel To remove mount a wheel 1 Disconnect the grinder from the power supply 2 Remove the three Phillip...

Page 15: ...e right hand sanding belt cover as shown in Fig13 and remove the cover 3 Loosen the sanding belt tension knob as shown in Fig14 4 Pull the sanding belt tension knob down with one hand and work the san...

Page 16: ...e being blown or circuit breakers tripped 1 Overloading due to binding 2 Defective plug 3 Defective cord 4 Defective switch 1 Clean around wheels and shaft and or replace bearings 2 Replace plug 3 Rep...

Page 17: ...into w heel 2 Wheel too soft for the material being ground select harde r bond 3 Replace the wheel 4 Dress the wheel 5 Consult manufacturer of grinding wheel Wheel clogs and workpiece shows burn mark...

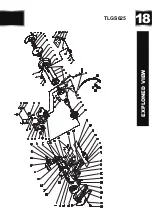
Page 18: ...18 EXPLONED VIEW TLGS625...

Page 19: ...g Screw 1 42 Hex Bolt M5X 10 2 43 Fixing Disc 1 44 Work Table Deflector 1 1 6 1 7 Philips Screw Flat Washer Spring WasherAssy M5x10 M4x8 3 45 Flat Washer D5 4 46 Limit Plate 1 47 Coolant Tray 1 48 Hex...

Page 20: ...20 BD4603 TLGS625 Having Problems Give us a chance to help you before returning this product Email After the phone 844 866 5687 ONE YEAR LIMITED WARRANTY WARRANTY info toolots com...

Reviews: