


Page 4 of 6
ASSEMBLY
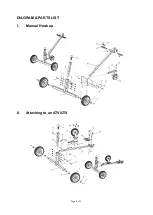
See parts diagram for reference during assembly
1. Attach sector plate (#5) to axle assembly (#1) using bolt (#6) , nut (#7), pin shaft (#13) and R
pin(#14).
2. Install trailer ball (#11) onto the ball mount bracket (#8), then insert the ball mount bracket (#8)
into axle assembly (#1) and secure them with pin shaft(#9) and R pin (#10)
3. A
ttach the 10” Caster (#17) to caster bracket (#16) using bolt (#18) and nut (#19).
3.1 Manual hook-up
Attach 10” caster (#17) with sector plate(#5) using pin shaft (#13) and R
pin (#14)
(See Diagram I)
3.2
Attaching to an ATV/UTV: Attach 10” caster (#17) with bracket on handle (#15)
(See Diagram II)
4. Attach two
16” Flat free tires (#3) to axle assembly (#1) and secure them with flat washers (#2)
and safety pin (#4)
5. Attach Top handles (#20) to Handle assembly (#15) using bolt (#21) and Ring pin (#22)
6. Connect axle assembly (#1), T-Bar handle (#15) and sector plate (#5) together using bolt
(#12), and nut (#7). Keep the handle in horizontal position when attaching to an ATV/UTV.
Note:
•
This dolly can be set up for two different functions: In manual mode, the product can be used
to move an attached lightweight trailer short distance over a flat, level surface.
•
The dolly can also be set up to attach to an ATV, UTV, or lawn tractor to pull a loaded trailer in an
off-road situation at a speed not to exceed 10 MPH.
•
OPERATION
1. Design load limit is 1000lbs, for the adjustable trailer dolly alone, not including load supported
by trailer wheels. Do not exceed the rated capacity.
2. Always keep arms, feet, and legs, etc. out from under the trailer tongue while hitching,
unhitching or moving the trailer. Children should always be kept at a safe distance.
3. Always make sure any loaded trailer is blocked properly while the adjustable trailer dolly is
being moved into place.
4. Make sure the trailer tongue is securely connected to the adjustable trailer dolly coupler ball
before attempting to unblock and move the trailer.
5. Take precautions to prevent uncontrolled movement of the trailer once it is connected to the
adjustable trailer dolly. Use on level surfaces ONLY.
6. If the adjustable trailer dolly is being connected to a trailer which is being stored over a
lengthy period of time, make sure both the trailer and the adjustable trailer dolly are blocked
properly.
7. Keep the adjustable trailer dolly clean and free of road dirt. Inspect the adjustable trailer dolly
before each use to make sure all parts are securely in place and in working order. Periodically
lubricate moving parts.
WARNING: FAILURE TO FOLLOW THESE INSTRUCTIONS COULD RESULT IN
LOSS OF LOAD AND/OR PERSONAL INJURY OR DAMAGE TO PROPERTY.


