which your model should balance for your first flights. Later, you
may wish to experiment by shifting the balance up to 1/4"
forward or back to change the flying characteristics. Moving the
balance forward may improve the smoothness and arrow-like
tracking, but it may then require more speed for takeoff and
make it more difficult to slow down for landing. Moving the
balance aft makes the model more agile with a lighter and
snappier feel. In any case, please start at the location we
recommend and do not at any time balance your model outside
the recommended range.
❍
(2) With all equipment installed (ready to fly) and an empty
fuel tank, lift the model at the balance point. If the tail drops
when you lift, the model is “tail heavy” and you must move
weight toward the nose to balance. If the nose drops, it’s “nose
heavy” and you must move weight toward the tail to balance.
Try to balance the model by changing the position of the
receiver battery and receiver. If this is not enough, you may
need to add stick-on weights to the tail or a Great Planes spinner
weight (GPMQ4645) to the nose.
CONTROL SURFACE THROWS
Control throw adjustment
❍
(1) By moving the position of the clevis at the control horn
toward the outermost hole, you will decrease the amount of
throw of that control surface. Moving it toward the control
surface will increase the amount of throw. If these adjustments
don’t accomplish the job, you may need to work with a
combination of adjustments by also repositioning the pushrod at
the servo end. Moving the pushrod toward the splined shaft on
the servo will decrease the control surface throw — outward
will increase it.
We recommend the following control surface throws as a
starting point:
High Rate
Low Rate
ELEVATOR:
7/8" up [22mm]
1/2" up [13mm]
7/8" down [22mm]
1/2" down [13mm]
RUDDER:
1-3/4" right [44.5mm]
Same as high rates
1-3/4" left [44.5mm]
AILERONS:
1" up [25.4mm]
5/8" up [16mm]
1" down [25.4mm]
5/8" down [16mm]
25
Note: Throws are measured at the widest part of the elevators,
rudder and ailerons. If your radio does not have dual rates, set the
control throws halfway between the specified high and low rates.
❍
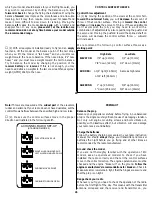
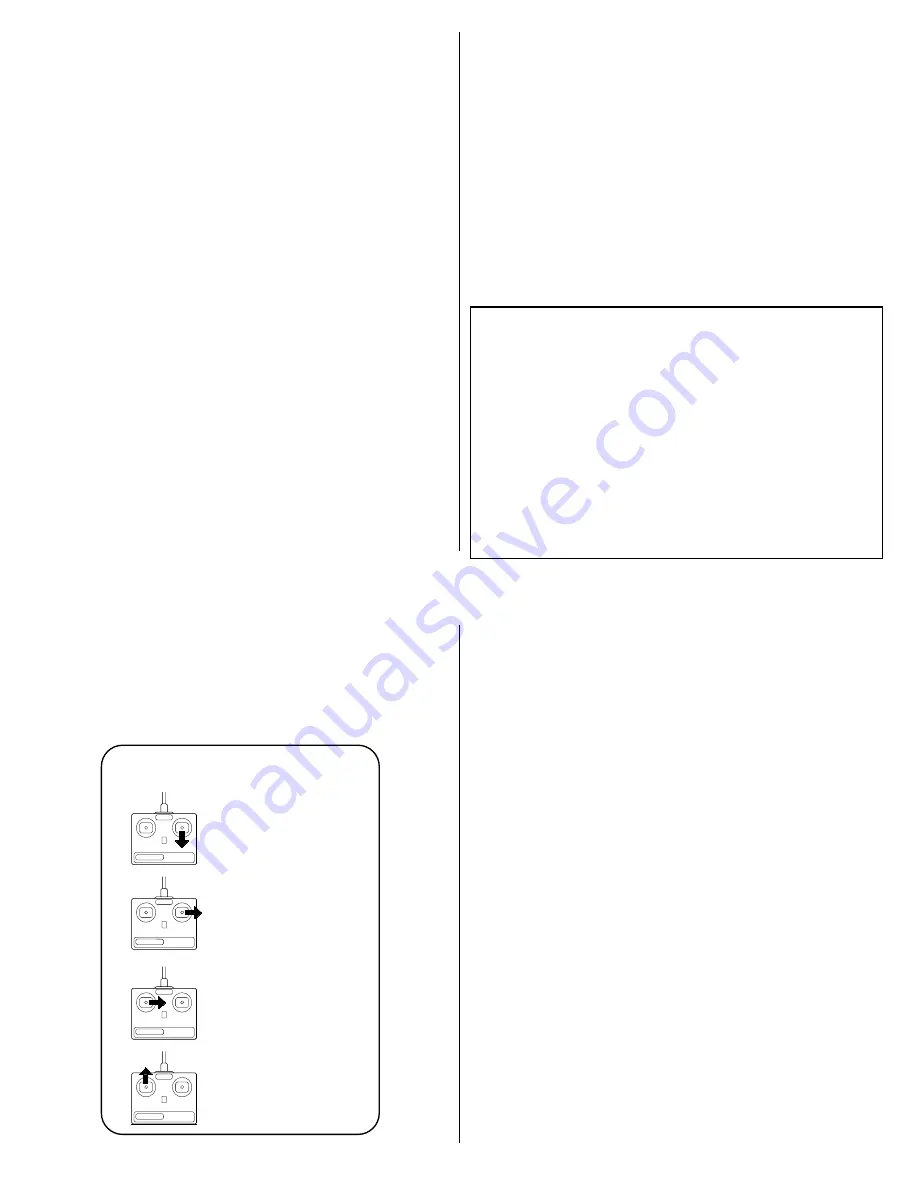
(2). Make sure the control surfaces move in the proper
direction as illustrated in the following sketch.
PREFLIGHT
Balance the prop
Balance your propellers carefully before flying. An unbalanced
prop is the single most significant cause of damaging vibration.
Not only will engine mounting screws and bolts vibrate out,
possibly with disastrous effect, but vibration will also damage
your radio receiver and battery.
Charge the batteries
Follow the battery charging procedures in your radio instruction
manual. You should always charge your transmitter and receiver
batteries the night before you go flying and at other times as
recommended by the radio manufacturer.
Ground check the model
If you are not thoroughly familiar with the operation of R/C
models, ask an experienced modeler to check if you have
installed the radio correctly and that all the control surfaces
move in the correct direction. The engine operation also must be
checked and the engine “broken-in” on the ground. Follow the
engine manufacturer’s recommendations for break-in. Check to
make sure all screws remain tight, that the hinges are secure and
that the prop is on tight.
Range check your radio
Whenever you fly, you need to check the operation of the radio
before the first flight of the day. This means with the transmitter
antenna collapsed and the receiver and transmitter on, you
4-CHANNEL
TRANSMITTER
4-CHANNEL
TRANSMITTER
4-CHANNEL
TRANSMITTER
4-CHANNEL RADIO SET-UP
(STANDARD MODE 2)
TRANSMITTER
4-CHANNEL
ELEVATOR MOVES UP
RIGHT AILERON MOVES UP
LEFT AILERON MOVES DOWN
RUDDER MOVES RIGHT
CARBURETOR WIDE OPEN
26


