background image


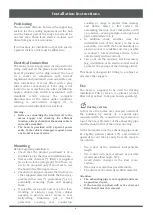
Positioning 

The  minimum  distance  between  the  supporting 
surface  for  the  cooking  equipment  on  the  hob 

and  the  lowest  part  of  the  range  hood  must  be 
not  less  than  50cm  from  electric  cookers  and 

65cm from gas or mixed cookers. 
 

If instructions for installation of gas hob specify 
a greater distance, this must be adhered to. 


Electrical Connection 

The mains power supply must correspond to the 
rating indicated on the plate situated inside the 

hood.  If  provided  with  a plug  connect  the  hood 
to  a  socket  in  compliance  with  current 

regulations and positioned in an accessible area, 
after  installation.  If  it  not  fitted  with  a  plug 

(direct  mains  connection)  or  if  the  plug  is  not 
located  in  an  accessible  area,  after  installation, 

apply  a  double  pole  switch  in  accordance  with 
standards  which  assures  the  complete 

disconnection  of  the  mains  under  conditions 

relating  to  over-current  category  III,  in  
accordance with installation instructions. 


Warning: 

 

Before  re-connecting  the  hood  circuit  to  the 
mains  supply  and  checking  the  efficient 
function, always check that the mains cable is 
correctly assembled.  

 

The  hood  is  provided  with  a  special  power 
cable . If the cable is damaged, request a new 

one from Customer Service. 


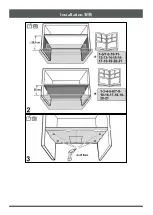
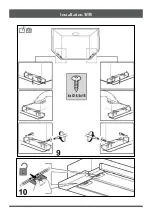
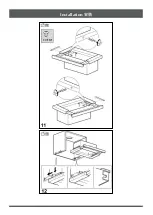
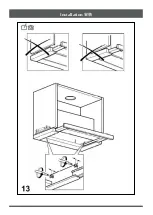
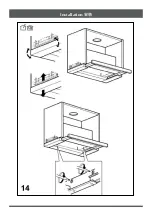
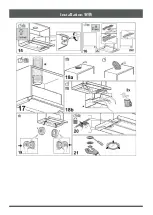
Mounting 

Before beginning installation: 

 

Check  that  the  product  purchased  is  of  a 
suitable size for the chosen installation area. 

 

Remove  the  charcoal  (*)  filter/s  if  supplied 
(see  also  relative  paragraph)  This/these  is/

are  to  be  mounted  only  if  you  want  to  use 
the hood in the filtering version. 

 

Check (for transport reason) that there is no 
other supplied material inside the hood (e.g. 

packets with screws (*), guarantees (*), etc.), 
eventually  removing  them  and  keeping 

them. 

 

If  possible,  disconnect  and  move  the  free-

standing  or  slide-in  range  from  cabinet 

opening  to  provide  easier  access  to  rear 
wall/ceiling.  Otherwise  put  a  thick 

protective 

covering 

over 

countertop, 

cooktop  or  range  to  protect  from  damage 
and  debris.  Select  a  flat  surface  for 

assembling the unit. Cover that surface with 
a protective covering and place canopy hood 

parts and hardware in it. 

 

In  addition  check  whether  near  the 

installation  area  of  the  hood  (  in  the  area 
accessible    also  with  the hood mounted)  an 

electric socket is available and it is possible 
to  connect  a  fumes  discharge  device  to  the 

outside (only suction version). 

 

Carry  out  all  the  masonry  work  necessary 

(e.g. installation of an electric socket and/or 
a hole for the passage of the discharge tube). 


This hood is designed for fitting in a cabinet or 
on some other support. 


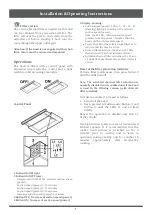
Use 

The  hood  is  supplied  to  be  used  for  ducting 
installation.  Filter  version  is  optional  (carbon 

filter not provided , to be purchased separately). 
 

Ducting version 

In  this  case  the  fumes  are  conveyed  outside  of 

the  building  by  means  of  a  special  pipe 
connected  with  the  connection  ring  located  on 

top of the hood. Diameter of the exhausting pipe 
must be equal to that of the connection ring. 

 
In the horizontal runs the exhausting pipe must 

be  slightly  slanted  (about  10°)  and  directed 
upwards to vent the air easily from the room to 

the outside. 
 

 

Use  a  duct  of  the  minimum  indispensable 
length. 

 

Use  a  duct  with  as  few  elbows  as  possible 

(maximum elbow angle: 90°). 

 

Avoid  drastic  changes  in  the  duct  cross-

section. 

 

Use a duct as smooth as possible inside. 

 

The duct must be made of certified material.  

 
Attention: 

 

The exhausting pipe is not supplied and must 
be purchased apart. 

 

If  the  hood  is  supplied  with  active  charcoal 
filter, then it must be removed. 

Installation Instructions 

Summary of Contents for Mia Cucina MY60

Page 1: ......

Page 2: ......

Page 3: ...Installation 安裝 ...

Page 4: ...Installation 安裝 ...

Page 5: ...Installation 安裝 ...

Page 6: ...Installation 安裝 ...

Page 7: ...Installation 安裝 ...

Page 8: ...Installation 安裝 ...

Page 9: ...Installation 安裝 ...

Page 10: ...Installation 安裝 ...

Page 11: ...Installation 安裝 ...

Page 12: ...owing instructions that ensure correct operation and optimal performance Contents Important Instructions P 1 Installation Instructions P 2 Operating Instructions P 3 Maintenance P 4 Attentions Use only the fixing screws supplied with the product for installation Use the correct length screws which are identified in the Installation Guide Warning Failure to install the screws or fixing device in ac...

Page 13: ... system for this appliance must not be connected to any existing ventilation system which is being used for any other purpose such as discharging exhaust fumes from appliances burning gas or other fuels The flaming of foods beneath the hood itself is severely prohibited The use of exposed flames is detrimental to the filters and may cause a fire risk and must therefore be avoided in all circumstan...

Page 14: ...lly removing them and keeping them If possible disconnect and move the free standing or slide in range from cabinet opening to provide easier access to rear wall ceiling Otherwise put a thick protective covering over countertop cooktop or range to protect from damage and debris Select a flat surface for assembling the unit Cover that surface with a protective covering and place canopy hood parts a...

Page 15: ...ive suction speed power works for about 5 minutes then the hood sets the intermediate speed Timer the LED of the selected speed flashes to indicate that the timer is active Grease filter saturation the L3 and L4 LEDs flash alternately at short intervals of time Activated charcoal filter saturation the L3 and L4 LEDs flash simultaneously at short intervals of time Reset of the filter saturation ind...

Page 16: ... be cleaned once a month using non aggressive detergents either by hand or in the dishwasher which must be set to a low temperature and a short cycle When washed in a dishwasher the grease filter may discolour slightly but this does not affect its filtering capacity To remove the grease filter pull the spring release handle Charcoal Filter Filter version only Fig 19 It absorbs unpleasant odours ca...

Page 17: ...油煙機 MY60 MY90 尊敬的客戶 多謝選用 Mia Cucina 的產品 本產品經精心 設計 採用優質材料生產以及通過嚴謹測試 定能滿足您的需要 為確保產品正確使用及維 持最佳效能 請細閱及遵循以下說明 目錄 重要指示 第 1 頁 安裝說明 第 2 頁 操作指示 第 3 頁 保養 第 4 頁 注意 使用隨產品內所提供的螺絲裝配抽油煙機 依說明指示使用合適長度螺絲 警告 如未有按指示安裝螺絲及配件或會引致觸電意外 ...

Page 18: ...切勿任由兒童把玩 或觸碰控制部份 格柵在未妥當安裝前 切勿使用油煙機 除特別說明 切勿將油煙機作支承用途 當油煙機與其他燃氣爐具或設備一起使用時 必 須確保場所通風良好 不可將本油煙機與其他燃氣裝置共用排煙管道 切勿在油煙機下採用以烈酒燃點食物的烹調方 法 避免讓火焰觸及油煙機 以免損壞濾網及釀成火 警 由於食油在高熱下會有搶火現象 在進行油炸時 應小心 避免油温過熱 當煮食時 油煙機的可接觸的表面會較熱 排放油煙時 請遵守當地有關的技術及安全條例 的規定 應經常清潔油煙機內外 每月至少清潔一次 如未有按指示清潔油煙機及濾油網 或會釀成火 警 因此 務請恪守該等指引 如未確定燈泡已經安裝妥當 請不要使用油煙機 以免發生觸電危險 請恪守本說明書所載的指示 否則我們不會對所 造成的故障 損壞或火警負上任何責任 棄置 本產品受規範於歐盟所制訂的廢棄電子電機設備 指引 European direc...

Page 19: ...有活性炭過濾裝置 參考相關段 落 需將其拆除 活性炭過濾裝置只適用 於過滤模式 檢查 搬運時 機內是否有其他配件 如螺絲包 維修保養書 等 如機內有這些配 件 取出並保存好 如可以 先移離在抽油煙機安裝位置下的煮 食爐具 以便進行安裝工作 否則可放置一 個带保護作用的厚墊蓋在爐面 以免爐具受 損及砂塵破壞 當裝嵌配件時 先在工作枱 面放上保護墊 然後把抽油煙機組件放置其 上 重新檢查裝機的位置是否有可用的電源插 座 而排煙裝置可把油煙排到室外 只適用 於排煙模式 進行所有必要工作 如安裝電源位 或裝置 排氣喉的開孔位 本機供橱櫃內置式安裝或以支承架裝嵌 使用 本油煙機設定為排氣模式 如選擇安裝為過濾 模式 活性碳過濾裝置需另外購買 排氣模式 在此安裝模式 煙氣透過油煙機頂部的排氣囗 經排氣管送到室外 排氣管的直徑須與排氣接 口一致 水平安裝管道應微斜向上 約 10 以便將煙氣 排出室外 按...

Page 20: ...按鍵 5 顯示燈 風速 LED 燈 L1 L2 L3 L4 閃 動 顯示燈亮著 表示抽油煙機正以所選 的風速級別運作 註 L4 LED 燈 最高風速 運作 5 分鐘 後 風速會自動降至第二級 計時 所選的風速顯示燈閃動時 表示延 時關機已啓動 濾油網飽和提示 L3 和 L4 顯示燈交替 閃動一段短時間 活性炭裝置飽和提示 L3 和 L4 顯示燈同 時閃動一段短時間 重設濾油網飽和提示 清洗濾網後 按鍵2直至所有顯示燈熄掉 注意 一般情况 活性炭飽和提示為未被啓動 於採用過 濾模式運作時 已安裝活性炭過濾裝置 才能啓動活性炭 飽和提示 依循下列步驟可啓動提示 1 關閉抽油煙機 2 同時長按鍵3和鍵4 至 L1 顯示燈變為短 暫閃動 要取消此項提示 重覆以上步驟直至 L1 顯示燈 短暫閃動 如廚房有大量油煙 應選擇以最高風速運作 建議在煮食前 5 分鐘啓動抽油煙機 並讓其一 直運作至完成煮食後...

Page 21: ... 損壞或任何火災損害 本公司不會承擔任何責 任 濾油網 圖10 20 阻隔烹飪所產生的油脂 濾油網必須每月使用性質温和清潔劑清洗一 次 除手洗外 可使用洗碗碟機洗滌 但應選 用低温和短促的清洗程序 濾油網經洗碗機清 洗後會稍微褪色 但這不會影響其過濾功能 要拆除濾油網 只要拉開彈簧鎖扣即可濾油網 拆出 活性炭過濾裝置 只適用於過濾模式 圖19 用以吸收烹飪時產生的異味 活性炭達到飽和 使用時間 取決於烹飪類型和濾油網的清潔次 數 在任何情況下都必須至少每四個月更換一次活 性炭過濾裝置 活性炭濾隔不可清洗或反覆使 用 安裝活性炭過濾裝置 1 先拆下濾油網 2 在風機兩側框架放置一個活性炭濾隔 3 裝回濾油網 更換燈泡 更換前必須先切斷油煙機的電源 本機使用 LED 燈作照明 除提供足夠照明 LED 燈較一般照明燈的使用時間長 10 倍 且能 節省 90 電能 如需更換 聯絡維修服務 保養 ...

Page 22: ......

Page 23: ......

Page 24: ...2 0 1 6 0 8 M Y 6 0 M Y 9 0 ...

Reviews: