background image

36

PRIUS PRIME_QG_OM47C92U_(U)

3. Basic operation

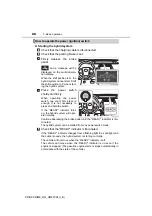
Set the vehicle speed

Press  the  “ON-OFF”  button
to activate the cruise control.

Radar  cruise  control  indicator
will come on and a message will
be  displayed  on  the  multi-infor-
mation display.
Press the button again to deacti-
vate the cruise control.

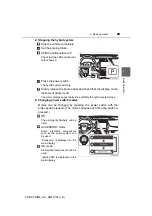
Accelerate or decelerate, with accelerator pedal operation, to the
desired  vehicle  speed  (at  or  above  approximately  30  mph  [50
km/h]) and push the lever down to set the speed.

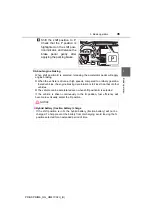
Adjusting the set speed

Increases the speed

(Except  when  the  vehicle  has
been stopped by system control
in  vehicle-to-vehicle  distance
control mode)

Decreases the speed

Fine  adjustment:  Momentarily
move  the  lever  in  the  desired
direction.
Large adjustment: Hold the lever up or down to change the speed,
and release when the desired speed is reached.

Dynamic  radar  cruise  control  operation  (vehicle-to-vehicle  dis-
tance control mode)

1

2

1

2

Summary of Contents for Prius Prime

Page 1: ... not intended as a substitute for your OWNER S MANUAL We strongly encourage you to review the OWNER S MANUAL and supplementary manuals so you will have a better understanding of your vehicle s capabilities and limitations Depending on specifications the vehicle shown in the illustration may differ from your vehicle in terms of equipment ...

Page 2: ...ent If equipped refer to OWNER S MANUAL Charging equipment and names Charging inlet Charging inlet light Charging port lid Charging indicator Charging connector lock switch Hybrid battery traction bat tery status indicator Charging cable Charging port 1 2 3 4 5 6 7 8 ...

Page 3: ...ration 1 Charging operation The names of each part of the charging cable Charging connector Latch release button Plug Plug cord CCID Charging Circuit Inter rupting Device Power indicator Charging indicator Error warning indicator 1 2 3 4 5 6 7 8 ...

Page 4: ...d to the plug While charging if heat is generated due to looseness on the outlet side etc this function suppresses heat by controlling the charging current Conditions for supplying current to the vehicle The CCID Charging Circuit Interrupting Device is designed to prevent electrical current from being supplied to the charging connector when it is not connected to the vehicle even if the plug is in...

Page 5: ...e Use of a 15A individual circuit is strongly recommended Use of a block heater for charging is prohibited Make sure to connect the charging connector and charging inlet directly Do not connect a converting adaptor or extension cord between the charging connector and charging inlet Do not connect the charging cable to a multi outlet adapter multi plugs or con version plug Connecting the charging c...

Page 6: ... port lid Then open the lid fully by hand Vehicles with smart lid con nector locking system Press the rear edge of the charging port lid the position shown in the illustration with the doors unlocked Push and take your hand away to slightly open the charging port lid Then open the lid fully by hand While the doors are locked only the charging port lid can be unlocked by carrying an electronic key ...

Page 7: ...e rear edge of the charging port lid the position shown in the illustration Vehicles with smart lid con nector locking system When the doors are locked with the smart key system wireless remote control or door lock switch the charging port lid is also locked If the charging port lid is closed with the doors locked the charging port lid locks ...

Page 8: ... turned off illuminated or flashing When the hybrid battery traction battery is fully charged When the charging cable is connected all 3 hybrid battery traction battery status indicators illuminate to inform the user that the hybrid battery traction battery is fully charged The illumination flashing pattern changes to inform the user of the charging status Hybrid battery traction battery status in...

Page 9: ... minutes Charging can be conducted outdoors To charge properly follow the procedure after reading the explanation below Charging is intended to be carried out by licensed drivers only who properly understand the charging procedure Charging should not be carried out by children When charging with a charging equipment follow the procedures for using each equipment When charging using a public chargi...

Page 10: ...ch is off The time required to charge the hybrid battery traction battery differs according to the charging voltage and charging current 1 This is the maximum value 2 The time required for charging to complete depends on conditions such as the remaining charge of the hybrid battery traction battery and the outside temperature Confirm the following before charging Estimated charging time Connected ...

Page 11: ...heck that the power indicator on the CCID Charging Circuit Inter rupting Device is illuminated In order to reduce the load on the outlet and plug when inserting the plug use a string etc to hang the CCID Charging Circuit Interrupting Device on a hook or equivalent Open the charging port lid The charging inlet light will illumi nate Remove the charging inlet cap and secure it as shown in the illust...

Page 12: ...inlet as far as possible Once a click sound is heard check that the charging connector is securely locked Confirm that the charging indi cator is illuminated Charging will not start if the charging indicator does not illumi nate when the charging connector is inserted If the charging indicator is flashing the charge schedule is registered If the error warning indicator on the CCID Charging Circuit...

Page 13: ... if the electronic key is not in detection area of charging port lid The charging indicator will turn off when charging is completed During charging The surface of the CCID Charging Circuit Interrupting Device may become hot but this does not indicate a malfunction Depending on radio wave conditions interference may be heard on the radio The current charging condition and the estimated time until ...

Page 14: ...ach the charging connector cap Attach the charging inlet cap and close the charging port lid Remove the plug from the outlet when the charging equipment will not be used for a prolonged period of time Hold the body of the plug when removing Make sure to put the cable away immediately after disconnecting When leaving the plug inserted inspect the plug and connector once a month to check if dirt or ...

Page 15: ... is open Do not touch the terminals of the charging connector and charging inlet with a sharp metal objects needles etc or hands or short them with for eign objects When charging outdoors make sure to connect to a weatherproof outlet for outdoor use Do not insert the plug if the outlet is submerged in water or snow Follow these points when charging while it is raining or snowing Check that no snow...

Page 16: ... related parts To prevent damage to the charging cable and related parts observe the fol lowing precautions When interrupting or canceling charging remove the charging connector before removing the plug Vehicles with smart lid connector locking system When removing the charging cable check that the charging connector is unlocked Do not forcefully pull the connector cap and charging inlet cap Do no...

Page 17: ...plug may be damaged if the cable is stepped on or ridden over by the vehicle Using private power generator Do not use private power generators as a power source for charging Doing so may make charging unstable the voltage may be insufficient and the error warning indicator on the CCID Charging Circuit Interrupting Device of the charging cable may flash Usable temperature range Do not charge if the...

Page 18: ...ng Air conditioning linked setting Climate Prep Turning Charge Now on and off Changing Next Charging Event For details of each settings refer to OWNER S MANUAL The charge schedule can be registered on the multi information dis play or 11 6 inch display if equipped When operating timer settings use the charging timer switch and meter control switches Charging timer switch Meter control switches Mul...

Page 19: ... information about setting of the items other than Scheduled Events refer to OWNER S MANUAL Press or of the meter control switches to select and then press The Edit Charging Event screen will display Operate the meter control switches to select the item and change the setting After changing the settings to the desired settings press to return to the previous screen After setting operations are com...

Page 20: ...display on the multi information dis play Press or of the meter control switches to select Scheduled Events and then press The Scheduled Events screen is displayed which displays a list of the registered charge schedule Press or of the meter control switches to select the item to change and then press The Edit Charging Event screen will display Operate the meter control switches to select the item...

Page 21: ... the start or departure time When activating the repeated settings press the desired day but ton When the charging mode is set to Departure set the Climate Prep to on or off After setting operations are complete press Save To cancel registration of the timer settings press After setting operations are complete when the power switch is turned off and the charging cable is connected to the vehicle c...

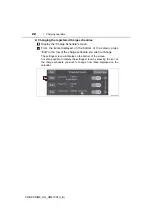
Page 22: ...om the items displayed on the bottom of the screen press Edit in the row of the charge schedule you wish to change The settings screen will display on the bottom of the screen It is also possible to display the settings screen by pressing the icon of the charge schedule you wish to change from those displayed on the calendar 1 2 ...

Page 23: ... charging When any door is opened during charging the current charging condition and remain ing time until charging is com plete can be checked After charging is complete After charging is complete the first time that the hybrid system is started a message detailing the results of the charging is displayed Also a message is displayed if an operation that stops charging is performed or a situation ...

Page 24: ... The plug is not dirtied by dust etc Remove the plug from the outlet before inspecting it If any abnormalities are found in the charging cable as a result of the inspection immediately stop use and consult your Toyota dealer Maintaining the charging cable When the charging cable is dirty first remove the dirt with a hard wringed cloth and then wipe the cable with a dry cloth However never wash it ...

Page 25: ...arging stations to the map screen Type A View list of nearby charging stations and corresponding charging station information such as voltage supported Type B For details about the function refer to http www toyota com entune Plug in Hybrid Applications is a service for plug in hybrid vehi cles These are added to the Safety Connect and Entune App Suite products The contents provide charge support ...

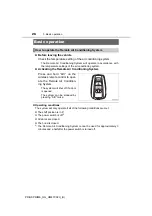
Page 26: ... A C on the wireless remote control to oper ate the Remote Air Condition ing System The system will shut off if a door is opened The system can be stopped by pressing A C twice Operating conditions The system will only operate if all of the following conditions are met The shift position is in P The power switch is off All doors are closed The hood is closed The Remote Air Conditioning System cann...

Page 27: ...s Make sure to touch the sensor on the back of the handle The doors cannot be unlocked for 3 seconds after the doors are locked The door unlock settings can be changed Refer to OWNER S MANUAL Touch the lock sensor the indentation on the surface of the front door handle to lock the doors Check that the door is securely locked Back door Locks all the doors Check that the door is securely locked Unlo...

Page 28: ... to press and hold the switch If the READY indicator turns on the hybrid system will oper ate normally Continue depressing the brake pedal until the READY indicator is illu minated The hybrid system can be started from any power switch mode Check that the READY indicator is illuminated If the READY indicator changes from a flashing light to a solid light and the buzzer sounds the hybrid system is ...

Page 29: ...y on the instrument cluster is off The meter display sequentially turns off after the hybrid system stops Changing power switch modes Modes can be changed by pressing the power switch with the brake pedal released The mode changes each time the switch is pressed Off The emergency flashers can be used ACCESSORY mode Some electrical components such as the audio system can be used Accessory is displa...

Page 30: ...nd the lever returns to its home position Confirm which position is selected with the shift posi tion indicator in the instru ment cluster Release the parking brake and your foot from the brake pedal gradually and then start the vehicle by depress ing the accelerator pedal gently Stopping procedure Stop the vehicle completely by depressing the brake pedal and then apply the parking brake Shift lev...

Page 31: ...iven at high speeds compared to ordinary gasoline fueled vehicles the engine braking deceleration is felt less than that of other vehicles The vehicle can be accelerated even when shift position B is selected If the vehicle is driven continuously in the B position fuel efficiency will become low Usually select the D position 2 NOTICE Hybrid battery traction battery charge If the shift position is ...

Page 32: ...ittent windshield wipers with interval adjuster if equipped Type A Off Intermittent operation Low speed operation High speed operation Temporary operation Type B Off Intermittent operation Low speed operation High speed operation Temporary operation How to operate the wipers and washers IO53PH023 1 2 3 4 5 1 2 3 4 5 ...

Page 33: ...ntermittent operation is selected Increases the intermittent windshield wiper frequency Decreases the intermittent windshield wiper frequency Washer wiper dual operation Pulling the lever operates the wipers and washer The wipers will automatically operate a couple of times after the washer squirts 6 7 8 ...

Page 34: ...n High speed operation Temporary operation Type B Off Rain sensing operation Low speed operation High speed operation Temporary operation When is selected the wipers will operate automatically when the sensor detects falling rain The system automatically adjusts wiper tim ing in accordance with rain volume and vehicle speed 1 2 3 4 5 1 2 3 4 5 ...

Page 35: ...e sensor sensitivity can be adjusted when is selected Increases the sensitivity Decreases the sensitivity Washer wiper dual operation Pulling the lever operates the wipers and washer The wipers will automatically operate a couple of times after the washer squirts 6 7 8 ...

Page 36: ...ion to the desired vehicle speed at or above approximately 30 mph 50 km h and push the lever down to set the speed Adjusting the set speed Increases the speed Except when the vehicle has been stopped by system control in vehicle to vehicle distance control mode Decreases the speed Fine adjustment Momentarily move the lever in the desired direction Large adjustment Hold the lever up or down to chan...

Page 37: ...e lever up resumes the cruise control and returns vehicle speed to the set speed However when a vehicle ahead is not detected cruise control does not resume when the vehicle speed is approximately 25 mph 40 km h or less Dynamic radar cruise control with full speed range can be set when The shift position is in D Vehicle speed is at or above approximately 30 mph 50 km h However when a preceding veh...

Page 38: ... is more than approximately 84 mph 135 km h When power is needed temporarily for example when the accelerator pedal is depressed firmly or when accelerating suddenly When the temperature of the hybrid system is high The vehicle has been left in the sun driven on a hill driven at high speeds etc When the temperature of the hybrid system is low When the heater is switched on when the outside tempera...

Page 39: ...y may become limited When dust etc has accumulated in the air intake vent clean it with a vac uum cleaner to prevent the vent from clogging Do not wet or allow foreign substances to enter the air vents as this may cause a short circuit and damage the hybrid battery traction battery Do not carry large amounts of water such as water cooler bottles in the vehicle If water spills onto the hybrid batte...

Page 40: ...he vehicle is used Refuel at least 5 3 gal 20 L 4 4 Imp gal of fuel every 12 months refuel a total of at least 5 3 gal 20 L 4 4 Imp gal over a 12 month period as this may affect components of the fuel system or the gasoline engine If the vehicle has not been refueled for a certain amount of time and it is possible that the quality of the fuel remaining in the tank has changed No new fuel has been ...

Reviews: