background image

TOYOTA 

PRIUS 

2010– 

TVIP V4

PROCEDURE   


REMOTE ENGINE STARTER (RES)

Page 20 of 33

Issue : D  05/22/09

Cut 2 Wire Ties securing the 

l. 

V5 Harness.

Disconnect the V5’s and  

m. 

Vehicle’s 12P Connectors.

Plug the V4 12P Connectors 

n. 

in between the Vehicle’s and 

V5 Connectors.

Summary of Contents for PT398-47091

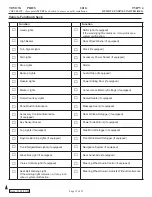
Page 1: ...ylon Panel Removal Tool e g Panel Pry Tool 1 Toyota SST 00002 06001 01 Side Cutters Torque Wrench 48 in lbf 5 4 N m 66 4 in lbf 7 5 N m Tape Clear Electrical Socket 10mm extension Special Chemicals Cleaner VDC Approved Cleaner Glass Cleaner Household Glass Cleaner x1 x1 x1 x1 x10 x1 x1 x1 English x2 Spanish x2 Kit Contents Additional Items may be required Item Description Recommended Sequence of A...

Page 2: ...cle The installation of this accessory should follow approved guidelines to ensure a quality installation These guidelines can be found in the Accessory Installation Practices document This document covers such items as Vehicle Protection use of covers and blankets cleaning chemicals etc Safety eye protection checking torque procedure etc Vehicle Disassembly Reassembly panel removal part storage e...

Page 3: ...1 26P White B OL1 26P White C OL2 12P White D OL2 12P White E 24P White for RES ECU J L79 3P White M 1P White for Registration N 1P White for Registration S 2D Wire Terminal RED Wire W RES ECU A B D E C W N M S J Prius Wire Harness Outline Color of Harness on Overview corresponds with Colored Tape near Connectors on Harness ...

Page 4: ...TOYOTA PRIUS 2010 TVIP V4 PREPARATION REMOTE ENGINE STARTER RES Page 4 of 33 Issue D 05 22 09 TVIP Vehicle Description Y A47 Hood Switch Y Prius Wire Harness Outline ...

Page 5: ...d Switch Installation 1 Place the vehicle in Park with a the Parking Brake set Remove the Rear Board b Disassembly Overview 1 Rear Board 2 Rear Box 3 Rear Trim 4 DS Step Cover 5 DS Cowl Cover 6 Lower Dash Cover 7 Lower Steering Column Cover Disconnect all Corresponding Connectors 1 3 4 6 5 2 7 3 ...

Page 6: ... the Rear Trims to d gain access to the Battery Disconnect the Negative e Battery Terminal Note the Battery Cable Position as it will be re installed in the same position CAUTION Do not touch the Positive Terminal Swap the Bolt and Nut on the f Negative Battery Terminal from one side to the other for easier installation ...

Page 7: ...TOYOTA PRIUS 2010 TVIP V4 PROCEDURE REMOTE ENGINE STARTER RES Page 7 of 33 Issue D 05 22 09 Check if Hood Switch is installed WITH Hood Switch Go to Next Section Page 10 WITHOUT Hood Switch NO YES ...

Page 8: ...bly Remove 3 Bolts Install the Hood Switch with i the Switch Lever underneath the Hood Latch Trigger Lever CAUTION Make sure the Hood Switch Lever is under the Latch Lever Make sure to hold the Hood Switch by its sides Make sure the Hood Switch Lever is positioned properly If the Hood Switch is Broken RES will not function ...

Page 9: ...RES Page 9 of 33 Issue D 05 22 09 Tighten 1 Screw j Connect the Vehicle s Hood k Switch Connector to V4 Hood Switch Connector Disconnect the Jumper Connector if installed Reinstall the Hood Latch l Assembly m Torque the Hood Latch Bolts to 66 4 in lbf 7 5 N m ...

Page 10: ...010 TVIP V4 PROCEDURE REMOTE ENGINE STARTER RES Page 10 of 33 Issue D 05 22 09 Secure the Vehicle Hood n Switch Harness to the Vehicle with 1 Wire Tie Disassembly Driver s 2 Side Remove the Driver s Side a Step Cover ...

Page 11: ...ssue D 05 22 09 Remove the Driver s Side b Cowl Cover Remove 1 Nut Remove the Lower Dash c Cover Remove 1 Screw Wrap the Lower Dash Cover d in a blanket and place on the floor Dislodge the Steering e Column s Center Clip CAUTION Do not force this clip as it is very easy to break ...

Page 12: ...lips on f both sides Release the Front Clips on g both sides Turn the Steering wheel from Right to Left to access the Holes Use a Flat Blade Jeweler s Screw driver wrapped with Electrical Tape to release the clips RES ECU Preparation 3 Install the Bracket to RES a ECU Attach a piece of Foam Tape b to the RES ECU ...

Page 13: ...lla 4 tion Driver s J B Area Disconnect the Vehicle a Connectors on the right side of the Junction Box Disconnect the 36P White b Vehicle Connector Release Black Connector Lever V4 V5 ADD ON ONLY Dislodge the GBS ECU c Bracket Remove 1 Bolt and Washer Disconnect GBS Connector CAUTION Do not drop the Bolt and Washer ...

Page 14: ...e 36P Vehicle Connector Close the Terminal Retainer Clip VERIFY Terminal Pins are properly inserted and do not come out Re attach the Black Connec f tor Lever Reconnect the Vehicle Con g nectors Using Flat Blade Jeweler s c Screwdriver remove the Black Connector Lever Do not force the Lever Lift up the Terminal Retainer d Clip Do not pull out the Retainer Clip ...

Page 15: ...REMOTE ENGINE STARTER RES Page 15 of 33 Issue D 05 22 09 V4 ONLY Install RES ECU using the h Bolt and Washer from the Kit Attach GBS Bracket and RES Bracket Install the RES ECU with RES GBS Bracket CAUTION Do not drop the Bolt and Washer ...

Page 16: ...V4 Harness along m the Vehicle Harness towards the Driver s Cowl Area Reinstall the Vehicle s Har n ness Shielding Secure the V4 Harness to the o Vehicle Harness Shielding with 1 Wire Tie V4 V5 ADD ON ONLY Attach GBS Bracket and RES i Bracket Install the RES ECU with j GBS Bracket CAUTION Do not drop the Bolt and Washer Plug the V5 8P Connector to k the GBS ECU ...

Page 17: ... 22 09 Plug the V4 RES Connector p to RES ECU Secure the V4 Harness to q Vehicle Harness with 2 Wire Ties V4 Wire Harness Installa 5 tion Driver s Cowl Area Secure V4 Harness to the a Vehicle Harness with 1 Wire Tie V4 ONLY Connect the V4 3P Connec b tor to the Vehicle s 3P Pre connector ...

Page 18: ... PROCEDURE REMOTE ENGINE STARTER RES Page 18 of 33 Issue D 05 22 09 Disconnect the Vehicle s c White 12P Connector Plug the V4 12P Connectors d in between the Vehicle s Con nectors Disconnect the Vehicle s e White 26P Connector ...

Page 19: ...on nectors Remove the Tape securing g the RES Diagnostic Connectors Secure the V4 26P Connec h tors to the Vehicle Harness with 1 Wire Tie Secure the V4 12P 3P and i 1P Connectors to the Vehicle Harness with 1 Wire Tie Secure the V4 Harness to the j Vehicle Harness with 1 Wire Tie V4 V5 ADD ON ONLY Connect the V4 3P Connec k tor to V5 3P Connector ...

Page 20: ...OCEDURE REMOTE ENGINE STARTER RES Page 20 of 33 Issue D 05 22 09 Cut 2 Wire Ties securing the l V5 Harness Disconnect the V5 s and m Vehicle s 12P Connectors Plug the V4 12P Connectors n in between the Vehicle s and V5 Connectors ...

Page 21: ...ES Page 21 of 33 Issue D 05 22 09 Disconnect the Vehicle s and o V5 s 26P Connectors Plug the V4 26P Connectors p in between the Vehicle s and V5 s Connectors Apply 1 Piece of Foam Tape q to the metal edge of the opening above the Driver s Side Connector Block ...

Page 22: ...ess with 1 Wire Tie You may need to pull some of the Vehicle Harness out of the Pillar DON T FORCE THE HARNESS Push the V4 26P Connec s tor and the Vehicle Harness back into the opening in the Pillar Secure the V5 26P Connec t tor to the Vehicle Harness with 1 Wire Tie Secure the V4 and V5 12P u Connectors to the Vehicle Harness with 1 Wire Tie ...

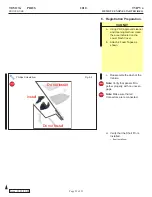
Page 23: ...g method clean the area indicated on the Lower Dash Cover Attach 2 Foam Tapes as b shown Reassemble the dash of the c Vehicle Note Verify that panels fit to gether properly with no uneven gaps Note Make sure that all Connectors are reconnected Verify that the Short Pin is d Installed If not Install now Phillips Screwdriver Fig 6 2 Do not Install Do not Install Install ...

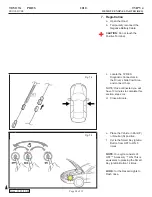
Page 24: ...ry ON This is equivalent to pressing the Smart Key Ignition Button 14 times LOOK for the Hazard Lights to Flash once Locate the 1P RES c Diagnostic Connectors in the Driver s Side Cowl Area and connect them NOTE Once connected you will have 10 minutes to complete this section steps d x Close all doors d Registration 7 Open the Hood a Temporarily reconnect the b Negative Battery Cable CAUTION Do no...

Page 25: ...Lights flash Three Times Disconnect the V4 Harness s 1P RES Diagnostic Connectors Start again from step c Connect the Techstream i Notebook to the Vehicle s Diagnostic Port With the Remote Control Key j in your possession press the Power Button twice to select the Ignition ON position Start the TIS Techstream k Application by clicking on the shortcut located on the Desktop Click Connect to Vehicle...

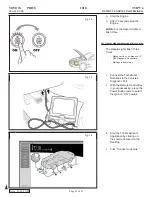
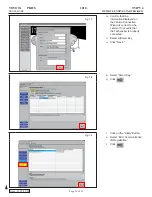
Page 26: ...he m information displayed on the Vehicle Connection Wizard is correct for the vehicle If not verify that the Techstream is properly connected Select w Smart Key n Click Next o Select Smart Key p Click q Click on the Utility Button r Select ECU Communication s ID Registration Click t Fig 7 7 Fig 7 8 Fig 7 9 ...

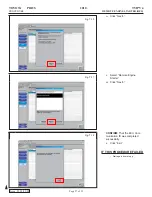
Page 27: ...TARTER RES Page 27 of 33 Issue D 05 22 09 Click Next u Select Remote Engine v Starter Click Next w CONFIRM That the ECU Com munication ID was completed successfully Click Exit x IF THIS PROCEDURE FAILED Start again from step p Fig 7 10 Fig 7 11 Fig 7 12 ...

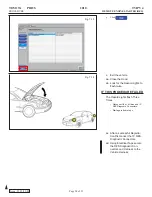
Page 28: ...ights to ab flash twice IF THIS PROCEDURE FAILED The Hazard Lights flash Three Times Disconnect the V4 Harness s 1P RES Diagnostic Connectors Start again from step c After a successful Registra ac tion Disconnect the 1P RES Diagnostic Connectors Using Electrical Tape secure ad the RES Diagnostic Con nectors and Harness to the Vehicle Harness Fig 7 13 Fig 7 14 ...

Page 29: ... shown CAUTION Do not touch the adhesive surface Using VDC approved cleaner c and cleaning method clean the indicated area on the Remote Use a piece of Clear Tape to d lift the Label off its protective backing CAUTION Do not touch the adhesive surface Attach the Key Label as e shown Attach the Key Tag f REPEAT steps c f with the other Remote Use Household Glass g Cleaner to clean the inside of the...

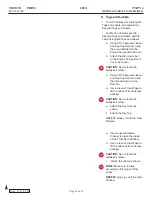
Page 30: ...ith no uneven gaps VERIFY That all Connectors are plugged in Clean up and Remove trash Sealed in its protective bag c place the Owner s Manual in the Glove box Reset the power windows d Turn the ignition ON Lower the Windows halfway Pull up on the Power Window Switches until the windows close Continue to hold up on the switches for a minimum of 1 Second Reset the Moon Roof e Turn the ignition ON O...

Page 31: ... the driver s exterior door handle to unlock the vehicle Refer to Step 1 The engine stops The hazard lights flash once Enter the vehicle and close all doors 5 Start the Vehicle again using the remote With the engine running manually unlock any door with the inside lock switch Refer to Step 1 The engine stops The hazard lights flash once The security alarm triggers if equipped 6 Start the Vehicle a...

Page 32: ...ghts Convenience Memory Settings if equipped Dome Courtesy Lights Heated Seats if equipped Panel Switch Illumination Massage Seats if equipped Accessory Controls Illumination if equipped Rear Window Defogger if equipped Key Sensor Buzzer Power Side Mirrors if equipped Fog Lights if equipped Side Mirror Defogger if equipped Daytime Running Lights if equipped Front Windshield Defogger if equipped Tr...

Page 33: ...t remains on it may indicate a system malfunction Front Wiper Washer HVAC Hood Latch Release Power Locks if equipped Passenger Air Bag Switch if equipped Power Windows if equipped Rollover Side Curtain Air Bag Switch RSCA if equipped Power Seats if equipped Tire Pressure Monitoring System TPMS Prior to TPMS activation and Pre delivery Service PDS of the Vehicle the TPMS light will blink when IG is...

Reviews: