


ENGLISH
,
6
NOTE: When the heater does not ignite after once or twice igniting operation, do not ignite many times and
contact your dealer to avoid abnormal combustion. If the abnormal combustion occurs, press ON/OFF
button to “OFF” position and wait until the accumulating fuel burns out. When this occurs, do not unplug
the heater.
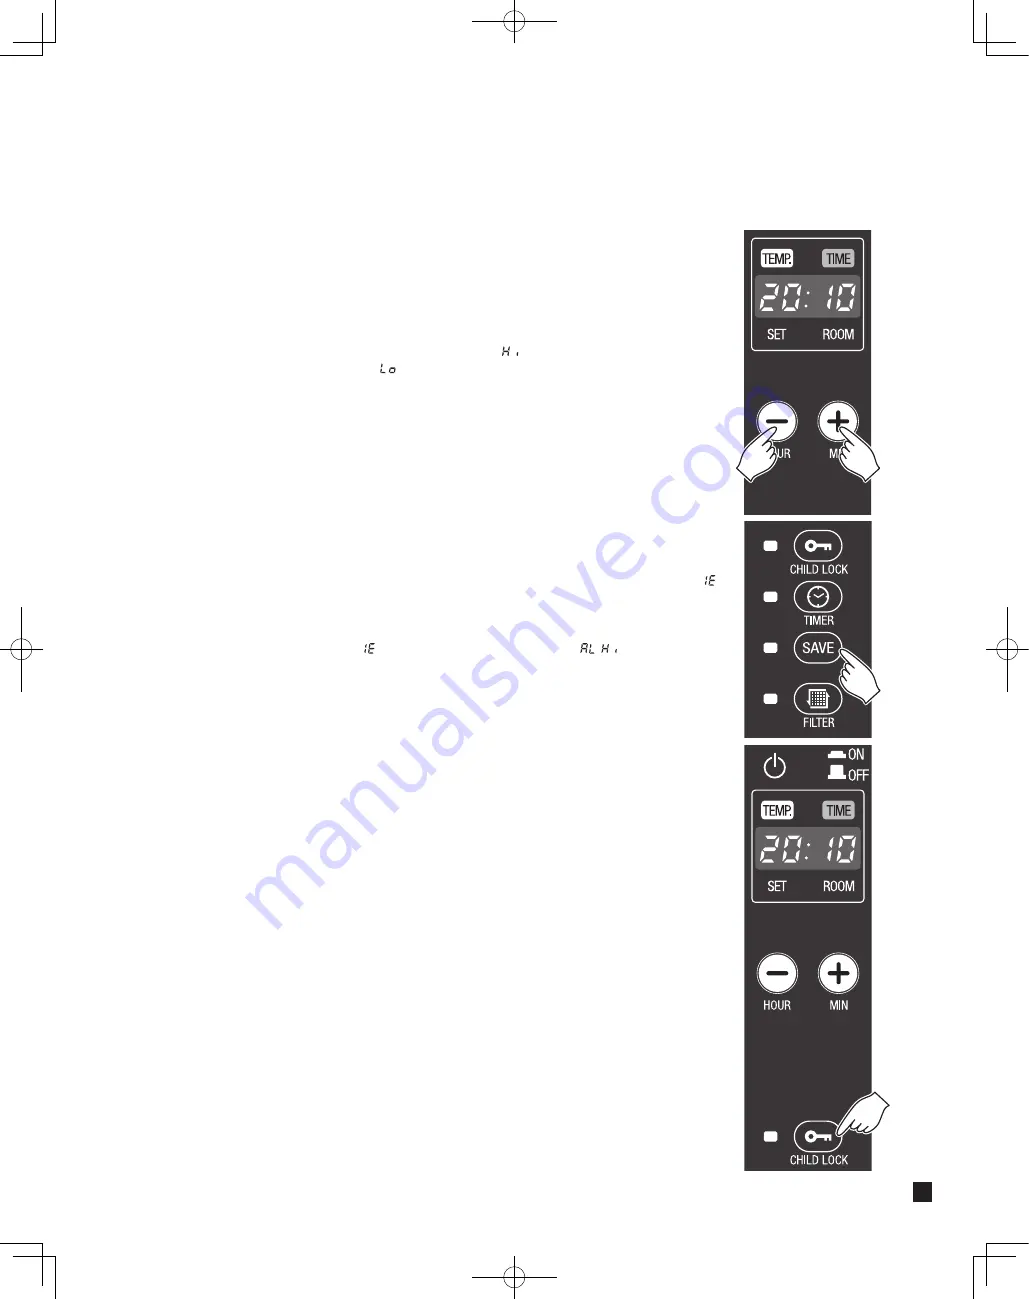
2. SETTING THE ROOM TEMPERATURE
The temperature setting can only be adjusted, when the heater is burning. Use the
adjustment keys to adjust the temperature. First press either of the two buttons to
switch on the function (the TEMP. light will start blinking). Next, adjust the temperature
using the key on the right (+MIN.) to higher the temperature and on the left (–HOUR)
to lower the temperature. After approximately 10 seconds the TEMP. light will stop
blinking and setting will be locked. The available temperature settings range is from
10°C at minimum to 32°C at maximum.
When room temperature is higher than 35°C,
(Hi) is displayed. When room
temperature is lower than -9°C,
(Lo) is displayed.
The operating mode is automatically controlled in accordance with the room
temperature detected by the room temperature sensor. The heater works in the “HIGH”
operating mode until the room temperature has reached the set temperature. When
the room temperature reaches the chosen setting, the heater automatically will
switch to the “MED” or “LOW” operating mode in order to maintain the desired
temperature.
NOTE: When you use the heater at first, the original setting is 20°C.
SET ALTITUDE
If the heater is used at a height of 1000 - 1500 m, use the altitude mode.
1. Make sure that the heater is switched off.
2. Press the (–HOUR) key and (+MIN.) key at the same time for more than 3 seconds. “ ”
is shown in the information display. If the room temperature is shown, it also can
continue to set altitude.
3. Press the TIMER key and SAVE key at the same time for more than 3 seconds while the
information display indicates “ ”. You will hear the buzzer and “
” will be blinking
on the information display for 3 seconds and the display will turn back to the original
state.
To release the altitude mode, start the procedure from 1 again.
NOTE: In the event of power failure or disconnection of heater, the altitude setting will
remain.
CAUTION:
Do not use the heater at a height of over 1500 meters.
THE CORRECT USE OF ‘SAVE’
The ‘SAVE’ function allows you to limit the temperature. You can set the 'SAVE' function
when the heater is burning. When this function is activated, the heater will automatically
switch off, when the room temperature exceeds the set temperature by 2°C. Subsequently,
when the room temperature has dropped again to the set temperature, the heater will
automatically switch on again. ’SAVE’ setting will be activated by pressing the key. The
SAVE lamp will light up. Switch off the function by pressing the SAVE key once again.
NOTE: Without the ‘SAVE’ setting, your heater will maintain the set temperature by
approximation as well, by adjusting its heating capacity. ‘SAVE’ is an economical
setting, which you can use when, for instance, you are not present in the room or to
keep it frost-free.
CHILD PROOF LOCK OPERATION
The childproof lock can be used to prevent children accidentally changing the heater
settings. When the heater is burning and the childproof key is on, the heater can only be
switched off. Other functions are blocked then. If the heater has already been switched off,
the childproof lock also prevents accidental ignition of the heater.
1. Press the CHILD LOCK (CLEAR) button for more than 3 seconds to set the childproof
lock while in operation or not operation. CHILD LOCK lamp will light.
To release the child lock operation, press the CHILD LOCK (CLEAR) button for more
than 3 seconds.


