6.
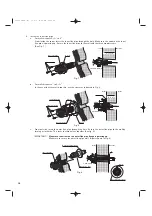
Install the inner flue pipe.
a.
For wall thickness 5-
3
/
16
” to 9”
From inside the room, insert the inner flue pipe through the hole. Make sure the arrow on the inner
flue pipe is pointing up. Secure the inner flue pipe to the wall with the three wood screws.
(See Fig. 7.)
b.
For wall thickness 4” to 5-
3
/
16
”
In the event that the wall is too thin, use the spacer as indicated in Fig. 8.
c.
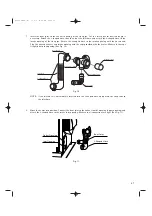
From outside, insert the outer flue pipe through the hole. Secure the outer flue pipe to the wall by
turning it clockwise. This locks the two halves together (See fig. 9).
IMPORTANT:
Make sure the arrow on the outer flue pipe flange is pointing up.
Make sure to secure the outer flue pipe well. (A-part shown in Fig. 9)
Inner flue pipe
Wood screws
Arrow
Inside
Outside
5-
3
/
16
” to 9”
2˚ downward Min.
Fig. 7
Inner flue pipe
Wood screws
Arrow
Inside
Outside
4” to 5-
3
/
16
”
2˚ downward Min.
Spacer
Tapping screws
Spacer
Fig. 8
Inner flue pipe
Inside
Outside
Arrow
2˚ downward Min.
Outer flue pipe flange
A
Outer flue pipe
Outer flue pipe flange
Fig. 9
26
Laser 60AT (E) 11.3.3 0:59 PM Page 26


