background image

10

Chapter 2


Connect the Hardware

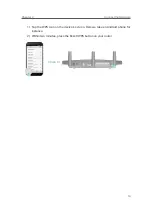
1 )  Tap the WPS icon on the device’s screen. Here we take an Android phone for 

instance.

2 )  Within two minutes, press the Reset/WPS button on your router.


close to

Summary of Contents for Archer A9

Page 1: ...REV6 0 1 1910012496 User Guide AC1900 Wireless MU MIMO Gigabit Router Archer A9...

Page 2: ...4 3 Set Up an IPv6 Internet Connection 18 4 4 Configure the Router in Access Point Mode 21 Chapter 5 TP Link Cloud Service 23 5 1 Register a TP Link ID 24 5 2 Change Your TP Link ID Information 24 5...

Page 3: ...moothly by UPnP 56 Chapter 12 VPN Server 58 12 1 Use OpenVPN to Access Your Home Network 59 12 1 1 Step1 Set up OpenVPN Server on Your Router 59 12 1 2 Step 2 Configure OpenVPN Connection on Your Remo...

Page 4: ...83 14 4 2 Manual Upgrade 84 14 4 3 Restore Interrupted Upgrade after Power Failure 85 14 5 Backup and Restore Configuration Settings 85 14 6 Set the Router to Reboot Regularly 87 14 7 Change the Logi...

Page 5: ...s to show the path to load the corresponding page For example Advanced Wireless MAC Filtering means the MAC Filtering function page is under the Wireless menu that is located in the Advanced tab Note...

Page 6: ...y as a result of 1 environmental factors including building materials physical objects and obstacles 2 network conditions including local interference volume and density of traffic product location ne...

Page 7: ...Chapter 1 Get to Know About Your Router This chapter introduces what the router can do and shows its appearance It contains the following sections Product Overview Appearance...

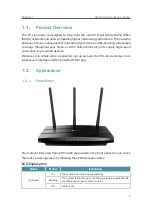
Page 8: ...h speed connection to your wired devices Moreover it is simple and convenient to set up and use the TP Link router due to its intuitive web interface and the powerful Tether app 1 2 Appearance 1 2 1 F...

Page 9: ...nternet service is not available Off The router s Internet port is unplugged Ethernet On A powered on device is connected to the router s corresponding Ethernet port Off Nopowered ondeviceisconnectedt...

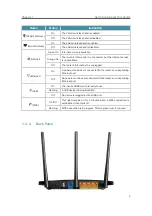
Page 10: ...ngs USB Port For connecting to a USB device Internet Port For connecting to a DSL Cable modem or an Ethernet jack Ethernet Ports 1 2 3 4 For connecting your PC or other Ethernet network devices to the...

Page 11: ...Chapter 2 Connect the Hardware This chapter contains the following sections Position Your Router Connect Your Router...

Page 12: ...cordless phones and microwaves 2 2 Connect Your Router Follow the steps below to connect your router If your internet connection is through an Ethernet cable directly from the wall instead of through...

Page 13: ...mputer or go to Wi Fi Settings of your smart device and then select the SSID to join the network Connections are available Wireless Network Connection Connect automatically Connect TP Link_XXXX TP Lin...

Page 14: ...10 Chapter 2 Connect the Hardware 1 Tap the WPS icon on the device s screen Here we take an Android phone for instance 2 Within two minutes press the Reset WPS button on your router close to...

Page 15: ...Chapter 3 Log In to Your Router...

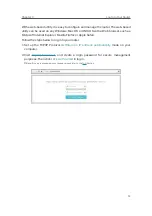
Page 16: ...s Microsoft Internet Explorer Mozilla Firefox or Apple Safari Follow the steps below to log in to your router 1 Set up the TCP IP Protocol in Obtain an IP address automatically mode on your computer 2...

Page 17: ...y ISP information built in automates many of the steps and verifies that those steps have been successfully completed Furthermore you can also set up an IPv6 connection if your ISP provides IPv6 servi...

Page 18: ...d router to your TP Link ID Note To learn more about the TP Link Cloud service please refer to the TP Link Cloud Service section If you do not want to register a TP Link ID now you may click Log In La...

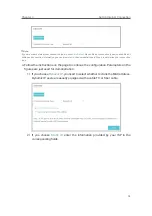
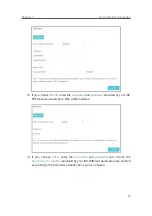
Page 19: ...onstrations in Step 4 to determine your connection type 4 Follow the instructions on the page to continue the configuration Parameters on the figures are just used for demonstration 1 If you choose Dy...

Page 20: ...name and password provided by your ISP PPPoE users usually have DSL cable modems 4 If you choose L2TP enter the username and password and choose the Secondary Connection provided by your ISP Different...

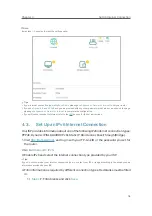
Page 21: ...ndary Connection provided by your ISP Different parameters are needed according to the Secondary Connection you have chosen 5 Click Save 6 To check your internet connection click Network Map on the le...

Page 22: ...4 3 Set Up an IPv6 Internet Connection Your ISP provides information about one of the following IPv6 internet connection types PPPoE Dynamic IP SLAAC DHCPv6 Static IP 6to4 tunnel Pass Through Bridge 1...

Page 23: ...lt the router uses the IPv4 account to connect to the IPv6 server Click Advanced to input further information if your ISP requires Click Save and then click Connect Note If your ISP provides two separ...

Page 24: ...internet connection type is a prerequisite for this connection type Manually Set up Your Internet Connection Click Advanced to input further information if your ISP requires Click Save and then click...

Page 25: ...ccessful PPPoE configuration Tips Visit the FAQ section if there is no internet connection 4 4 Configure the Router in Access Point Mode In this mode your router connects to an existing wired or wirel...

Page 26: ...he router 3 Go to Advanced Operation Mode select Access Point and click Save 4 Log in to the router via http tplinkwifi net after the router reboots 5 Go to Quick Setup or Settings Wireless Wireless S...

Page 27: ...ll notify you when an important firmware upgrade is available Surely you can also manage multiple TP Link Cloud devices with a single TP Link ID This chapter introduces how to register a new TP Link I...

Page 28: ...min and User TP Link ID refer to Manage the User TP Link IDs You can register another TP Link ID via the Tether APP Please refer to Manage the Router via the TP Link Tether App to install the app and...

Page 29: ...irst time login TP Link ID will be bound automatically to your router as an Admin account An admin account can add or remove other TP Link IDs to the same router as Users The admin account and User ac...

Page 30: ...ded and click Save Note If you need another TP Link ID please refer to Manage the Router via the TP Link Tether App to install the app and register a new one 4 The new TP Link ID will be displayed in...

Page 31: ...s 1 Open the Apple App Store or Google Play and search the key word TP Link Tether or simply scan the QR code to download and install the app OR 2 Connect your device to the router s wireless network...

Page 32: ...your main network When you have guests in your house apartment or workplace you can create a guest network for them In addition you can customize guest network options to ensure network security and...

Page 33: ...work and tick the Enable Guest Network checkbox 2 Customize the SSID Don t select Hide SSID unless you want your guests to manually input the SSID for guest network access 3 Set Security to WPA WPA2 P...

Page 34: ...o allow the wireless clients on your guest network to communicate with each other via methods such as network neighbors and Ping Allow guests to access my local network Tick this checkbox if you want...

Page 35: ...port to share files and media from the USB storage devices over your home network locally or remotely through the internet The router supports USB external flash drives and hard drives It contains th...

Page 36: ...ve make sure its file system is FAT32 or NTFS Before you physically disconnect a USB device from the router safely remove it to avoid data damage Go to Advanced USB Settings Device Settings and click...

Page 37: ...username and a password to deny anonymous access to the USB disks you should select the Registered User radio box To learn how to set up an account for the access refer to To Set up Authentication fo...

Page 38: ...te If your ISP assigns a private WAN IP address such as 192 168 x x or 10 x x x you cannot use this feature because private addresses are not routed on the Internet Follow the steps below to configure...

Page 39: ...a third party app for network files management Tips Click Set Up a Dynamic DNS Service Account to learn how to set up a domain name for you router 7 1 3 Customize the Access Settings By default all t...

Page 40: ...s or smb MyShare for Mac To Only Share Specific Content 1 Focus on the Folder Sharing section Click the button to disable Share All then click Add to add a new sharing folder 2 Select the Volume Name...

Page 41: ...es stored on the USB disk directly from DLNA supported devices Click Media Sharing to learn more 4 Click OK Tips The router can share 32 volumes at most You can click on the page to detach the corresp...

Page 42: ...Windows will be unable to remember your credentials and you will always be required to enter the sharing password for USB access 2 Enable Authentication to apply the account you just set If you leave...

Page 43: ...isk is inserted into the router your DLNA supported devices such as your computer and pad connected to the router can detect and play the media files on the USB disks 2 Refer to the following table fo...

Page 44: ...ns on internet access for each member of your family You can block inappropriate content set daily limits for the total time spent online and restrict internet access to certain times of the day It co...

Page 45: ...ntal Controls 3 Click to create a profile for a family member 4 Add basic profile information 1 Enter a Name for the profile to make it easier to identify 2 Under Devices click 3 Select the devices th...

Page 46: ...42 Chapter 8 Parental Controls 5 Add one or more keywords All websites containing the keywords will be blocked 6 Click Next 6 Set time restrictions on internet access...

Page 47: ...e your child spends online is controlled and inappropriate content is blocked on their devices 8 2 Monitor Internet Usage Check which websites my child has visited and how much time they have spent on...

Page 48: ...n menu behind Today to view the websites visited and time spent online for any of the last 7 days Click to view a complete history Click to block the corresponding content for this profile You can now...

Page 49: ...allows you to prioritize the internet traffic of specific devices to guarantee a faster connection when you need it the most Devices set as high priority will be allocated more bandwidth even when th...

Page 50: ...vanced QoS 3 Enable QoS 4 Enter the upload and download bandwidth provided by your internet service provider Click Save 5 Under Device Priority find your computer and toggle on Priority Click the entr...

Page 51: ...n protect your home network against DoS Denial of Service attacks from flooding your network with server requests using DoS Protection block or allow specific client devices to access your network usi...

Page 52: ...the router 2 Go to Advanced Security Settings 3 Enable DoS Protection 4 Set the level Off Low Middle or High of protection for ICMP FLOOD Attack Filtering UDP FlOOD Attack Filtering and TCP SYN FLOOD...

Page 53: ...a list of blocked devices Blacklist or a list of allowed devices Whitelist Block or allow specific client devices to access my network via wired or wireless 1 Visit http tplinkwifi net and log in with...

Page 54: ...tion from the Online Devices list if the device is connected to your network 3 Click OK Nowyoucanblockorallowspecificclientdevicestoaccessyour network via wired or wireless using the Blacklist or Whit...

Page 55: ...evice s according to your need To bind the connected device s Click to add the corresponding device to the Binding List To bind the unconnected device 1 Click Add in the Binding List section 2 Enter t...

Page 56: ...warding feature the router can penetrate the isolation of NAT and allows devices on the internet to initiatively communicate with devices on the local network thus realizing some special functions The...

Page 57: ...ervice port number before the configuration Share my personal website I ve built in local network with my friends through the internet For example the personal website has been built on my home PC 192...

Page 58: ...n the internet can use http domain name to visit the website If you have changed the default External Port you should use http WAN IP External Port or http domain name External Port to visit the websi...

Page 59: ...e enter the parameters manually You should verify the external ports the application uses first and enter them into External Port field according to the format the page displays 11 3 Make Applications...

Page 60: ...MZ and select Enable DMZ 4 Enter the IP address 192 168 0 100 in the DMZ Host IP Address filed 5 Click Save The configuration is completed You ve set your PC to a DMZ host and now you can make a team...

Page 61: ...to the router which has connected to the internet to play online games UPnP will send request to the router to open the corresponding ports allowing the following data penetrating the NAT to transmit...

Page 62: ...more stable It is suitable for restricted environment such as campus network and company intranet PPTP VPN is more easily used and its speed is faster it s compatible with most operating systems and...

Page 63: ...Link ID or the password you set for the router 2 Go to Advanced VPN Server OpenVPN and select Enable VPN Server Note Before you enable VPN Server we recommend you configure Dynamic DNS Service recomme...

Page 64: ...re and install it on your device where you want to run the OpenVPN client utility Note You need to install the OpenVPN client utility on each device that you plan to apply the VPN function to access y...

Page 65: ...internet 3 In the Client IP Address filed enter the range of IP addresses up to 10 that can be leased to the devices by the PPTP VPN server 4 Click Advanced to set the PPTP connection permission acco...

Page 66: ...igure PPTP VPN Connection on Your Remote Device The remote device can use the Windows built in PPTP software or a third party PPTP software to connect to PPTP Server Here we use the Windows built in P...

Page 67: ...63 Chapter 12 VPN Server 3 Select Connect to a workplace and click Next 4 Select Use my Internet connection VPN...

Page 68: ...rver 5 Enter the internet IP address of the router for example 218 18 1 73 in the Internet address field Click Next 6 Enter the User name and Password you have set for the PPTP VPN server on your rout...

Page 69: ...65 Chapter 12 VPN Server 7 The PPTP VPN connection is created and ready to use...

Page 70: ...o configure advanced network features It contains the following sections Change the LAN Settings Configure to Support IPTV Service Specify DHCP Server Settings Set Up a Dynamic DNS Service Account Cre...

Page 71: ...priate to your needs And leave the Subnet Mask as the default settings 4 Click Save Note If you have set the Virtual Server DMZ or DHCP address reservation and the new LAN IP address is not in the sam...

Page 72: ...your ISP is not listed and no other parameters are required Select Custom if your ISP is not listed but provides necessary parameters 3 After you have selected a mode the necessary parameters includi...

Page 73: ...specified client devices 1 Visit http tplinkwifi net and log in with your TP Link ID or the password you set for the router 2 Go to Advanced Network DHCP Server To specify the IP address that the rou...

Page 74: ...ht apply the DDNS Dynamic Domain Name Server feature on the router to allow you and your friends to access your router and local servers FTP HTTP etc using a domain name without checking and rememberi...

Page 75: ...u have to log in with a TP Link ID If you have not logged in with one click Log in 4 Click Register in the Domain Name List if you have selected TP Link and enter the Domain Name as needed If you have...

Page 76: ...ata packets to the specific destination Visit multiple networks and servers at the same time Forexample inasmalloffice myPCcansurftheinternetthrough Router A but I also want to visit my company s netw...

Page 77: ...dress of the company network is the destination IP address so here enter 172 30 30 1 Subnet Mask Determines the destination network with the destination IP address If the destination is a single IP ad...

Page 78: ...he company network 13 6 Specify Wireless Settings The router s wireless network name SSID and password and security option are preset in the factory The preset SSID and password can be found on the la...

Page 79: ...etwork name SSID and wireless password 1 Go to Basic Wireless 2 Create a new SSID in Network Name SSID and customize the password for the network in Password The value is case sensitive Note If you ch...

Page 80: ...wireless network Channel Select an operating channel for the wireless network It is recommended to leave the channel to Auto if you are not experiencing the intermittent wireless connection issue Tran...

Page 81: ...the router 2 Go to Advanced Wireless WPS 13 7 1 Set the Router s PIN Router s PIN is enabled by default to allow wireless devices to connect to the router using the PIN You can use the default one or...

Page 82: ...Chapter 13 Customize Your Network Settings 2 Success will appear on the above screen and the WPS LED on the router will keep on for five minutes if the client has been successfully added to the netwo...

Page 83: ...ntains the following sections Set Up System Time Control LEDs Test the Network Connectivity Upgrade the Firmware Backup and Restore Configuration Settings Set the Router to Reboot Regularly Change the...

Page 84: ...anced System Tools Time Settings It is 12 hour time by default and you can toggle on to change to 24 hour time To get time from the internet 1 In the Set Time field select Get automatically from the I...

Page 85: ...ne 3 Select the correct End date and time when daylight saving time ends at your local time zone 4 Click Save 14 2 Control LEDs The router s LEDs indicate router s activities and status You can turn o...

Page 86: ...t and log in with your TP Link ID or the password you set for the router 2 Go to Advanced System Tools Diagnostics 3 Enter the information with the help of page tips 1 Choose Ping or Traceroute as the...

Page 87: ...h Traceroute 14 4 Upgrade the Firmware TP Link aims at providing better network experience for users We will inform you through the web management page if there s any update firmware available for you...

Page 88: ...er you will see the notification similar as shown below on your computer as long as a web browser is opened Click Upgrade now and log into the web management page with the username and password you se...

Page 89: ...Browse and select the downloaded firmware file 5 Click Upgrade and wait for a few minutes until the router completes the upgrading and restarts 14 5 Backup and Restore Configuration Settings The conf...

Page 90: ...e Factory Default Restore session 2 Wait a few minutes for the resetting and rebooting Note During the resetting process do not turn off the router After reset you can still use the current login pass...

Page 91: ...t Time when the router reboots and Repeat to decide how often it reboots 5 Click Save 14 7 Change the Login Password The account management feature allows you to change your login password of the web...

Page 92: ...outer 2 Go to Advanced System Tools Administration and focus on the Password Recovery section 3 Tick the Enable Password Recovery checkbox 4 Specify a mailbox From for sending the recovery letter and...

Page 93: ...rom accessing the router by using the MAC address based authentication 1 Visit http tplinkwifi net and log in with your TP Link ID or the password you set for the router 2 Go to Advanced System Tools...

Page 94: ...g Devices list or enter the MAC address of the device manually 4 Specify a Description for this entry 5 Tick the Enable This Entry checkbox 6 Click OK 14 10 Remote Management This feature allows you t...

Page 95: ...router from the internet via the displayed Web Address for Management Note If a warning pops up when you visit the above address remotely click Trust or a similar option to continue 14 11 System Log W...

Page 96: ...to the web management page every time I want to go checking It would be great if the system logs could be sent to my mailbox at 8 a m every day 1 Visit http tplinkwifi net and log in with your TP Lin...

Page 97: ...Auto Mail Tips The router will send the system log to the designated email address if this option is enabled 8 Set a fixed time The recipient will receive the system log sent at this time every day 5...

Page 98: ...94 Chapter 14 Manage the Router Click to reset the statistic information of the specific device Click to delete the specific device item in the list...

Page 99: ...nkwifi net to create a new login password Note Please refer to Password Recovery to learn how to configure Password Recovery You ll need to reconfigure the router to surf the internet once the router...

Page 100: ...96 4 Click LAN settings and deselect the following three options and click OK 5 Go to Advanced Restore advanced settings click OK to save the settings...

Page 101: ...router is limited I want to use an extended router to extend the wireless network of the root router Note WDS bridging only requires configuration on the extended router WDS bridging function can be e...

Page 102: ...4GHz WDS section click Enable WDS Bridging 2 Click Survey locate the root router s SSID and click Choose Here we take TP Link_4F98 as example 3 If therootrouterhaswirelesspassword youshouldenterthewir...

Page 103: ...internet status As the follow picture shows if IP address is a valid one please try the methods below and try again Your computer might not recognize any DNS server addresses Please manually configur...

Page 104: ...Check the TCP IP settings on the particular device if all other devices can get internet from the router As the picture below shows if the IP address is 0 0 0 0 please try the methods below and try ag...

Page 105: ...r existing ADSL modem router If so the router is not able to communicate with your modem and you can t access the internet To resolve this problem we need to change the LAN IP address of the router to...

Page 106: ...Q6 What should I do if I cannot find my wireless network or I cannot connect the wireless network If you fail to find any wireless network please follow the steps below Make sure the wireless function...

Page 107: ...but fail to connect please follow the steps below Authenticating problem password mismatch 1 Sometimes you will be asked to type in a PIN number when you connect to the wireless network for the first...

Page 108: ...Windows unable to connect to XXXX Can not join this network Taking longer than usual to connect to this network Check the wireless signal strength of your network If it is weak 1 3 bars please move t...

Page 109: ...roduct names are trademarks or registered trademarks of their respective holders No part of the specifications may be reproduced in any form or by any means or used to make any derivative such as tran...

Page 110: ...this equipment does cause harmful interference to radio or television reception which can be determined by turning the equipment off and on the user is encouraged to try to correct the interference b...

Page 111: ...rations The antennas used for this transmitter must be installed to provide a separation distance of at least 20 cm from all persons and must not be co located or operating in conjunction with any oth...

Page 112: ...to indoor use Canadian Compliance Statement This device complies with Industry Canada license exempt RSS standard s Operation is subject to the following two conditions 1 This device may not cause int...

Page 113: ...t non point point En outre les utilisateurs devraient aussi tre avis s que les utilisateurs de radars de haute puissance sont d sign s utilisateurs principaux c d qu ils ont la priorit pour les bandes...

Page 114: ...e away from water fire humidity or hot environments Do not attempt to disassemble repair or modify the device Do not use damaged charger or USB cable to charge the device Do not use any other chargers...

Page 115: ...LI LT LU LV MT NL NO PL PT RO SE SI SK UK Explanations of the symbols on the product label Symbol Explanation DC voltage Indoor use only RECYCLING This product bears the selective sorting symbol for W...

Reviews: