background image

67

Chapter 12


Customize Your Network Settings

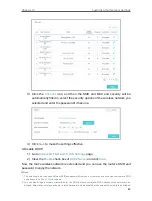
Follow the steps below to reserve an IP address for your devices.

1. 

Visit


http://tplinkwifi.net

, and log in with the password you set for the router. 

2. 

Go to


Advanced


>


Network


LAN Settings


page and select 

IPv4

.

3. 

Scroll down to the 

Address Reservation 

section, and click 

Add 

to add an address 

reservation entry for your device.


4. 

Enter the 

MAC Address

 of the device for which you want to reserve IP address.

5. 

Specify the IP address which will be reserved by the router.

6. 

Select the 

Enable This Entry


check box and click 

OK

 to make the settings effective.

12. 2.  Configure IPv6 LAN Settings

Based on the IPv6 protocol, the router provides two ways to assign IPv6 LAN addresses: 
•  Configure the RADVD (Router Advertisement Daemon) address type
•  Configure the DHCPv6 Server address type

12. 2. 1.  Configure the RADVD Address Type

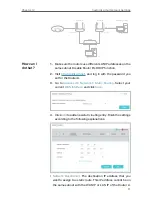
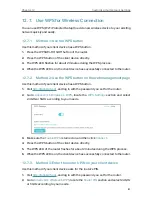
1. 

Visit


http://tplinkwifi.net

, and log in with the password you set for the router.

2. 

Go to 

Advanced 

Network

 > 

LAN Settings

.

3. 

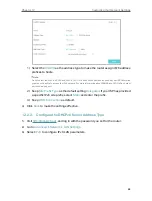
Select 

IPv6 

to configure IPv6 LAN parameters.

Summary of Contents for EC231-G1u

Page 1: ...1910020879 REV1 0 0 User Guide AC1350 Wireless Dual Band Gigabit Router EC231 G1u...

Page 2: ...lly Set Up Your Internet Connection 13 4 3 Set Up an IPv6 Internet Connection 15 4 4 More Operation Modes 16 4 4 1 Configure the Router in Access Point Mode 16 4 4 2 Configure the Router in Range Exte...

Page 3: ...5 12 1 1 Change the LAN IP Address 65 12 1 2 Use the Router as a DHCP Server 65 12 1 3 Reserve LAN IP Addresses 66 12 2 Configure IPv6 LAN Settings 67 12 2 1 Configure the RADVD Address Type 67 12 2 2...

Page 4: ...Network Connectivity 86 13 4 Upgrade the Firmware 86 13 5 Backup and Restore Configuration Settings 87 13 6 Reboot the Router 88 13 7 Administration Management 89 13 7 1 Change the Login Password 89 1...

Page 5: ...show the path to load the corresponding page For example Advanced Wireless Advanced Settings means the Advanced Settings function page is under the Wireless menu that is located in the Advanced tab N...

Page 6: ...Chapter 1 Get to Know Your Router This chapter introduces what the router can do and shows its appearance It contains the following sections Product Overview Appearance...

Page 7: ...upply high speed connection to your wired devices Moreover it is simple and convenient to set up and use the TP Link router due to its intuitive web interface 1 2 Appearance 1 2 1 Top Panel The router...

Page 8: ...ts Internet On Internet service is available Orange On The router s WAN port is connected but the internet service is unavailable Off The router s WAN port is unplugged USB On The USB device is ready...

Page 9: ...this button for at least 5 seconds to reset the router to its factory default settings Wi Fi WPS button Press this button to establish a WPS connection Press and hold the button for at least 5 second...

Page 10: ...Chapter 2 Connect the Hardware This chapter contains the following sections Position Your Router Connect Your Router...

Page 11: ...magnetic reference such as Bluetooth devices cordless phones and microwaves 2 2 Connect Your Router Follow the steps below to connect your router If your internet connection is through an Ethernet cab...

Page 12: ...our computer and connect the devices as shown below Ethernet cable USB WAN LAN1 LAN2 LAN3 LAN4 RESET Wi Fi WPS Method 2 Wireless 1 Find the SSID Network Name and Wireless Password printed on the label...

Page 13: ...ure the wireless function is enabled and is configured with the appropriate encryption before configuring the WPS 1 Tab the WPS icon on the device s screen Here we take an Android phone for instance 2...

Page 14: ...Chapter 3 Log In to Your Router...

Page 15: ...plorer Mozilla Firefox or Apple Safari Follow the steps below to log in to your router 1 Set up the TCP IP Protocol in Obtain an IP address automatically mode on your computer 2 Visit http tplinkwifi...

Page 16: ...s necessary ISP information built in automates many of the steps and verifies that those steps have been successfully completed Furthermore you can also set up an IPv6 connection if your ISP provides...

Page 17: ...Connection In this part you can check your current internet connection settings You can also modify the settings according to the service information provided by your ISP Follow the steps below to ch...

Page 18: ...e corresponding fields 3 If you choose PPPoE enter the Username and Password provided by your ISP PPPoE users usually have DSL cable modems 4 If you choose L2TP enter the Username and Password and sel...

Page 19: ...ective Tips 1 You can check your internet connection by clicking Network Map on the left of the page 2 If you use Dynamic IP and PPPoE and you are provided with any other parameters that are not requi...

Page 20: ...default setting as Current Connection Note If your ISP has provided the IPv6 address click Advanced to reveal more settings You can check the detailed settings of IPv6 and enter the parameters provide...

Page 21: ...to Settings or Advanced Operation Mode select Access Point and click Save Log in to the router via http tplinkwifi net after the router reboots 5 Go to Quick Setup or Settings Wireless Wireless Setti...

Page 22: ...host network 1 Go to Settings Wireless Connect to Network select the wireless band 2 4GHz or 5GHz you want to connect to 2 Make sure the Connect to 2 4GHz Network check box is selected and then click...

Page 23: ...ptions of the host wireless network you selected and enter the password if it has one and click Save to make the settings effective To specify the extended network 1 Go to Settings Wireless Extended N...

Page 24: ...eless security WPA WPA2 Reconmmended Select this option to enable the wireless security This is highly recommended to protect the wireless network from unauthorized access And you can select a securit...

Page 25: ...Fi access for your visitors without disclosing your main network When you have guests in your house apartment or workplace you can create a multi SSID wireless network for them In addition you can cus...

Page 26: ...SSID for Wi Fi access 4 Select the Security option for the multi SSID wireless network WPA WPA2 Personal Recommended is recommended and you can set a password for the network See each other select th...

Page 27: ...e files and media from the USB storage devices over your home network locally or remotely through the internet The router supports USB external flash drives and hard drives This chapter contains the f...

Page 28: ...pport the HFS and exFAT file systems Before you physically disconnect a USB device from the router safely remove it to avoid data damage Go to Advanced USB Sharing USB Storage Device and click 6 1 1 A...

Page 29: ...LAN address of the router and account username and password admin Mac 1 Select Go Connect to Server 2 Type the server address smb tplinkwifi net 3 Click Connect 4 When prompted select the Guest radio...

Page 30: ...on your camera s memory card from time to time during your journey Note If your ISP assigns a private WAN IP address such as 192 168 x x or 10 x x x you cannot use this feature because private addres...

Page 31: ...Enter on the keyboard 4 Access with the username and password you set in To Set Up Authentication for Data Security Tips You can also access the USB disk via a third party app for network files manag...

Page 32: ...lders on your USB disk You can customize your sharing settings by setting a sharing account sharing specific contents and setting a new sharing address on the router s web management page 1 Visit http...

Page 33: ...og in to the Sharing Account to access the USB disk Refer to To Set Up Authentication for Data Security to learn more Enable Write Access If you select this check box network clients can modify this f...

Page 34: ...ou can create a new username and password Note For Windows users do not set the sharing username the same as the Windows username Otherwise Windows credential mechanism may cause the following problem...

Page 35: ...ge the address of the USB disk by referring to To Customize the Address of the USB Disk 6 2 Media Sharing The feature of Media Sharing allows you to view photos play music and watch movies stored on t...

Page 36: ...G USB modem You can use your 3G 4G network an a backup solution for the Internet access To use the 3G 4G network as a backup solution for internet access Using 3G 4G network as a backup solution for i...

Page 37: ...b page http www tp link com en comp list html If your USB modem is incompatible contact our technical support 5 Verify that the router has correctly recognized your Mobile ISP When your Mobile ISP is...

Page 38: ...Chapter 7 Parental Controls This function allows you to block inappropriate explicit and malicious websites and control access to specified websites at specified time...

Page 39: ...PM to 22 00 10 PM on the weekdays and not other time 1 Visit http tplinkwifi net and log in with the password you set for the router 2 Go to Basic Parental Controls or Advanced Parental Controls and...

Page 40: ...policy Tips With Blacklist selected the controlled devices cannot access any websites containing the specified keywords during the Effective Time period With Whitelist selected the controlled devices...

Page 41: ...low access only to its related websites If you wish to block all internet browsing access do not add any keyword to the Whitelist For Blacklist Specify a web address e g wikipedia org a web address ke...

Page 42: ...Chapter 8 QoS This chapter explains how to create the QoS Quality of Service rule to prioritize your online activities which minimizes the impact caused by heavy internet traffic...

Page 43: ...uter 2 Go to Advanced QoS Basic Settings and enable QoS of Upstream and QoS of Downstream 3 SelecttheSchedulerAlgorithmasthenetworkscheduling discipline for upstream and downstream SP Strict priority...

Page 44: ...1 is the highest precedence Weight It is the queue s quota bandwidth calculated as percentage of the total bandwidth 4 Enter a description for the queue in the Queue Name box 5 Select Enable this entr...

Page 45: ...an match only one flow classification Matching is started from the lower order to the higher order 3 Specify the classification criteria The ingress interface type is necessary and unique for each cla...

Page 46: ...Enable Policer Select this check box to specify the Committed Rate and Committed Burst Size if needed 5 Click OK to make the settings effective 6 Repeat step 1 5 to set other flow classes according to...

Page 47: ...functions You can block or allow specific client devices to access your wireless network using MAC Filtering or using Access Control for wired and wireless networks or you can prevent ARP spoofing and...

Page 48: ...kwifi net and log in with the password you set for the router 2 Go to Advanced Security Firewall DoS Protection Note DoS Protection and Traffic Statistics must be enabled at the same time you can go t...

Page 49: ...f packets exceeds the preset threshold value and the vicious host will be displayed in the Blocked DoS Host List 9 2 Service Filtering With Service Filtering you can prevent certain users from accessi...

Page 50: ...ffective Note If you want to disable an entry click the button 9 3 Access Control Access Control is used to block or allow specific client devices to access your network via wired or wireless based on...

Page 51: ...ave 2 Select the device s to be blocked in the Online Devices table or click the Add under the Devices in Blacklist and enter the Device Name and MAC Address manually 3 Click Block above the Online De...

Page 52: ...Binding IP MAC Binding namely ARP Address Resolution Protocol Binding is used to bind a network device s IP address to its MAC address This will prevent ARP spoofing and other ARP attacks by denying n...

Page 53: ...s to be bound in the ARP List 2 Click Bind to add to the Binding List To bind the unconnected device 1 Click Add 2 Enter the MAC address and IP address that you want to bind 3 Select the Enable This...

Page 54: ...uter can penetrate the isolation of NAT and allows devices on the internet to initiatively communicate with devices on the local network thus realizing some special functions The TP Link router suppor...

Page 55: ...o Point sessions to be tunneled through an IP network and passed through the router IPSec Pass through If enabled it allows IPSec Internet Protocol Security to be tunneled through an IP network and pa...

Page 56: ...in HTTP service port 21 in FTP service port 25 in SMTP service and port 110 in POP3 service Please verify the service port number before the configuration Share my personal website I ve built in loca...

Page 57: ...be overlapped Users on the internet can enter http WAN IP in this example http 218 18 232 154 to visit your personal website Tips 1 For a WAN IP that is assigned dynamically by ISP it is recommended...

Page 58: ...ple 4 Click OK to make the settings effective Tips 1 You can add multiple port triggering rules according to your network need 2 The triggering ports can not be overlapped 3 If the application you nee...

Page 59: ...t and log in with the password you set for the router 3 Go to Advanced NAT Forwarding DMZ and select the Enable check box to turn on DMZ 4 Enter the IP address 192 168 0 100 in the DMZ Host IP Address...

Page 60: ...erating system need to install the UPnP components For example when you connect your Xbox to the router which has connected to the internet to play online games UPnP will send request to the router to...

Page 61: ...stable It is suitable for restricted environment such as campus network and company intranet PPTP VPN is more easily used and its speed is faster it s compatible with most operating systems and also...

Page 62: ...1 Before you enable VPN Server we recommend you configure Dynamic DNS Service recommended or assign a static IP address for router s WAN port and synchronize your System Time with internet 2 The first...

Page 63: ...y or Apple App Store 2 After the installation copy the file exported from your router to the OpenVPN client utility s config folder for example C Program Files OpenVPN config on Windows The path depen...

Page 64: ...N server 4 Enter the Username and Password to authenticate clients to the PPTP VPN server 5 Click Save to make the settings effective Step 2 Configure PPTP VPN Connection on Your Remote Device The rem...

Page 65: ...61 Chapter 11 VPN Server 4 Select Use my Internet connection VPN 5 Enter the internet IP address of the router for example 218 18 1 73 in the Internet address field Click Next...

Page 66: ...62 Chapter 11 VPN Server 6 Enter the User name and Password you have set for the PPTP VPN server on your router and click Connect 7 The PPTP VPN connection is created and ready to use...

Page 67: ...63 Chapter 11 VPN Server Tips You can go to Advanced VPN VPN Connections to view the clients that are currently connected to the PPTP VPN servers...

Page 68: ...sic configuration of the router using the web management page It contains the following sections Configure LAN Settings Configure IPv6 LAN Settings Set Up a Dynamic DNS Service Account Create Static R...

Page 69: ...te to your needs 4 Select the Subnet Mask from the drop down list The subnet mask together with the IP address identifies the local IP subnet 5 Keep IGMP Snooping enabled by default IGMP snooping is t...

Page 70: ...d to work as a DHCP Relay A DHCP relay is a computer that forwards DHCP data between computers that request IP addresses and the DHCP server that assigns the addresses Each of the device s interfaces...

Page 71: ...hich you want to reserve IP address 5 Specify the IP address which will be reserved by the router 6 Select the Enable This Entry check box and click OK to make the settings effective 12 2 Configure IP...

Page 72: ...information about RDNSS and ULA Prefix contact our technical support 2 Keep Site Prefix Type as the default setting Delegated If your ISP has provided a specific IPv6 site prefix select Static and en...

Page 73: ...ce Account Most ISPs Internet service providers assign a dynamic IP address to the router and you can use this IP address to access your router remotely However the IP address can change any time and...

Page 74: ...or network Data from one point to another will always follow the same path regardless of other considerations Normal internet usage does not require this setting to be configured Visit multiple networ...

Page 75: ...n 2 Visit http tplinkwifi net and log in with the password you set for the Router A 3 Go to Advanced Network Static Routing Select your current WAN Interface and click Save 4 Click Add to add a new st...

Page 76: ...the LAN port of Router A so LAN should be selected 5 Select the Enable This Entry check box to enable this entry 6 Click OK to make the settings effective Open a web browser on your PC Enter the compa...

Page 77: ...with the 6to4 tunnel Note If you still can t access IPv6 resources it may means that no 6to4 public server was found in your network You can contact your ISP to sign up for IPv6 connection service 12...

Page 78: ...rk name SSID and password and security option are preset in the factory The preset SSID and password can be found on the product label You can customize the wireless settings according to your needs V...

Page 79: ...ings effective Mode Select the desired transmission mode 802 11n only Select only if all of your wireless clients are 802 11n devices 802 11g n mixed Select if you are using both 802 11g and 802 11n w...

Page 80: ...ity WPA WPA2 Personal Recommended and WPA WPA2 Enterprise WPA2 uses the newest standard and the security level is the highest We recommend you don t change the default settings unless necessary 3 Clic...

Page 81: ...dingitsconnection type and security option as well as the packets transmitted Tips You can also see the wireless details by clicking the wireless clients icon on Basic Network Map 12 6 3 Advanced Wire...

Page 82: ...cation Message DTIM 1 indicates the DTIM Interval is the same as Beacon Interval Group Key Update Period Enter the number of seconds to control the time interval for the encryption key automatic renew...

Page 83: ...ess of the router 1 Go to Advanced Network LAN Settings configure the IP address of the extended router to be in the same subnet with the root router For example the IP address of the root router is 1...

Page 84: ...2 Clear the Enable check box of DHCP Server and click Save Now the root s wireless network is extended and you can use the router s SSID and password to enjoy the network Note 1 The extended router ca...

Page 85: ...ur client device has a WPS button 1 Visit http tplinkwifi net and log in with the password you set for the router 2 Go to Advanced Wireless WPS locate the WPS Settings section and select 2 4GHz or 5GH...

Page 86: ...ease make sure the wireless function is enabled before configuring WPS 12 7 4 Method 4 Enter the client device s PIN on the router 1 Visit http tplinkwifi net and log in with the password you set for...

Page 87: ...to select the time when you want your wireless network off and then click Save to make the settings effective Note 1 Make sure that the time of the router is correct before using this function For det...

Page 88: ...ining your router It contains the following sections Set System Time Control LEDs Test the Network Connectivity Upgrade the Firmware Backup and Restore Configuration Settings Reboot the Router Adminis...

Page 89: ...d select the local time Get from PC Click this button if you want to use the current time of your PC Get from the Internet Click this button if you want to get time from the internet Make sure your ro...

Page 90: ...en the router and the host or other network devices 1 Visit http tplinkwifi net and log in with the password you set for the router 2 Go to Advanced System Tools Diagnostics 3 Click Start to test the...

Page 91: ...e downloaded firmware file is matched with the Hardware Version 5 Focus on the Local Upgrade section Click Browse to locate the downloaded new firmware file and click Upgrade 6 Wait a few minutes for...

Page 92: ...router 2 Wait a few minutes for the resetting and rebooting Note 1 During the resetting process do not turn off or reset the router 2 We strongly recommend you backup the current configuration settin...

Page 93: ...to its factory defaults system will reboot automatically Update the configuration with the file system will reboot automatically Note The Auto Reboot feature takes effect based on the router s system...

Page 94: ...ement over a more secure way HTTPS Follow the steps below to allow only the specific device to manage the router via the local management over HTTPS 1 Visit http tplinkwifi net and log in with the pas...

Page 95: ...s to manage the router over HTTPS 1 Visit http tplinkwifi net and log in with the password you set for the router 2 Go to Advanced System Tools Administration page and locate the Remote Management sec...

Page 96: ...outer s replies to ICMP Ping requests 1 Visit http tplinkwifi net and log in with the password you set for the router 2 Go to Advanced System Tools Administration and locate the ICMP Ping section 3 Sp...

Page 97: ...Save Locally Select this option to cache the system log to the router s local memory select the minimum level of system log to be saved from the drop down list The logs will be shown in the table in d...

Page 98: ...em Tools CWMP Settings page CWMP Enable or disable the CWMP CPE WAN Management Protocol function Inform Enable or disable the function of sending an inform message to the ACS Auto Configuration Server...

Page 99: ...r network monitoring It allows management applications to retrieve status updates andstatisticsfromtheSNMPagentwithinthisdevice Inthisway networkadministrators can easily search and modify the informa...

Page 100: ...plays the textual description of the managed device This value should include the full name and version identification of the system s hardware type software operating system and networking software S...

Page 101: ...to enable traffic statistics function you can view the total number of packets and bytes received and transmitted by the router within the selected Statistics Interval This function is disabled by de...

Page 102: ...reconfigure the router to surf the internet once the router is reset and please mark down your new password for future use Q3 What should I do if I cannot log in to the router s web management page Th...

Page 103: ...99 4 Click LAN settings and clear the following three options and click OK 5 Go to Advanced Restore advanced settings click OK to save the settings...

Page 104: ...reconfigure the router to surf the internet once the router is reset Q4 What should I do if I cannot access the internet even though the configuration is finished 1 Visit http tplinkwifi net and log i...

Page 105: ...DNS server operated by Google Restart the modem and the router 1 Power off your modem and router and leave them off for 1 minute 2 Power on your modem first and wait about 2 minutes until it gets a s...

Page 106: ...2 Go to Advanced Network Internet and click the edit icon to find the MAC Clone section 3 Choose an option as needed enter the MAC address if Use Custom MAC Address is selected and click OK Tips Some...

Page 107: ...twork LAN Settings 3 Modify the LAN IP address as the following image shows Here we take 192 168 2 1 as an example 4 Click Save Restart the modem and the router 1 Power off your modem and router and l...

Page 108: ...ed successfully and the wireless adapter is enabled On Windows 7 1 If you see the message No connections are available it is usually because the wireless function is disabled or blocked somehow 2 Clic...

Page 109: ...your router modem Move it closer if it is currently too far away Go to Advanced Wireless Wireless Settings and check the wireless settings Double check your wireless Network Name and make sure the SSI...

Page 110: ...r wireless router Note Wireless Password Network Security Key is case sensitive Windows unable to connect to XXXX Can not join this network Taking longer than usual to connect to this network Check th...

Page 111: ...roduct names are trademarks or registered trademarks of their respective holders No part of the specifications may be reproduced in any form or by any means or used to make any derivative such as tran...

Page 112: ...communications However there is no guarantee that interference will not occur in a particular installation If this equipment does cause harmful interference to radio or television reception which can...

Page 113: ...ade in the equipment and the equipment is properly maintained and operated FCC compliance information statement Product Name I T E POWER SUPPLY Model Number AMS159A 1201000FU Responsible party TP Link...

Page 114: ...device may not cause harmful interference 2 This device must accept any interference received including interference that may cause undesired operation Any changes or modifications not expressly appr...

Page 115: ...le 3 1a on the limitation of exposure of the general public to electromagnetic fields by way of health protection The device complies with RF specifications when the device used at 20 cm from your bod...

Page 116: ...r une utilisation l int rieur afin de r duire les risques de brouillage pr judiciable aux syst mes de satellites mobiles utilisant les m mes canaux Radiation Exposure Statement This equipment complies...

Page 117: ...113 4 7 9 2 BSMI Notice Pb Cd Hg CrVI PBB PBDE PCB 1 0 1 wt 0 01 wt 2 3...

Page 118: ...us Please read and follow the above safety information when operating the device We cannot guarantee that no accidents or damage will occur due to improper use of the device Please use this product w...

Reviews: