background image

MR4-WR642G

108M Wireless Router User Guide 


 24


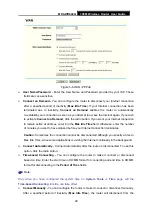
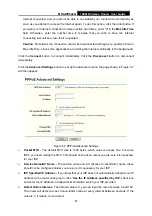
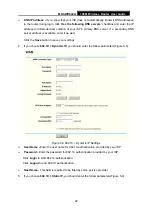
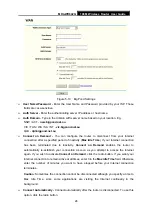
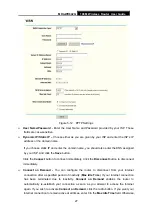
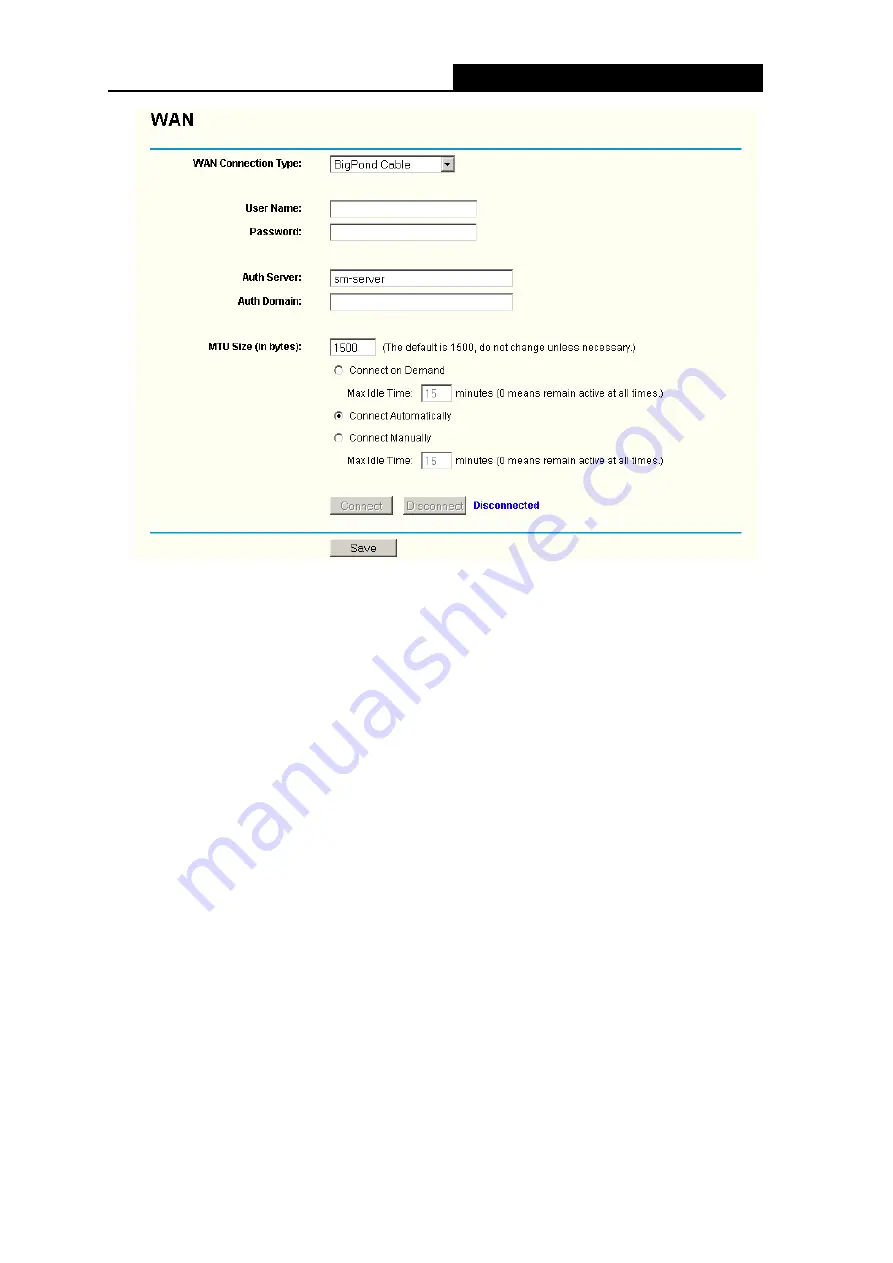
Figure 5-10    Big Pond Settings 

¾


User Name/Password -

 Enter the User Name and Password provided by your ISP. These 

fields are case-sensitive. 

¾


Auth Server - 

Enter the authenticating server IP address or host name. 

¾


Auth Domain

 - Type in the domain suffix server name based on your location. Eg, 

NSW / ACT - 

nsw.bigpond.net.au


VIC / TAS / WA / SA / NT - 

vic.bigpond.net.au


QLD - 

qld.bigpond.net.au


¾


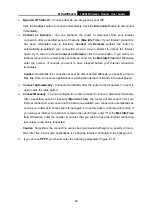
Connect on Demand -

 You can configure the router to disconnect from your Internet 

connection after a specified period of inactivity (

Max Idle Time

). If your Internet connection 

has been terminated due to inactivity, 

Connect on Demand

 enables the router to 

automatically re-establish your connection as soon as you attempt to access the Internet 

again. If you wish to activate 

Connect on Demand

, click the radio button. If you want your 

Internet connection to remain active at all times, enter 0 in the 

Max Idle Time

 field. Otherwise, 

enter the number of minutes you want to have elapsed before your Internet connection 

terminates. 

Caution

: Sometimes the connection cannot be disconnected although you specify a time to 

Max Idle Time, since some applications are visiting the Internet continually in the 

background. 

¾


Connect Automatically -

 Connect automatically after the router is disconnected. To use this 

option, click the radio button. 

Summary of Contents for MR4-WR642G

Page 1: ...MR4 WR642G 108M Wireless Router Rev 1 0 0...

Page 2: ...e with the instructions may cause harmful interference to radio communications However there is no guarantee that interference will not occur in a particular installation If this equipment does cause...

Page 3: ...ironment this product may cause radio interference in which case the user may be required to take adequate measures National Restrictions 2400 0 2483 5 MHz Country Restriction Reason remark Bulgaria G...

Page 4: ...lation Environment Requirements 7 3 3 Connecting the Router 7 Chapter 4 Quick Installation Guide 9 4 1 TCP IP configuration 9 4 2 Quick Installation Guide 11 Chapter 5 Configuring the Router 15 5 1 Lo...

Page 5: ...g 54 5 9 1 Binding Setting 54 5 9 2 ARP List 56 5 10 Static Routing 56 5 11 DDNS 58 5 11 1 Dyndns org DDNS 58 5 11 2 Oray net DDNS 58 5 11 3 Comexe cn DDNS 59 5 12 System Tools 60 5 12 1 Time 61 5 12...

Page 6: ...ne detachable antenna One AC power Adapter for MR4 WR642G 108Mbps Wireless Router Quick Installation Guide One Resource CD for MR4 WR642G 108Mbps Wireless Router including This Guide Other Helpful Inf...

Page 7: ...nsmission technology so that transmission distance is 2 3 times of traditional IEEE 802 11g and IEEE 802 11b solutions up to 855 36m tested in China The transmission range is extended to 4 9 times It...

Page 8: ...data transmission rate is up to 108Mbps It adopts 2x to 3x eXtended Range WLAN transmission technology so that transmission distance is 2 3 times that of traditional IEEE 802 11g and IEEE 802 11b solu...

Page 9: ...ing Built in firewall supporting IP address filtering Domain Name filtering and MAC address filtering Supports connecting disconnecting from the Internet on a specified time of day Supports access con...

Page 10: ...n There is a device linked to the corresponding port but no activity Flashing There is an active device linked to the corresponding port 2 3 2 The Rear Panel Figure 2 2 Rear Panel sketch The rear pane...

Page 11: ...Defaults page in the router s Web based Utility 2 Use the Factory Default Reset button First turn off the router s power Second press and hold the default reset button then turn on the router s power...

Page 12: ...l the router you should connect your PC to the Internet through your broadband service successfully If there is any problem please contact your ISP After that please install the router according to th...

Page 13: ...MR4 WR642G 108M Wireless Router User Guide 8 Figure 3 1 Hardware Installation of the MR4 WR642G 108Mbps Wireless Router...

Page 14: ...1 Set up the TCP IP Protocol for your PC If you need instructions as to how to do this please refer to Appendix B Configuring the PC 2 Configure the network parameters The IP address is 192 168 1 xxx...

Page 15: ...lure result of Ping command Please check the connection following these steps 1 Is the connection between your PC and the router correct Note The 1 2 3 4 LEDs of LAN port which you link to on the rout...

Page 16: ...in window will appear similar to that shown in Figure 4 4 Enter admin for the User Name and Password both in lower case letters Then click the OK button or press the Enter key Figure 4 4 Login Windows...

Page 17: ...he necessary network parameters If you choose PPPoE you will see this page shown in Figure 4 7 Figure 4 7 Quick Setup PPPoE User Name and Password Enter the User Name and Password provided by your ISP...

Page 18: ...another DNS server enter it into this field After you complete the above click Next the Wireless settings page will appear shown in Figure 4 9 Figure 4 9 Quick Setup Wireless settings In this page yo...

Page 19: ...2 11g 11Mbps 802 11b If you select 108Mbps Dynamic it is compatible with 54Mbps 802 11g and 11Mbps 802 11b If you select 54Mbps 802 11g it is compatible with 11Mbps 802 11b These settings are only for...

Page 20: ...page displays the router s current status and configuration All information is read only shown in Figure 5 1 1 LAN This field displays the current settings or information for the LAN including the MA...

Page 21: ...MR4 WR642G 108M Wireless Router User Guide 16 Figure 5 1 Router Status 5 3 Quick Setup Please refer to Section 4 2 Quick Installation Guide...

Page 22: ...as seen from the LAN The value can t be changed IP Address Enter the IP address of your router in dotted decimal notation factory default 192 168 1 1 Subnet Mask An address code that determines the si...

Page 23: ...tion 1 If you choose Dynamic IP the router will automatically get IP parameters from your ISP You can see the page as follows Figure 5 4 Figure 5 4 WAN Dynamic IP This page displays the WAN IP paramet...

Page 24: ...aces provided IP Address Enter the IP address in dotted decimal notation provided by your ISP Subnet Mask Enter the subnet Mask in dotted decimal notation provided by your ISP usually is 255 255 255 0...

Page 25: ...inutes you want to have elapsed before your Internet connection terminates Caution Sometimes the connection cannot be disconnected although you specify a time to Max Idle Time since some applications...

Page 26: ...ck the Advanced Settings button to set up the advanced option the page shown in Figure 5 7 will then appear Figure 5 7 PPPoE Advanced Settings Packet MTU The default MTU size is 1480 bytes which value...

Page 27: ...lick the Save button to save your settings 4 If you choose 802 1X Dynamic IP you should enter the follow parameters Figure 5 8 Figure 5 8 802 1X Dynamic IP Settings User Name Enter the user name for 8...

Page 28: ...ck Login to start 802 1X authentication Click Logout to end 802 1X authentication IP Address Enter the IP address in dotted decimal notation provided by your ISP Subnet Mask Enter the subnet Mask in d...

Page 29: ...nternet connection has been terminated due to inactivity Connect on Demand enables the router to automatically re establish your connection as soon as you attempt to access the Internet again If you w...

Page 30: ...ve at all times enter 0 in the Max Idle Time field Otherwise enter the number in minutes that you wish to have the Internet connecting last unless a new link is requested Caution Sometimes the connect...

Page 31: ...d although you specify a time to Max Idle Time since some applications is visiting the Internet continually in the background Connect Automatically Connect automatically after the router is disconnect...

Page 32: ...ck the Connect button to connect immediately Click the Disconnect button to disconnect immediately Connect on Demand You can configure the router to disconnect from your Internet connection after a sp...

Page 33: ...ise enter the number in minutes that you wish to have the Internet connecting last unless a new link is requested Caution Sometimes the connection cannot be disconnected although you specify a time to...

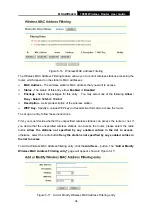
Page 34: ...ick the Save button the router will prompt you to reboot 5 5 Wireless Figure 5 14 Wireless menu There are three submenus under the Wireless menu shown in Figure 5 14 Wireless Settings MAC Filtering an...

Page 35: ...of up to 32 characters The same name SSID must be assigned to all wireless devices in your network The default SSID is TP LINK but it is recommended strongly that you change your networks name SSID to...

Page 36: ...other nearby access point Mode Select the desired wireless mode The options are 108Mbps Dynamic Super G 802 11g and 802 11b wireless stations can connect to the router 108Mbps Static Only Super G wire...

Page 37: ...K for authentication type you can select Automatic WPA PSK or WPA2 PSK as authentication options When you select WPA WPA2 as an authentication type you can select Automatic WPA or WPA2 as authenticati...

Page 38: ...d up 1 29 seconds are not usable figures Enter 0 to disable the update Figure 5 15b WPA WPA2 Radius Server IP Enter the IP address of the Radius Server Radius Port Enter the port number that the radiu...

Page 39: ...on WEP Key Specify a unique WEP key in Hexadecimal format to access the router To set up an entry follow these instructions First you must decide whether the unspecified wireless stations can access t...

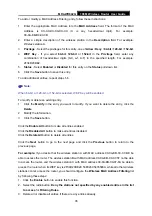
Page 40: ...ck the Modify in the entry you want to modify If you want to delete the entry click the Delete 2 Modify the information 3 Click the Save button Click the Enable All button to make all entries enabled...

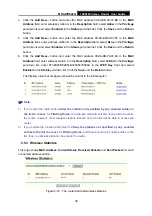
Page 41: ...e Privilege pull down list enter 2F34D20BE2E54B326C5476586A in the WEP Key field and select Enabled in the Status pull down list Click the Save and the Return button The filtering rules that configure...

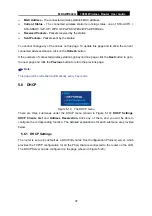
Page 42: ...ick the Next button to go to the next page and click the Previous button to return the previous page Note This page will be refreshed automatically every 5 seconds 5 6 DHCP Figure 5 19 The DHCP menu T...

Page 43: ...ss Enter the amount of time in minutes The user will be leased this dynamic IP Address The range of the time is 1 2880 minutes The default value is 120 minutes Default Gateway Optional Suggest to inpu...

Page 44: ...pecify a reserved IP address for a PC on the LAN that PC will always receive the same IP address each time when it accesses the DHCP server Reserved IP addresses should be assigned to servers that req...

Page 45: ...vious button to return the previous page Note The function won t take effect until the router reboots 5 7 Forwarding Figure 5 24 The Forwarding menu There are four submenus under the Forwarding menu s...

Page 46: ...or this application either TCP UDP or All all protocols supported by the router Status The status of this entry either Enabled or Disabled To setup a virtual server entry 1 Click the Add New button po...

Page 47: ...return the previous page Note If you set the virtual server of service port as 80 you must set the Web management port on Security Remote Management page to be any value except 80 such as 8080 Or else...

Page 48: ...ts or port section Every group of ports must be set apart with For example 2000 2038 2050 2051 2085 3010 3030 Incoming Protocol The protocol used for Incoming Ports Range either TCP or UDP or ALL all...

Page 49: ...closed 2 Each rule allowed to be used only by one host on LAN synchronously The trigger connection of other hosts on LAN will be refused 3 Incoming Port Range cannot overlap each other 5 7 3 DMZ The...

Page 50: ...ettings List This table displays the current UPnP information App Description The description provided by the application in the UPnP request External Port External port which the router opened for th...

Page 51: ...ngs Enable Firewall the general firewall switch is on or off Enable IP Address Filtering set IP Address Filtering is enabled or disabled There are two default filtering rules of IP Address Filtering e...

Page 52: ...se follow these instructions 1 Effective Time Enter a range of time in HHMM format which point to the range time for the entry to take effect For example 0803 1705 the entry will take effect from 08 0...

Page 53: ...the Save button Click the Enable All button to make all entries enabled Click the Disabled All button to make all entries disabled Click the Delete All button to delete all entries You can change the...

Page 54: ...or the entry to take effect For example if you enter 0803 1705 than the entry will take effect from 08 03 to 17 05 2 Domain Name Type the domain or key word as desired in the field A blank in the doma...

Page 55: ...Filtering page the MAC Address Filtering page shown in Figure 5 37 allows you to control access to the Internet by users on your local network based on their MAC Address Figure 5 37 MAC address Filte...

Page 56: ...lick the Save button Click the Enable All button to make all entries enabled Click the Disabled All button to make all entries disabled Click the Delete All button to delete all entries Click the Next...

Page 57: ...this function change the default IP Address to another IP Address as desired To access the router you will type your router s WAN IP Address into your browser s Address in IE or Location in Navigator...

Page 58: ...UPD FLOOD Packets numbers is beyond the set value the router will start up the blocking function immediately Enable TCP SYN FLOOD Attack Filtering Enable or Disable the TCP SYN FLOOD Attack Filtering...

Page 59: ...AC Binding Setting Figure 5 42 the IP MAC Binding menu There are two submenus under the IP MAC Binding menu shown in Figure 5 42 Binding Setting and ARP List Click any of them and you will be able to...

Page 60: ...Add New button 2 Enter the MAC Address and IP Address 3 Select the Bind checkbox 4 Click the Save button to save it To modify or delete an existing entry 1 Find the desired entry in the table 2 Click...

Page 61: ...address binding Configure Load or delete item Load Load the item to the IP MAC Binding list Delete Delete the item Click the Bind All button to bind all the current items available after enable Click...

Page 62: ...portion Gateway This is the IP Address of the gateway device that allows for contact between the router and the network or host 3 Select Enabled or Disabled for this entry on the Status pull down list...

Page 63: ...p for DDNS follow these instructions 5 11 1 Dyndns org DDNS If your selected dynamic DNS Service Provider is www dyndns org the page will appear as shown in Figure 5 49 Figure 5 49 Dyndns org DDNS Set...

Page 64: ...Password for your DDNS account 3 Click the Login button to login the DDNS service Connection Status The status of the DDNS service connection is displayed here Domain Name The domain names are displa...

Page 65: ...nt 3 Type the Password for your DDNS account 4 Click the Login button to login to the DDNS service Connection Status The status of the DDNS service connection is displayed here Click Logout to logout...

Page 66: ...ur local time in HH MM SS into the right blanks Time setting follows these steps below 1 Select your local time zone 2 Enter date and time in the right blanks 3 Click Save Click the Get GMT button to...

Page 67: ...urrent configuration settings so make sure you backup the router s settings before you upgrade its firmware To upgrade the router s firmware follow these instructions 1 Download the latest firmware up...

Page 68: ...r as backup or restore the configuration file you saved before Figure 5 56 Backup Restore Configuration Click the Backup button to save all configuration settings as a backup file in your local comput...

Page 69: ...router s settings to factory default system will reboot automatically 5 12 6 Password This page shown in Figure 5 58 allows you to change the factory default user name and password of the router Figur...

Page 70: ...button to clear all the logs 5 12 8 Statistics The Statistics page shown in Figure 5 60 displays the network traffic of each PC in LAN including total traffic and traffic of the last Packets Statisti...

Page 71: ...The total amount of the UDP packets transmitted to WAN in the last Packets Statistic interval seconds TCP SYN Tx The total amount of the TCP SYN packets transmitted to WAN in the last Packets Statisti...

Page 72: ...ernet by Ethernet users 1 Login to the router click the Network menu on the left of your browser and click WAN submenu On the WAN page select Dynamic IP for WAN Connection Type finish by clicking Save...

Page 73: ...dd or Modify a Virtual Server page enter 1720 into the blank behind the Service Port and your IP address behind the IP Address assuming 192 168 1 169 for an example remember to Enable and Save Figure...

Page 74: ...h as 88 into the Web Management Port field Click Save and reboot the router Figure A 7 Remote Management Note If the above configuration takes effect to configure to the router by typing http 192 168...

Page 75: ...router 1 Make sure the Wireless Router Radio is enabled 2 Make sure that the wireless stations SSID accord with the router s SSID 3 Make sure the wireless stations have right KEY for encryption when t...

Page 76: ...pter s manual if needed 1 Install TCP IP component 1 On the Windows taskbar click the Start button point to Settings and then click Control Panel 2 Click the Network and Internet Connections icon and...

Page 77: ...ties window will display and the IP Address tab is open on this window by default Now you have two ways to configure the TCP IP protocol below Setting IP address automatically Select Obtain an IP addr...

Page 78: ...er s LAN IP address is 192 168 1 1 type IP address is 192 168 1 x x is from 2 to 254 and Subnet mask is 255 255 255 0 3 Type the router s LAN IP address the default IP is 192 168 1 1 into the Default...

Page 79: ...MR4 WR642G 108M Wireless Router User Guide 74 Figure B 4...

Page 80: ...UTP category 3 4 5 cable maximum 100m EIA TIA 568 100 STP maximum 100m 100BASE TX UTP category 5 5e cable maximum 100m EIA TIA 568 100 STP maximum 100m Radio Data Rate 108 54 48 36 24 18 12 9 6Mbps or...

Page 81: ...ce of traditional 802 11b and 802 11g products for a coverage area that is up to nine times greater A traditional 802 11b and 802 11g product transmission distance is about 300m A 2x to 3x eXtended Ra...

Page 82: ...s on connection by simulating a dial up connection SSID A Service Set Identification is a thirty two character maximum alphanumeric key identifying a wireless local area network For the wireless devic...

Reviews: