background image

SECTION FOUR: OPERATING TIPS 

The Temperature Dial can be changed at any time to increase or decrease the 

cooking temperature of the Grill. The HIGH/HIGHER Temperature settings are for 
Grilling. The MED/MID RANGE Temperature settings are for Slow Cooking. Th
SMOKE set


1)  

ting is for Smoking and adding Smoke Flavor to foods being cooked. The 

2)  

ing on it, make sure the fire is 


4)  

5)  

at Baffle should be pointing down over the Firepot. If not seated properly, 


6)  When estimating cooking times, the outside temperature will be an important factor. 

7)  


ny 

ed Grease Drain and the Grease Drain Tube. 

Replace the Grease Drain Pan and the Porcelain Grill in their proper positions, 
restart the 


SECTION FIVE: MAINTAINING 

 
1)  


rain Pan and in the V-shaped Grease Drain, or 

is allowed to plug the Grease Drain Tube, a grease fire could result. We recommend 
cleaning these locations regularly. 

SMOKE setting can also be used to “hold” foods at approximately 180 to 200 
degrees F. 

Your TRAEGER PELLET GRILL should never be moved while it is hot. If you are 

transporting your Grill in a vehicle after cook
completely out and the Grill is COLD before placing it in any vehicle. NEVER put
water into the Firepot. It will jam the Auger. 

3)  The TRAEGER PELLET GRILL is designed to operate with the Door CLOSED. 

Cooking with the Door open greatly lengthens your cooking time. 

NEVER add Pellets by hand to a hot Firepot. This is dangerous and you may be 

seriously burned. If you run out of Pellets and lose your fire while cooking, let the 
Grill completely cool and start again with the 

INITIAL FIRING INSTRUCTIONS.  

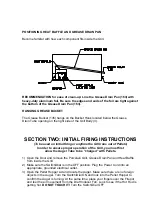
Make sure the Heat Baffle is properly seated on its locating brackets. The long lips of 

the He
direct heat and flame could come up out of the Firepot and cause a grease fire in the
Grill. 

If it is hot outside, it will take less time for food to cook. If it is cold, wet or windy, it 
will take longer. 

Grease fires are caused by not properly maintaining the Grill by failing to clean your 

Grease Drain Pan, V-shaped Grease Drain and Grease Drain Tube on a consisten
basis. In the unlikely event of a grease fire while cooking, 

TURN THE SWITCH/DIAL

OFF and KEEP THE DOOR CLOSED

 until the fire is completely out. Never keep 

the Door open during a grease fire. If it does not go out, lightly sprinkle baking soda 
on the fire. 

Be careful not to burn yourself.

 If this does not work, then carefully

remove the food from the Grill and keep the Door closed until the fire is completely 
out. 

Again, be careful not to burn yourself.

 When the Grill is completely cool, 

remove the Porcelain Grill and replace the foil on the Grease Drain Pan. Clean a
grease accumulation from the V-shap

Grill and resume cooking. 

YOUR NEW GRILL 

Change the aluminum foil on the Grease Drain Pan frequently. Periodically, clean

the grease out of the V-shaped Grease Drain and Grease Drain Tube and off of the
interior surfaces of the Grill. Empty the Grease Bucket occasionally and line with 
aluminum foil for easy clean-up. It is easier to clean off accumulated grease when 
the Grill is warm. 

BE CAREFUL NOT TO BURN YOURSELF.

 If too much grease is 

allowed to build up on the Grease D

Summary of Contents for BBQ055

Page 1: ...IAL PELLET GRILL This Grill Protected Under Patent Number 4 823 684 FOR OUTDOOR USE ONLY WARNING DO NOT STORE OR USE COMBUSTABLE MATERIALS NEAR THIS APPLIANCE USE ONLY TRAEGER BRAND HARDWOOD BBQ PELLETS IN THE OPERATION OF THIS UNIT ...

Page 2: ......

Page 3: ......

Page 4: ...hillips screwdriver INTRODUCTION Congratulations on your purchase of this Traeger Wood Pellet Grill Model BBQ055 With proper set up operation and main fo NOTE NUMBERS FOLLOWING PART NAM R When y p 1 Bag of Nuts Washers and Bolts These are for mounting the Pellet Hopper Burner 37 L 137 to the Gri 1 Main Body 3 4 Legs 115 119 123 127 a 1 Pellet Hopper Burner 37 1 Porcelain Grill 170 Remove for assem...

Page 5: ...s Tighten all four Bolts DO NOT OVER TIGHTEN THE BOLTS PHILLIPS SCREWS WITH FLAT WASHERS AND HEX NUT NOTE Install all Leg Screws and Nuts 3 in ea G M NOTE DO N Slide the Hopper Burner 37 square tube into the square opening located on the left side of the Grill Body 3 Gently push the Hopper Burner 37 into the Grill 2 Install a Flat Washer on each of the four Hex Head Bolts From the inside of the G ...

Page 6: ...for ease of clean up Line the Grease Drain Pan 163 with heavy duty aluminum foil Be sure the edg th H The Grease Bucket 135 hangs on the Bucket Hook locate D SECTION TWO INITIAL FIRING INSTRUCTIONS o be used on initial firing or anytime the Grill runs out of Pellets er to ensure proper operation of the Grill you must Open the Door and re from inside the Grill Make sure the Switch Dial is in the OF...

Page 7: ... Be sure the edges and ends of the foil are tight against the bottom of the Grease Drain Pan Position the He Grease Drain Pan and Porcelain Grill in their proper locations With the Door open turn the Switch Dial ON and set the Temperature Dial to SMOKE In approximately 2 minutes you will notice whitish gray smoke coming ou of the Grill as the Pellets ignite After assuring the Pellets have ignit Do...

Page 8: ... Cord into an appropriate grounded 2 ifically made to work 3 Remove the Porcelain Grill Grease Drain Pan and Heat Baffle to expose the Firepot Pellets 6 HOT OHOL GEL BOTTLE COULD EXPLODE AND CAUSE 8 After assuring the Pellets have ignited install the Heat Baffle Grease Drain Pan and 9 let the Grill pre heat for approximately 10 minutes before placing food in the Grill Making sure the Switch Dial i...

Page 9: ...ts and lose your fire while cooking let the Grill completely cool and start again with the INITIAL FIRING INSTRUCTIONS Make sure the Heat Baffle is properly seated on its locating brackets The long lips of the He direct heat and flame could come up out of the Firepot and cause a grease fire in the Grill If it is hot outside it will take less time for food to cook If it is cold wet or windy it will...

Page 10: ...to a GFI Ground Fault Interrupter check and reset if necessary b Initiate startup Still no ignition Proceed to step 2 2 Disconnect Power Cord from electrical outlet a Remove the Control and check the fuse on back Replace the fuse if blown Reinstall the Control b Unplug Hot Rod connector Purple White wire pair plug Power Cord into an appropriate grounded electrical outlet and turn the Switch Dial O...

Page 11: ...urns a bit and then stops continue watching and turn the Switch Dial to OFF If the fan blade UNWINDS slightly this indicates a jam in the Auger system which will need to be cleared d Disconnect Power Cord from electrical outlet and remove Pellets from the Pellet Hopper Check for foreign objects and wet decomposed Pellets both of which can cause a jam in the Auger system The Auger will need to be r...

Page 12: ...HY DOES MY GRILL FIRE GO OUT ON SMOKE SETTING Excess ash in the Firepot may be the problem 1 Open the Door and remove the Porcelain Grill Grease Drain Pan and Heat Baffle from inside the Grill 2 IMPORTANT Remove all unburned Pellets and ash from inside and around the Firepot A shop vac is ideal tor this task CAUTION ASSURE THAT THE GRILL IS COLD TO AVOID A FIRE FROM HOT ASH 3 Replace the Heat Baff...

Page 13: ... to any cooking setting desired HOW DO I PROTECT MY PAINT FINISH 1 Use a protective Cover on the Grill and touch up paint to repair any scratches A TRAEGER GRILL COVER to protect the Grill is highly recommended Covers and touch up paint are available from your local Traeger Dealer or log on to our Web Site www traegergrills com 2 Every 90 days use a high quality car wax on the outside surfaces of ...

Page 14: ... and Serial Number of the Grill located on a label inside the Hopper Lid along with the part identification TRAEGER PELLET GRILLS LLC 9445 SW Ridder Road 310 Wilsonville OR 97070 TRAEGER TECHNICAL SUPPORT Available 24 7 TRAEGER PARTS DEPARTMENT Available Weekdays 8AM to 4 30PM Pacific Time TRAEGER SALES ORDER DESK Available Weekdays 8AM to 5PM Pacific Time TOLL FREE TELEPHONE 1 800 872 3437 E mail...

Reviews: