background image

4

IMPORTANT SAFETY PRECAUTIONS

 CONTINUED

• 

w


DANGER


Do Not

 open the grill door to air out 

the grill. Stay away from the grill until smoke clears 
and the grill completely cools.

• 

This may be the result of a pellet overflow condition, 
which is caused by partial ignition of pellets. If 
allowed to continue long enough, gases will build 
up, which can ignite. If these gases ignite they 
will combust all at once, making a loud noise that 
may startle and/or injure persons in the immediate 
vicinity of the grill, and the grill door may open and 
close. This occurrence is sometimes referred to as 
a “grill burp” and should be avoided. If you have 
not properly maintained your grill, as described in 
“Maintaining Your Grill” on pages 22-23, a hazardous 
grease fire may also result.

• 

If a burp occurs, let the grill cool down completely, 
remove all internal components (including grill grates, 
drip tray, heat baffle, and firepot), and thoroughly 
clean all ash and pellets from the grill and firepot 
(see page 23, “Cleaning the Ash from Inside and 
Around the Firepot”) and ensure that grease and 
other buildup has been removed (see pages 22-23, 
“Maintaining Your Grill”). Remove all pellets from  
the pellet hopper. Run the prime auger sequence  
to push all pellets out of the auger and dispose  
of those pellets. Clean all pellets out of the firepot.  
Fill hopper with new pellets and prime the auger  
(see “Seasoning Your Grill” on page 13 for 
instructions on priming your auger).

• 

w


DANGER


Do Not

 stick your hand in or near  

the auger located at the bottom of your pellet 
hopper. Severe injury will occur if the auger is turning 
and your hand is caught in the auger. Do not remove 
the honeycomb guard in your pellet hopper. No 
maintenance should be performed on or around 
the auger while the grill is turned on or plugged into 
power. 

w


WARNING


 Electrical Shock Hazard 

Hazardous voltage is present, which can shock, burn, 
or cause death.

• 

Ground Fault Circuit Interrupter (GFCI) protection 
must be provided on the circuit(s) or outlet(s) to be 
used for the operation of this Traeger

®

 Grill.

• 

Disconnect the power cord before servicing the grill 
unless otherwise noted in this Owner’s Manual.

• 

If using an extension cord, only use an extension 
cord suitable for outdoor use to prevent electric 
shock in accordance with the instructions and 
warnings accompanying that product. This type of 
cord is designated with “W-A” or “W” on the cord’s 

jacket, such as an extension cord of cord type:  
SW-A, SOW-A, STW-A, STOW-A, SJW-A, SJOW-A, 
SJTW-A, or SJTOW-A.

• 

If using an extension cord, be sure to use a  
No. 14 AWG grounded extension cord.

• 

Do not modify the plug on your Traeger

®

 Grill, the 

extension cord receptacle, or the extension cord plug 
in any way, including by removing the ground (earth) 
prong.

• 

Make sure your extension cord is in good condition. 
Inspect extension cords prior to each use for loose or 
exposed wires and cut or worn insulation. Replace if 
damaged. Never use a damaged extension cord.

• 

Ensure that the power cord and extension cord are 
securely plugged together. Do not plug extension 
cords into one another.

• 

Keep extension cord clear of snow and standing 
water.

• 

Ensure that the power cord and extension cord 
do not create a tripping hazard. Do not route an 
extension cord through a window or doorway.

• 

When not in use, the extension cord should be 
removed and stored in a location protected from  
the sun and out of the reach of children.

w


CAUTION


• 

Never modify this grill or install any parts or 
components not authorized by Traeger for use with 
this grill. Any modification of this grill or installation 
of unauthorized parts or components will void the 
warranty and may create a safety hazard including, 
without limitation, a fire.

• 

Children should be supervised to ensure they  
do not play with the grill.

• 

Do not put a grill cover or anything flammable in the 
storage space area under the grill.

w


CAUTION


 Use Correct Pellets 

• 

This grill is designed and approved only for all-natural 
wood cooking pellets designed for wood pellet grills. 
Use of any other type of fuel in this grill will void the 
warranty, may lead to the auger becoming jammed, 
and may create a safety hazard.

• 

For best results and flavor, use genuine 
TRAEGER

®

 BRAND HARDWOOD PELLETS.

• 

Always store wood pellets in a dry location, away 
from heat-producing appliances and other fuel 
containers.

w


WARNING


Do not use fuel pellets. 

Never use 

heating fuel pellets in the grill because they may contain 
hazardous contaminants and additives and may 
damage the grill.

Summary of Contents for FREMONT

Page 1: ...T08730 FREMONT WELCOME TO THE WOOD FIRED REVOLUTION WE WANT YOU TO GET THE MOST OUT OF YOUR TRAEGER Scan here to access this manual in different languages as well as to learn how to set up season and get the most out of your grill ...

Page 2: ...er Grill outside in a well ventilated area This grill is intended for OUTDOOR USE ONLY Never use your Traeger Grill in any enclosed area or any area without adequate ventilation Know the symptoms of carbon monoxide poisoning headache dizziness weakness nausea vomiting sleepiness and confusion Carbon monoxide reduces the blood s ability to carry oxygen Low blood oxygen levels can result in loss of ...

Page 3: ...emove everything from the inside of your grill including all internal components grill grates drip tray heat baffle and firepot pots and pans and food Clean the entire grill including any grease accumulation from the Traeger Grease Management System TGMS and all ash and pellets from the grill and firepot see Maintaining Your Grill on pages 22 23 Replace the firepot heat baffle grease drip tray and...

Page 4: ... s Manual If using an extension cord only use an extension cord suitable for outdoor use to prevent electric shock in accordance with the instructions and warnings accompanying that product This type of cord is designated with W A or W on the cord s jacket such as an extension cord of cord type SW A SOW A STW A STOW A SJW A SJOW A SJTW A or SJTOW A If using an extension cord be sure to use a No 14...

Page 5: ...arthed electrical outlet and turn the main power switch to ON I Pellets should fall into the firepot and the hot rod should begin to heat it will start to turn red w CAUTION Do not touch the hot rod When flames start to come out of the firepot turn the main power switch to OFF O Let the grill cool down Now you re ready to place the heat baffle grease drip tray grill grates and food back into the g...

Page 6: ...6 6 ...

Page 7: ...GETTING TO KNOW YOUR GRILL 13 SEASONING YOUR GRILL 15 SUBSEQUENT START UP 16 USING YOUR GRILL 18 USING THE MEAT PROBE 19 HOPPER CLEAN OUT 20 FEATURES AND ACCESSORIES 22 MAINTAINING YOUR GRILL 24 TROUBLESHOOTING 24 OPERATING TIPS 25 SERVICE 26 WARRANTY TABLE OF CONTENTS ...

Page 8: ...T PAIRINGS Bold cuts of beef need bold wood flavors to match like hickory or mesquite Throw in some pellets and turn your Traeger into a wood fired pizza oven Cherry pie cooked over fruit hardwood pellets Yes please ...

Page 9: ...NSISTENT PERFORMANCE FLAVOR Pellets fuel the fire and add flavor to make meals unforgettable 3 The sawdust is compressed into pellets using heat and pressure 2 Traeger pellets are made from all natural hardwood sawdust 1 9 HOW OUR PELLETS ARE MADE ...

Page 10: ... HOPPER CLEAN OUT DOOR 17 HEAT BAFFLE 7 DIGITAL PRO CONTROLLER 18 GREASE DRIP TRAY 8 REAR WHEELED LEG 19 PORCELAIN COATED GRILL GRATE 9 FRONT WHEELED LEG 20 EXTRA GRILL RACK 10 LEG BRACES 21 CHIMNEY PIPE 11 REAR FIXED LEG 22 CHIMNEY CAP GETTING TO KNOW YOUR GRILL PARTS AND FEATURES Refer to the Assembly Guide to assemble and install your Traeger Fremont Grill 1 14 19 22 18 10 6 5 7 8 4 9 2 3 10 13...

Page 11: ...g even if you don t see it With 572 sq in 0 37 m2 of grilling space and up to 76 000 BTUs of wood fired heat your Traeger Grill has the real estate for party sized orders of T bones or racks of ribs with enough room left over to handle those side dishes too You don t have to worry about drippings flaring up and causing nasty fireballs that destroy your meal because Traeger Wood Fired Grills cook u...

Page 12: ...INDICATOR LIGHT PANEL The icons on this panel will light up when the corresponding feature is active The Timer icon will light when the timer is active The Meat Probe icon will light once the probe is plugged in and recognized by the grill The Keep Warm icon will light while this feature is active NOTE Temperature fluctuations are normal for Traeger Grills Any significant fluctuation could be the ...

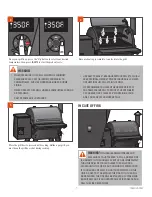
Page 13: ...tch on the back of the grill to ON I With the grill in standby mode press and hold the Up and IGNITE buttons simultaneously The display will flash Pri and the auger will begin priming NOTE Once you turn on your grill it will enter standby mode and the display s dashed border will pulse This indicates your grill is awaiting a command and is not actively operating The grill MUST be in standby mode t...

Page 14: ...s or heavy duty aluminum foil If using foil be sure the edges and ends of the foil are tight against the bottom of the grease drip tray Replace foil after each cook to reduce the possibility of a grease fire Please see Maintaining Your Grill on page 24 for more details 6 7 Press the Up button until the temperature display reads 450 F 250 C NOTE To change between Celsius C and Fahrenheit F press an...

Page 15: ...The control for this grill comes with an automatic shutdown cycle When finished cooking on your grill press and hold the center button for 3 seconds The display will flash OFF for several seconds then scroll COOL Dn followed by the actual temperature until the grill cools down enough to put out the fire in the firepot While the controller is flashing OFF you can cancel the shutdown cycle by pressi...

Page 16: ...parts present before using it Heat Baffle Drip Tray Grates 3 Make sure you have proper airflow Ensure nothing is obstructing the exhaust 4 Make sure the grill is a safe distance from combustibles see page 2 5 Make sure the grill is on a level surface 6 Inspect the pellets Make sure you have enough pellets in the hopper Make sure the pellets are not wet 7 Close the hopper lid 8 Close the grill door...

Page 17: ...GRILL WE RECOMMEND YOU CLEAN THE GREASE DRIP TRAY AND TGMS FREQUENTLY TO REDUCE THE POSSIBILITY OF A GREASE FIRE PLEASE SEE MAINTAINING YOUR GRILL ON PAGE 22 FOR MORE DETAILS 5 Close the grill door to proceed with cooking Unlike a gas grill you must keep the grill door shut during cooking IN CASE OF FIRE WARNING WITH REGULAR MAINTENANCE AND CLEANING OF YOUR TRAEGER GRILL A GREASE FIRE IS UNLIKELY ...

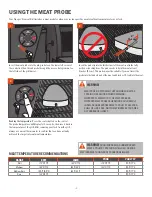
Page 18: ...The probe temperature will display for 5 seconds then revert back to the temperature of the grill After removing your food from the grill always use a meat thermometer to confirm that you have actually achieved the target internal meat temperature 3 WARNING MEAT PROBE IS EXTREMELY HOT DURING AND AFTER COOKING USE CAUTION WHEN REMOVING IMPROPER PLACEMENT OF THE MEAT PROBE OR IMPROPER MEAT PROBE CAL...

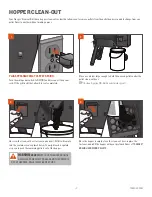
Page 19: ...e clean out door fastener and open it Pellets will empty into the container you ve placed below You might need a spatula or spoon to push the remaining pellets out of the hopper Once the hopper is empty close the clean out door replace the fastener and refill the hopper with your preferred flavor of TRAEGER BRAND HARDWOOD PELLETS Place a container large enough to hold the unused pellets under the ...

Page 20: ...s the center button to confirm The Timer icon will appear and time will begin counting down TO CANCEL THE TIMER 1 Press the center button until the time remaining is displayed 2 Press and hold the center button for 2 seconds to cancel the Timer TO ADJUST THE TIMER 1 Press the center button until the time remaining is displayed 2 Use the Up or Down buttons to adjust the time as needed 3 Press the c...

Page 21: ...g Press Keep Warm to activate the function and maintain the grill temperature at 165 F 74 C Press Keep Warm again to resume cooking FRONT SHELF To fold down the shelf pull up on the shelf until it releases then lower to the grill body WARNING PINCH HAZARD KEEP HANDS CLEAR WHEN RAISING OR LOWERING THE SHELF ...

Page 22: ...he grill on the interior bottom and sides If grease is allowed to build up a grease fire could result Scrape the grease accumulation from inside the grill using a stiff nonmetallic tool Much of the loosened grease can be removed using paper towels or disposable rags Excessive scraped off residue can be cleaned using a vacuum cleaner as described in Step 4 page 23 when cleaning the firepot of ashes...

Page 23: ... is clean remove the bag from the vacuum cleaner and place it in a metal container handled in the manner described under Disposal of Ashes below 5 DISPOSAL OF ASHES w WARNING Ashes should always be completely cool before handling Ashes should be placed in a metal container with a tight fitting lid The closed container of ashes should be placed on a noncombustible floor or on the ground well away f...

Page 24: ...ormat you ve chosen 3 Your Traeger Grill is designed to operate with the door closed Opening the grill door greatly lengthens your cooking time When putting frozen raw cold or otherwise uncooked food on the grill this may result in a temporary drop of your grill s internal temperature 4 Do not overload cooking surface with excessive amounts of food that reach beyond the edges of the footprint of t...

Page 25: ... or you can phone or write us at TRAEGER S CUSTOMER SERVICE Please visit traeger com support Phone US CA 1 800 TRAEGER 6 00 a m 10 00 p m MT Address TRAEGER PELLET GRILLS LLC 1215 E Wilmington Ave Suite 200 Salt Lake City UT 84106 SERVICE 1 Open the camera on your phone and point it at the QR code Navigate to www traeger OK 2 Wait for the camera to register and tap the notification or banner when ...

Page 26: ...eger com dealers together each an Authorized Seller The warranty period and coverage for the replacement parts shall be as follows WarrantyPeriodsandCoverage Components WarrantyPeriod Coverage Body Legs Hopper Cover 7 Years Will not rust through Grates 3 Years Will not rust through Controller 3 Years Material and Manufacturing Defects All Terrain Wheels 3 Years Material and Manufacturing Defects F...

Page 27: ... MAY HAVE OTHER RIGHTS WHICH VARY FROM STATE PROVINCE TO STATE PROVINCE BOTH YOU AND TRAEGER INTEND FOR THIS WARRANTY TO BE YOUR EXCLUSIVE REMEDY FOR A DEFECTIVE GRILL This warranty shall be void if i the grill is not assembled or operated in accordance with Traeger s operating instructions provided with this grill ii the grill is not purchased from an Authorized Seller iii the grill is resold or ...

Page 28: ...28 Traeger Pellet Grills LLC 1215 E Wilmington Ave Suite 200 Salt Lake City UT 84106 traeger com Made in China ...

Reviews: