Maintenance
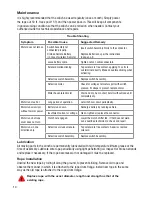
It is highly recommended that the winch be used regularly (once a month). Simply power
the rope out 50 ft., free spool 15 ft. and then power back in. This will keep all components
in good working condition so that the winch can be relied on when needed. Contact your
authorized outlet for technical assistance and repairs.
Trouble Shooting
Symptom
Possible Cause
Suggested Remedy
Motor does not turn on
Switch Assembly not
connected properly.
Drained Remote Battery
(in case of wireless Remote).
Insert switch Assembly fi rmly to the connector.
Replace Batteries as per the instructions
in page no. 9.
Loose battery cable.
Tighten nuts on cable connectors.
Solenoid malfunctioning.
Tap solenoid to free contact, applying 12 volts to
coil terminal directly. Make an audible clicking when
activating.
Defective switch Assembly.
Replace switch Assembly.
Defective motor.
Check for voltage at armature port with switch
pressed. If voltage is present, replace motor.
Water has entered motor.
Drain and dry, Run in short bursts without load until
completely dry.
Motor runs too hot.
Long period of operation.
Let winch cool down periodically.
Motor runs slowly or
without normal power.
Battery runs down.
Recharge battery by running vehicle.
Insuffi cient current or voltage.
Clean, tighten or replace the connector.
Motor runs but rope
drum does not turn.
Clutch not engaged.
Lower the clutch shifter tab, if that does not work,
ask a qualified technician to check and repair.
Motor runs in one
direction only.
Defective or stuck solenoid.
Tap solenoid to free contacts. Repair or replace
solenoid.
Defective switch Assembly.
Replace switch Assembly.
Replace rope with the exact diameter, length and strength as that of the
existing rope.
Lubrication
All moving parts in the winch are permanently lubricated with high temperature lithium grease at the
time of assembly. Lubricate wire rope periodically using light penetrating oil. Inspect for broken strands
and replace if necessary. If the rope becomes worn or damaged it must be replaced.
Rope Installation
Unwind the new rope by rolling it along the ground, to prevent kinking. Remove old rope and
observe the manner in which it is attached to the rope drum fl ange. Install new rope in the same
way as the old rope is attached to the rope drum flange.
10
Summary of Contents for Reflex WR08B
Page 1: ...English Owner s Manual Francais Espa ol...
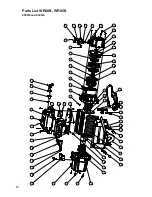
Page 12: ...8000lb and 9500lb Parts List WR08B WR95B 12...
Page 13: ...12000lb Parts List WR12B English 13 English...
Page 14: ...14 Parts List WRS95B and WRS12B 9500lb 12000lb...
Page 20: ......
Page 21: ...Treuil Manuel d utilisateur Francais...
Page 32: ...8000 livres et 9500 livres Liste des pi ces de WR08B WR95B 32...
Page 33: ...12000 livres Liste des pi ces de WR12B 33 Francais...
Page 34: ...Liste des pi ces de WRS95B et WRS12B 9500 livres et 12000 livres 34...
Page 40: ......
Page 41: ...Winch de remolque Manual de usuario Espa ol...
Page 52: ...8000lb 9500lb Lista de Partes WR08B WR95B 52...
Page 53: ...12000lb Lista de Partes WR12B 53 Espa ol...
Page 54: ...Lista de Partes WRS95B WRS12B 9500lb 12000lb 54...


