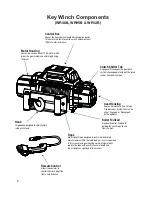
Remote control operation.
Remote battery changing instructions:
Note
1. Your battery must be kept in good condition.
2. Be sure battery cables are not drawn tight across any surfaces, which could possibly damage them.
3. Corrosion on electrical connections will reduce performance or may cause a short.
4. Clean all connections especially in remote control switch and receptacle.
5. In salty environments use a silicone sealer to protect from corrosion.
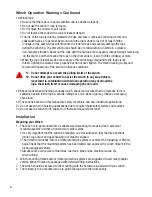
6. Index the heads of the plate studs into the keyhole slots on the back of the winch.
Electrical connection
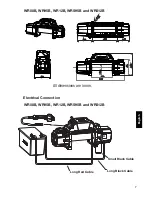
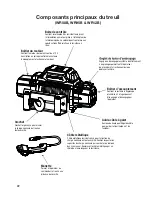
WR08B, WR95B, WR12B, WRS95B and WRS12B
If electrical cables are closer to hot surface, use the heat protection sleeve as
required to prevent damage.
For normal self-recovery work, your existing electrical system is adequate. A fully charged battery
and proper connections are essential. Run the vehicle engine during winching operation to keep
battery charged.
Pay close attention to proper electrical cable connection as follows:
1. Long Black Cable (Supplied Separately with Winch) one end connecting to the Winch
Terminal ‘A’ and other to the Negative (-) terminal of the Battery.
2. Long Red Cable from Winch connecting to the Positive (+) Terminal of the Battery.
.
1. Plug the control cable (with the remote hand controller attached) into the socket on the control
box and turn slightly counter-clockwise to lock into position.
2. It is recommended that for the initial set-up of the winch (prior to applying any load)
that the winch be operated in the Wired mode.
3. Once the winch has been set-up then the remote hand control can be operated either in
the Wired or Wireless mode.
4. To use the remote hand controller in the Wireless mode, remove the wireless device from
the wired remote.
5. The hand control is not waterproof and care must be taken in its usage.
1. Remove the screws & dismantle remote cover.
2. Remove the CR2 3V 900 mAh battery (Blue Color) & replace with a new one. This battery is not
related to the remote operation & needs to be changed only when the LED light is not working.
3. For changing remote operation battery, remove the “In & Out Switch” from PCBA by pulling it
upwards.
4. Slightly bend the small PCBA located above A23 12V battery (Golden Color) for easy access and
replace with a new one.
5. Bend the same PCBA back to its original position & fix “In & Out Switch”.
6. Fix the remote cover back in to its position & assemble with the screws.
7. Please use only the designated size batteries mentioned above.
8
Summary of Contents for Reflex WR08B
Page 1: ...English Owner s Manual Francais Espa ol...
Page 12: ...8000lb and 9500lb Parts List WR08B WR95B 12...
Page 13: ...12000lb Parts List WR12B English 13 English...
Page 14: ...14 Parts List WRS95B and WRS12B 9500lb 12000lb...
Page 20: ......
Page 21: ...Treuil Manuel d utilisateur Francais...
Page 32: ...8000 livres et 9500 livres Liste des pi ces de WR08B WR95B 32...
Page 33: ...12000 livres Liste des pi ces de WR12B 33 Francais...
Page 34: ...Liste des pi ces de WRS95B et WRS12B 9500 livres et 12000 livres 34...
Page 40: ......
Page 41: ...Winch de remolque Manual de usuario Espa ol...
Page 52: ...8000lb 9500lb Lista de Partes WR08B WR95B 52...
Page 53: ...12000lb Lista de Partes WR12B 53 Espa ol...
Page 54: ...Lista de Partes WRS95B WRS12B 9500lb 12000lb 54...


