40
TRAK Machine Tools
Southwestern Industries, Inc.
ProtoTRAK SMX, K2, K3 & K4 & Retrofit Safety, Installation, Maintenance, Service and Parts List Manual
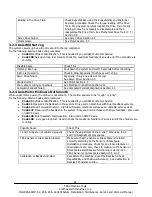
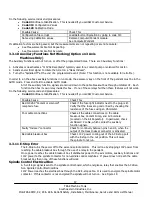
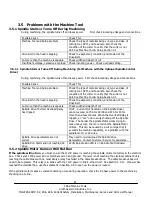
Possible Cause
Check This
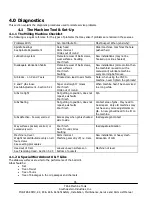
Machine Tool & Setup problem
Check for any looseness in the setup (Tool, Tool holder, Part,
Vise, or Fixture). See Machine Tool & Setup Section 4.1
X and Y Gibs are loose
Check the adjustment of the X and Y Gibs using the X and Y
Gib adjustment procedures. See Section 5.2.1
X and Y-axis Drive Trains are loose
Check Repeatability using the Repeatability and Positional
Accuracy procedure. Step by step, carefully inspect the Drive
Train for any looseness. It may be necessary to disassemble
and then reassemble the Drive Train. See Mechanical Drive
Train (X, Y) Section 4.2
3.1.4 Parts Have Incorrect Dimensions
Parts are being machined with dimensions that are different than those programmed. Typical accuracy expectations
should be:
Circles:
0.002” TIR over 3.00” DIA
Positional Accuracy: +/- 0.0005"
Repeatability: 0.0005"
Note:
The typical slideway-milling machine is not capable of achieving more precise results. Although careful
adjustments to a new milling machine have produced better results, you should not expect the same level of
accuracy from an older or worn machine.
Furthermore, the system should be expected to repeat within the resolution of the displayed DRO numbers of 0.0005”.
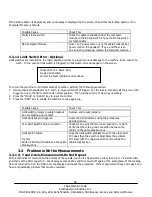
Do the following Service Code:
Code 33
Software Identification. This is needed if you call SWI Customer Service.
Code 123
Calibration.
Code 11
Measure's the backlash in the system. Only used on machines with Dual Feedback systems.
Code 12
Feed Forward Constant.
Code 127
Measure's the backlash in the system. Only used on machines with single feedback.
Code 128
Enter backlash compensation.
3.1.4.1 Every Part Has the Same Error
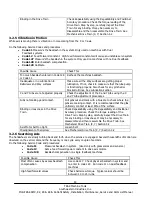
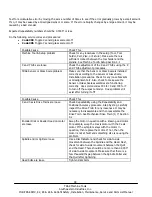
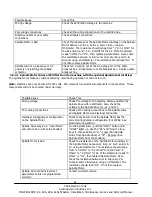
Possible Cause
Check This
Machine Tool & Setup problem
See Machine Tool & Setup Section 4.1
Programming Error
In the program, look for common errors in programming
such as transposing numbers, tool diameters, and
pressing INC SET when ABS SET is meant. This is
especially suspected if the dimensional errors are larger
than a few thousandths. See the Controls Programming,
Operations and Care manual.
Configuration file that contains
calibration file and backlash constants
has been erased or corrupted.
Verify configuration file (Code 313) does not read default
values. Load saved configuration file from floppy disk in
electrics cabinet with Code 141.
Calibration or Backlash problem
Recalibrate the machine. Reset the Backlash. Check
Repeatability and Positional Accuracy. See Calibration &
Backlash Constants
3.1.4.2 The Dimensional Errors Are Random or Accumulate in Size
Over the Part Program Run
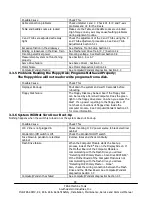
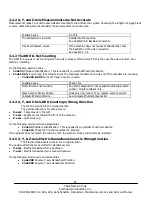
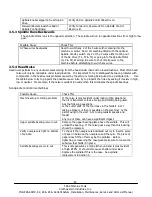
Possible Cause
Check This
Machine Tool & Setup problem
See Machine Tool & Setup Section 4.1


