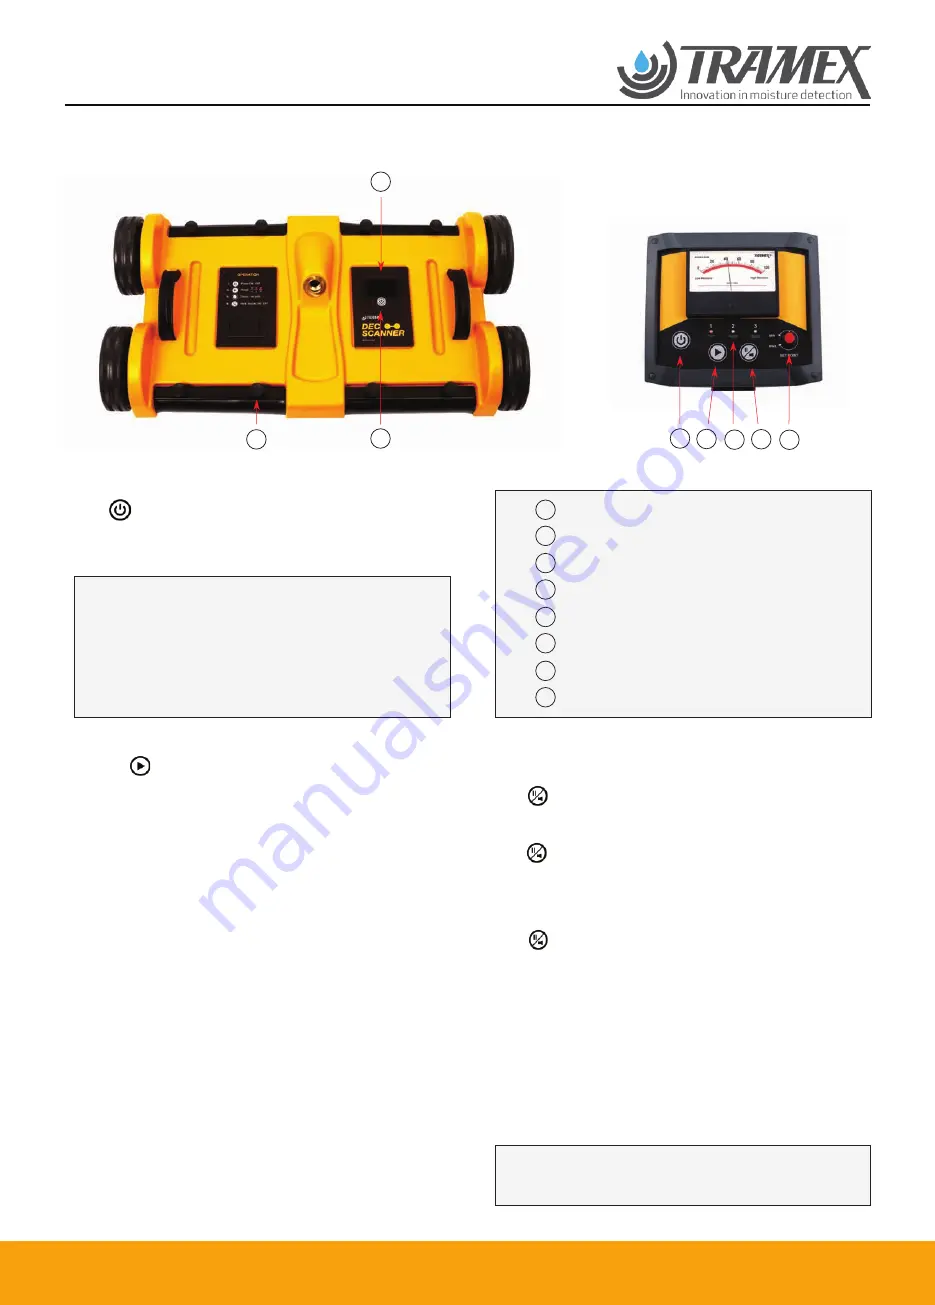
DEC SCANNER - Quick Start Guide
OPERATING INSTRUCTIONS
1
1
3
3
4 5 6 7 8
8
4
5
6
7
2
2
1. POWER ON:
Press to power on both the Base Unit and the Control Panel Meter.
2. LED Indicators:
3. RANGE selection:
• Base Unit LED and one of the Range LEDs will both flash
when in infrared communication.
OR
• Base Unit LED is solid when Control Panel Meter is OFF.
• Control Panel Meter LED is solid when Base Unit is OFF.
• Control Panel Meter LED will show the last used range.
Press to select the desired range.The selected range LED light will
flash. There are 3 Ranges, and they should be selected as best suits the
surface under test, for example:
Range 1- Most suitable for single-ply and thin roof coverings such as PVC,
Hypalon and other smooth surfaces where insulation is wet and
moisture is close to the surface.
Range 2 - Most suitable for multi-ply built-up and modified systems, mineral
surfaced felts, and other smooth or gravel surfaces where insulation is
less wet and moisture is below the surface.
Range 3 - Most suitable for thicker roof coverings such as mastic asphalt, thick
gravel and stone surfaced roofing.
4. CALIBRATION:
A known acceptably dry area serves as a reference dry reading
standard for the set up of the instrument.
A known acceptably dry area
of the roofing system, choose the most
appropriate range. Use the ‘Set Point’ knob to set the reference point to
just above zero to engage sensitivity.
A known acceptably dry area:
If a known acceptably dry area can not be
identified, position the DEC Scanner over what you consider to be a dry
area. Adjust the ‘Set Point’ knob until the needle points to mid-scale
(50). Move the instrument around the roof, following the direction of
the lower readings until the area with the lowest reading is found. Now
set the reference point to just above zero to engage sensitivity.
•
•
•
•
•
Press while reading to HOLD a comparative reading. The needle
freezes on the analog dial. The Base Unit LED remains solid while the
Control Panel range LED flashes.
Press again to release the HOLD function. The needle is unfrozen on
the analog dial. The Base Unit LED and the Control Panel Range LED both
flash.
Press two times in quick succession to turn on/off the audio signal.
When on, this will beep to indicate readings of over 5 on the comparative
dial. The audio signal will beep increasingly fast as moisture readings
increase.
If communication between the Base Unit and the Control
Panel Meter is interrupted, the reading is memorized until
communication is restored.
6. AUDIO signal:
5. HOLD function:
BASE UNIT
CONTROL PANEL
You may now begin your roof survey. Please read the User Guide for
further information on conducting roof surveys and tracing leaks.
www.tramexmeters.com
Infrared window
Screw fastner for electrode mat
ON / OFF - Base Unit
ON / OFF - Control Panel
Range Button
LED Range indicators
HOLD function / AUDIO signal button
SET POINT calibration knob


