background image

English

20

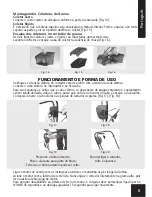
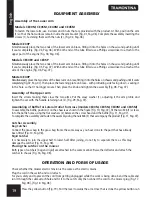
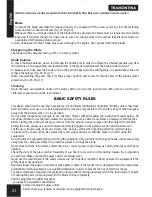
be released. To turn the mower off, let go of the lever [Fig. 20, Pag. 09].

Switch the engine on according to previous instructions and keep your feet away from the blade. Start the 

engine with the cutting blade free. Never start the mower directly on tall grass.

After switching the engine off, the blade will stop turning in less than 3 seconds. This procedure may cause some noise 

or a slight vibration, which is considered normal.

Keep hands and feet away from cutting blade.

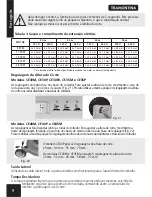
Power Cord Gauge

MOTOR

20 m

30 m

40 m

50 m

127 V

220 V

127 V

220 V

127 V

220 V

127 V

220 V

850 W

2 x 1,5 mm² 2 x 1,5 mm² 2 x 2,5 mm² 2 x 1,5 mm² 2 x 2,5 mm² 2 x 1,5 mm² 2 x 4,0 mm² 2 x 1,5 mm²

1.100 W

2 x 2,5 mm² 2 x 1,5 mm² 2 x 2,5 mm² 2 x 1,5 mm² 2 x 4,0 mm² 2 x 1,5 mm² 2 x 6,0 mm² 2 x 1,5 mm²

1.300 W

2 x 2,5 mm² 2 x 1,5 mm² 2 x 2,5 mm² 2 x 1,5 mm² 2 x 4,0 mm² 2 x 1,5 mm² 2 x 6,0 mm² 2 x 1,5 mm²

1.800 W

2 x 2,5 mm² 2 x 2,5 mm² 2 x 4,0 mm² 2 x 2,5 mm² 2 x 6,0 mm² 2 x 2,5 mm² 2 x 6,0 mm² 2 x 2,5 mm²

2.500 W

2 x 4,0 mm² 2 x 2,5 mm² 2 x 6,0 mm² 2 x 2,5 mm² 2 x 8,0 mm² 2 x 2,5 mm² 2 x 8,0 mm² 2 x 2,5 mm²

The use of unauthorized cords may damage the engine and is not covered by the warranty.

Setting the Cutting Height
Models CE30M, CE30P, CE30P2, CE35M and CE35P

The settings are on the chassis of the lawn mower. To set the cutting height move the wheel height to one of the 

3 adjustment positions. Try to set the same setting position for the height of both the front and rear wheels of the 

lawn mower [Fig. 21, Pag. 09]. 

Models CE40M, CE40P and CE45M 

The adjusting devices are located next to the lawn mower wheels. To adjust the cutting height it is enough to 

move the adjusting rod pushing it out of the chassis in order to release it from the adjusting plate [Fig. 22, Pag. 

10]. Try to set the same setting position for the height of both the front and rear wheels of the lawn mower.
Model CE40P has 4 cutting height positions: 25 mm - 40 mm - 55 mm - 70 mm.
Models CE40M and CE45M have 5 cutting height positions: 20 mm - 32 mm - 45 mm - 58 mm - 72 mm.
Some warnings are important when choosing the cutting height:

In order to make a low cut, the land must be flat, without undulations or holes otherwise the blade can touch the 

ground impairing the engine output and damaging the lawn. 

In very tall grass, first make a previous cut with the cutter adjusted to high level and then another cut with the 

final desired cut. This will make the task easier and will not overload the motor.

Excess loading will cause an brisk fall in revolutions and engine overheating, which will reduce its useful 

life or cause burnout and loss of warranty.

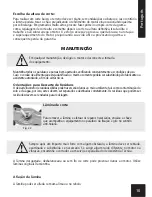
MAINTENANCE

Before performing any kind of maintenance work, turn the engine off and unplug the equipment.

Ensure that all the screws and nuts are always well tightened by constantly checking if the equipment is ready for use. 

If the power cord is damaged, it should be replaced by the manufacturer, an authorized dealer or a qualified person 

to reduce risk of injury. 

Instructions for waste disposal

Improper disposal of solid waste can cause serious damage to the environment, including soil and water contamination. 

Summary of Contents for CE30M

Page 1: ...RTADORES DE GRAMA COM MOTOR EL TRICO ELECTRIC LAWN MOWERS CORTADORAS DE C SPED CON MOTOR EL CTRICO Manual de uso e manuten o User and maintenance manual Manual de uso y mantenimiento www tramontina co...

Page 2: ...nterruptor 03 Man pulo 04 Bra o Inferior 05 Chassi 06 Fixa Cabo 07 Roda 08 Capota do Motor 09 Defletor para Sa da Lateral CONHE A O PRODUTO 01 Bra o Superior 02 Interruptor 03 Man pulo 04 Bra o Inferi...

Page 3: ...Roda 08 Capota do Motor 09 Defletor para Sa da Lateral CONHE A O PRODUTO 01 Bra o Superior 02 Interruptor 03 Man pulo 04 Bra o Inferior 05 Chassi 06 Defletor 07 Coletor de Grama 08 Fixa Cabo 09 Roda...

Page 4: ...Capota do Motor 10 Haste de Regulagem 06 03 02 04 07 08 10 05 01 09 CE35P CONHE A O PRODUTO 01 Bra o Superior 02 Interruptor 03 Man pulo 04 Bra o Inferior 05 Chassi 06 Defletor 07 Coletor de Grama 08...

Page 5: ...e de Regulagem CE40P 10 11 09 03 02 08 05 06 01 04 07 CE45M CONHE A O PRODUTO 01 Bra o Superior 02 Interruptor 03 Man pulo 04 Bra o Inferior 05 Chassi 06 Defletor para Sa da Lateral 07 Fixa Cabo 08 Ro...

Page 6: ...1 1 kW h CE30P Monovolt 127 V ou 220 V 0 7 hp 850 W 3 400 356 30 cm Dom stico 0 85 kW h CE30P Monovolt 127 V ou 220 V 1 0 hp 1100 W 3 400 356 30 cm Dom stico 1 1 kW h CE30P2 Monovolt 127 V ou 220 V 0...

Page 7: ...ndo os com as porcas 2 Fig 02 CE30P Encaixe as pontas do tubo do bra o na abertura do chassi e empurre at o fundo Fig 03 Com as duas extremidades do tubo j encaixadas e com a ajuda de uma chave fenda...

Page 8: ...para firmar o conjunto Fig 08 Montagem do Bra o Superior Encaixe os parafusos fazendo com que eles atravessem os dois bra os Coloque a arruela ondulada 1 ajustando a ao perfil do bra o e aperte o conj...

Page 9: ...guran a e evitar que o cabo el trico se desconecte do plugue enquanto o equipamento estiver sendo utilizado dobre o cabo e passe pelo orif cio do fixador do cabo e encaixe o na presilha s depois conec...

Page 10: ...e CE35P As regulagens encontram se no chassi do cortador Para ajustar a altura de corte movimente o eixo da roda para uma das 3 posi es de ajuste Fig 21 Procure utilizar a mesma posi o de regulagem da...

Page 11: ...danificado o mesmo somente poder ser substitu do pelo fabricante ou assistente autorizado a fim de evitar riscos Orienta es para Descarte de Res duos O descarte incorreto de res duos s lidos pode traz...

Page 12: ...recebido instru es referentes utiliza o do aparelho ou estejam sob supervis o de uma pessoa respons vel pela sua seguran a Mantenha crian as ou animais dist ncia do cortador quando ele estiver em oper...

Page 13: ...lo e marca Tramontina Para uma maior seguran a recomenda se que o equipamento seja alimentado a partir de uma rede el trica em conformidade com a NBR 5410 que pede a exist ncia do dispositivo de corre...

Page 14: ...indevido que n o cumpram com as indica es deste manual Avarias do motor decorrentes de uso indeviso como sobrecarga e tens o fora do especificado Revis es manuten es e limpezas peri dicas necess rias...

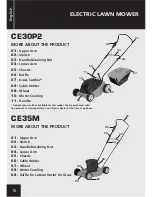
Page 15: ...t 04 Lower Arm 05 Chassis 06 Cable Holder 07 Wheel 08 Motor Cowling 09 Baffle for Lateral Outlet for Grass MORE ABOUT THE PRODUCT 01 Upper Arm 02 Switch 03 Handle Retaining Nut 04 Lower Arm 05 Chassis...

Page 16: ...for Grass 15 CE30P2 MORE ABOUT THE PRODUCT 01 Upper Arm 02 Switch 03 Handle Retaining Nut 04 Lower Arm 05 Chassis 06 Baffle 07 Grass Catcher 08 Cable Holder 09 Wheel 10 Motor Cowling 11 Handle 06 09...

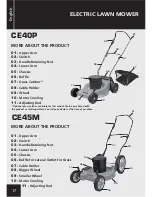
Page 17: ...R CE40M MORE ABOUT THE PRODUCT 01 Upper Arm 02 Switch 03 Handle Retaining Nut 04 Lower Arm 05 Chassis 06 Baffle for Lateral Outlet for Grass 07 Cable Holder 08 Wheel 09 Motor Cowling 10 Adjusting Rod...

Page 18: ...Rod 01 02 03 04 07 11 10 05 06 09 08 17 ELECTRIC LAWN MOWER MORE ABOUT THE PRODUCT 01 Upper Arm 02 Switch 03 Handle Retaining Nut 04 Lower Arm 05 Chassis 06 Baffle 07 Grass Catcher 08 Cable Holder 09...

Page 19: ...85 kW h CE30P2 Monovolt 127 V or 220 V 1 0 hp 1100 W 3 400 356 30 cm Domestic 1 1 kW h CE35M Monovolt 127 V or 220 V 1 2 hp 1300 W 3 400 356 35 cm Domestic 1 3 kW h CE35M Monovolt 127 V or 220 V 1 7...

Page 20: ...em cross the two arms Put the wavy washer 1 adjusting it the arm profile and tighten the set with the handle retaining nut 2 Fig 09 Pag 07 Assembling of Baffle for Lateral Outlet for Grass models CE30...

Page 21: ...eels of the lawn mower Fig 21 Pag 09 Models CE40M CE40P and CE45M The adjusting devices are located next to the lawn mower wheels To adjust the cutting height it is enough to move the adjusting rod pu...

Page 22: ...it is in operation Do not allow inexperienced people to use the lawn mower without reading the instruction manual before Do not allow children to use the lawn mower The operator or user is liable for...

Page 23: ...e The period of this warranty dates from the date of emission of the equipment sales receipt which should be attached to this agreement with the warranty only being valid on presentation of the sales...

Page 24: ...ivela 04 Brazo Inferior 05 Chasis 06 Fija Cable 07 Rueda 08 Capota del Motor 09 Deflector de Salida Lateral de C sped CONOZCA EL PRODUCTO 01 Brazo Superior 02 Interruptor 03 Manivela 04 Brazo Inferior...

Page 25: ...SPED CON MOTOR EL CTRICO CONOZCA EL PRODUCTO 01 Brazo Superior 02 Interruptor 03 Manivela 04 Brazo Inferior 05 Chasis 06 Deflector 07 Recoletor de C sped 08 Fija Cable 09 Rueda 10 Capota del Motor 11...

Page 26: ...4 07 08 10 05 01 09 25 CORTADORAS DE C SPED CON MOTOR EL CTRICO CE35P CONOZCA EL PRODUCTO 01 Brazo Superior 02 Interruptor 03 Manivela 04 Brazo Inferior 05 Chasis 06 Deflector 07 Recoletor de C sped 0...

Page 27: ...o Superior 02 Interruptor 03 Manivela 04 Brazo Inferior 05 Chasis 06 Deflector de Salida Lateral de C sped 07 Fija Cable 08 Rueda Mayor 09 Rueda Menor 10 Capota del Motor 11 Haste de Regulado 01 02 03...

Page 28: ...1 0 hp 1100 W 3 400 356 30 cm Dom stico 1 1 kW h CE35M Monovolt 127 V or 220 V 1 2 hp 1300 W 3 400 356 35 cm Dom stico 1 3 kW h CE35M Monovolt 127 V or 220 V 1 7 hp 1800 W 3 400 356 35 cm Dom stico 1...

Page 29: ...esen los dos brazos Coloque la arandela de presi n 1 ajust ndolo al perfil del brazo y apriete el conjunto con la manivela 2 Fig 09 Pag 07 Montaje del Deflector de Salida Lateral de C sped modelos CE3...

Page 30: ...rate de utilizar la misma posici n de regulaci n de la altura de corte en las ruedas delanteras y traseras del cortador Fig 21 Pag 09 Modelos CE40M CE40P y CE45M Las regulaciones est n dispuestas junt...

Page 31: ...os que hayan recibido instrucciones relativas al uso del aparato o que est n bajo la supervisi n de una persona responsable por su seguridad Mantenga alejados a los ni os o animales mientras utilice e...

Page 32: ...rant a legal conforme lo que establece el art culo 26 del C digo de Defensa del Consumidor El plazo de la garant a comienza en la fecha de emisi n de la boleta de venta del equipo que se debe anexar a...

Page 33: ...a ser v lida somente com a apresenta o deste certificado preenchido por completo Guarantee is valid only presenting this certificate completely filled in La garant a solamente ser validada con la pres...

Page 34: ...Mango Telesc pico Ref 79632 Ro adeira Combust o RC43B Combustion Grass Trimmer RC43B Desbrozadora a Combusti n RC43B Ref 79811 430 TROTTER Cortador de Grama Dirig vel CD100 2 Riding Lawn Mower TROTTER...

Page 35: ...Imagens meramente ilustrativas Pictures merely illustrative Im genes meramente ilustrativas...

Page 36: ...14 TRAMONTINA MULTI S A Rod RSC 470 Km 230 CEP 95185 000 Carlos Barbosa RS Brasil Tel 55 54 3461 8250 SAC 55 54 3461 8295 CNPJ 88 037 668 0001 54 www tramontina com Ind stria Brasileira Made in Brazil...

Reviews: