background image

6

18-AC51D3-3

Installer’s Guide

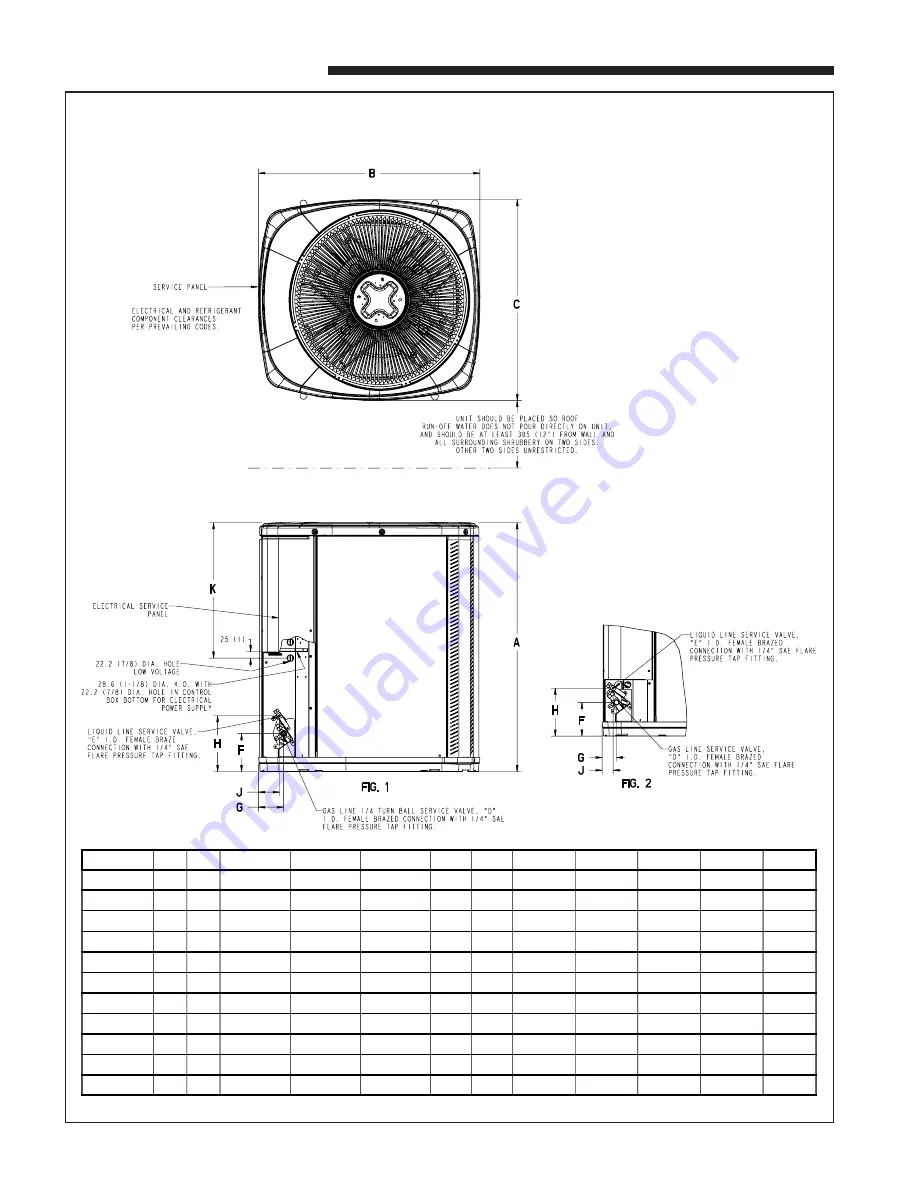
2TTA OUTLINE DRAWING

Note: All dimensions are in MM (Inches).

From Dwg. 21D153074 Rev. 5

MODELS

BASE FIG.

A

B

C

D

E

F

G

H

J

K

2TTA0030A

2

2

651 (25-5/8)

724 (28-1/2)

651(25-5/8)

3/4

5/16

127 (5)

57 (2-1/4)

181 (7-1/8)

44 (1-3/4)

457 (18)

2TTA0036A

2

2

651 (25-5/8)

724 (28-1/2)

651(25-5/8)

7/8

3/8

127 (5)

57 (2-1/4)

181 (7-1/8)

44 (1-3/4)

457 (18)

2TTA0042A

2

2

730 (28-3/4)

724 (28-1/2)

651(25-5/8)

7/8

3/8

137 (5-3/8)

65 (2-5/8)

210 (8-1/4)

57 (2-1/4)

457 (18)

2TTA0048A

2

2

730 (28-3/4)

724 (28-1/2)

651(25-5/8)

1-1/8

3/8

137 (5-3/8)

65 (2-5/8)

210 (8-1/4)

57 (2-1/4)

457 (18)

2TTA0060A

3

1

832 (32-3/4)

829 (32-5/8)

756 (29-3/4)

1-1/8

3/8

143 (5-5/8)

92 (3-5/8)

210 (8-1/4)

79 (3-1/8)

508 (20)

2TTA0072A

4

1

1045 (41-1/8)

946 (37-1/4)

870 (34-1/4)

1-1/8

3/8

152 (6)

98 (3-7/8)

219 (8-5/8)

86 (3-3/8)

508 (20)

2TTA2030A

2

2

730 ( 28-3/4)

724 (28-1/2)

651( 25-5/8)

3/4

3/8

137 (5-3/8)

65 (2-5/8)

210 (8-1/4)

57 (2-1/4)

457 (18)

2TTA2036A

2

2

832 (32-3/4)

724 (28-1/2)

651( 25-5/8)

7/8

3/8

137 (5-3/8)

65 (2-5/8)

210 (8-1/4)

57 (2-1/4)

457 (18)

2TTA2042B

3

1

832 (32-3/4)

829 (32-5/8)

756 (29-3/4)

1-1/8

3/8

143 (5-5/8)

92 (3-5/8)

210 (8-1/4)

79 (3-1/8)

508 (20)

2TTA2048A

3

1

933 (36-3/4)

829 (32-5/8)

756 (29-3/4)

1-1/8

3/8

143 (5-5/8)

92 (3-5/8)

210 (8-1/4)

79 (3-1/8)

508 (20)

2TTA2060A

3

1

933 (36-3/4)

829 (32-5/8)

756 (29-3/4)

1-1/8

3/8

143 (5-5/8)

92 (3-5/8)

210 (8-1/4)

79 (3-1/8)

508 (20)

Summary of Contents for 2TTA2 Series

Page 1: ...y cutting with a sharp tool as shown in Figure 2 see page 2 2 The unit should be set on a level support pad at least as large as the unit base pan such as a concrete slab If this is not the application used please refer to application bulletin Trane APB2001 02 3 The support pad must NOT be in direct contact with any structure Unit must be positioned a minimum of 12 from any wall or surrounding shr...

Page 2: ...Provide a pull thru hole of sufficient size to allow both liquid and gas lines 5 Be sure the tubing is of sufficient length 6 Uncoil the tubing do not kink or dent 7 Route the tubing making all required bends and properly secure the tubing before making connections 8 To prevent a noise within the building structure due to vibration transmission from the refrigerant lines the following precautions ...

Page 3: ...coil before opening the gas and liquid line valves 2 Attach appropriate hoses from manifold gauge to gas and liquid line pressure taps NOTE Unnecessary switching of hoses can be avoided and complete evacuation of all lines leading to sealed system can be accomplished with manifold center hose and connecting branch hose to a cylinder of HCFC 22 and vacuum pump 3 Attach center hose of manifold gauge...

Page 4: ...g Floodback TXV System Liquid Refrig Floodback Capillary Tube System I D Coil Frosting Compressor Runs Inadequate or No Cooling ELECTRICAL Compressor O D Fan Do Not Start Compressor Will Not Start But O D Fan Runs O D Fan Won t Start Compressor Hums But Won t Start Compressor Cycles on IOL I D Blower Won t Start SYSTEM FAULTS P Primary Causes S Secondary Causes P P P S S P S S S S S S S P S S S S ...

Page 5: ...ow voltage wiring to be No 18 AWG minimum conductor 4 ODT B must be set lower than ODT A 5 If outdoor thermostats ODT are not used connect W1 to W2 and W3 PRINTED FROM B152901 P02 PRINTED FROM B152908 P02 PRINTED FROM B152903 P02 NOTE W2 present only on 2 stage thermostat and furnace PRINTED FROM B152907 P03 NOTE W2 present only on 2 stage thermostat and furnace LEGEND FACTORY WIRING FIELD WIRING ...

Page 6: ... 1 4 57 2 1 4 457 18 2TTA0060A 3 1 832 32 3 4 829 32 5 8 756 29 3 4 1 1 8 3 8 143 5 5 8 92 3 5 8 210 8 1 4 79 3 1 8 508 20 2TTA0072A 4 1 1045 41 1 8 946 37 1 4 870 34 1 4 1 1 8 3 8 152 6 98 3 7 8 219 8 5 8 86 3 3 8 508 20 2TTA2030A 2 2 730 28 3 4 724 28 1 2 651 25 5 8 3 4 3 8 137 5 3 8 65 2 5 8 210 8 1 4 57 2 1 4 457 18 2TTA2036A 2 2 832 32 3 4 724 28 1 2 651 25 5 8 7 8 3 8 137 5 3 8 65 2 5 8 210 ...

Page 7: ...18 AC51D3 3 7 Installer s Guide MOUNTING HOLE LOCATION Note All dimensions are in MM Inches NOTE For model base size see table on page 6 From Dwg 21D152989 Rev 0 ...

Page 8: ...ng 2 X X X X X 6 Inform owner on how to operate system and what to expect of it At the same time deliver Owner s Use and Care Booklet CHECKOUT PROCEDURE After installation has been completed it is recommended that the entire system be checked against the following list 1 Refrigerant Line Leak checked 2 Suction Lines and Fittings properly insulated 3 Have all Refrigerant Lines been secured and isol...

Reviews: