background image

AM7A0C36H31-SF-1A 

8

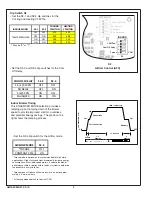
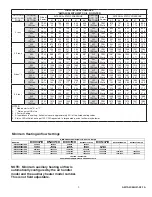
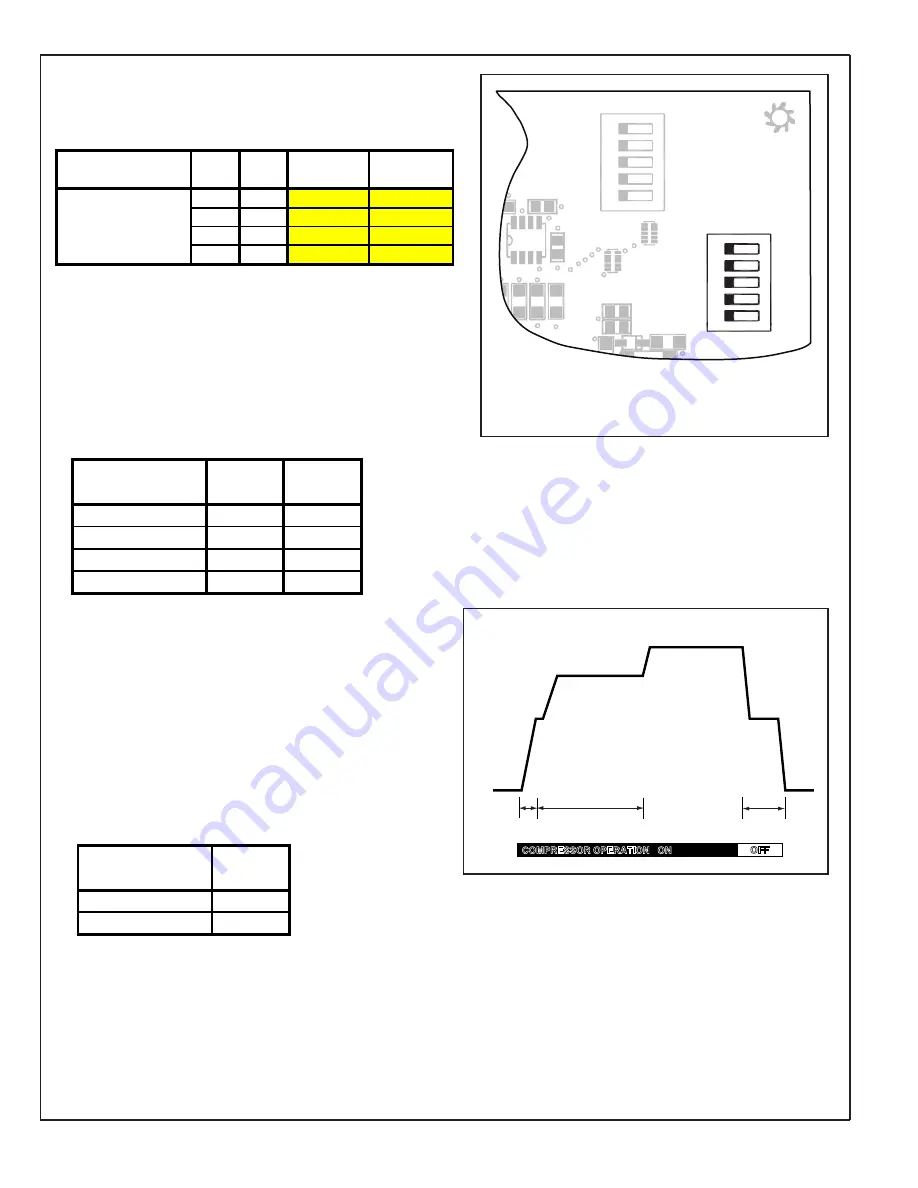
dip Switch S2

Set the S2-1 and S2-2 dip switches for the 


Cooling and Heating CFM/Ton.

Set the S2-3 and S2-4 dip switches for the Cool 


Off Delay.

COOL


OFF


DELAY

S2

3

S2

4

1.5m


@


100%

OFF

OFF

NO


DELAY

OFF

ON

3m


@


50%

ON


OFF

ENHANCED

ON


ON

AIRFLOW


MODE

S2

5

*TORQUE

OFF

CONSTANT


CFM

ON

Set the S2-5 dip switch for the airflow mode.


Indoor Blower Timing
This ENHANCED MODE selection provides a 
ramping up and ramping down of the blower 
speed to provide improved comfort, quietness, 
and potential energy savings.  The graph on the 
right shows the ramping process.

OFF

OFF

50%

80%

100% if necessary

50%

Dehumidify

Fast Coil Cooling

Efficiency

7.5

minutes

3

minutes

1

minute

FAN OPERATION (CFM)

COMPRESSOR OPERATION   ON

OFF

as required

S2

1

1

1
2
3
4
5

1
2
3
4
5

HP

2 (Compressor)

2 (Stages)

AC (System)

}

OUTDOOR

Capacity (Tons)

OUTDOOR

}

Torque

CFM/Ton

Cool Off Delay

}

INDOOR

CFM

+12V

R13

R14

R1

R4

1

U1

R NET 1

S1

on

on

S2

R NET 2

R

6

C

22

C

19

C

15

C

12

C

18

C

21

C10

D9

L1

R22

Airflow Control (AFC)

* Torque mode is optional and is recommended for high static 
applications.  High static conditions dramatically increase energy 
consumption with variable speed motors.  Evaluate the blower 
performance table in relationship to the duct system to determine 
the benefit of each installation.

* Torque mode will reduce airflow when static is above approxi-
mately 0.4" water column.

* All heating modes default to Constant CFM.

INDOOR


MODEL

S2

1

S2

2

COOLING


CFM/TON

HEATING


CFM/TON

OFF

OFF

370

420

OFF

ON

350

400

ON

OFF

390

440

ON

ON

410

450

*


May


be


"A"


or


"T"

*AM7A0C36H31SA

Summary of Contents for AM7A0C36H31SA Series

Page 1: ...ESSURE BEFORE OPENING THE SYSTEM DO NOT USE NON APPROVED REFRIGERANTS OR REFRIGERANT SUBSTITUTES OR REFRIGERANT ADDITIVES WARNING LIVE ELECTRICAL COMPONENTS During instal lation testing servicing and...

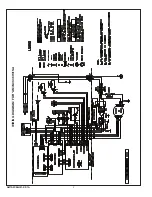
Page 2: ...AM7A0C36H31 SF 1A 2 WIRING DIAGRAM FOR AM7A0C36H31SA...

Page 3: ...stage control circuit 3 R G contacts close on comfort control sending 24VAC to the G terminal of the AFC 4 The AFC micro processor sends a command to the serial communicating blower motor to run at 1...

Page 4: ...to the AFC for that correct cfm The EHC determines the amount of heat per stage by either factory programming or by the kw jumper position 5 The AFC micro processor sends a command to the serial commu...

Page 5: ...ults that have occurred Each device will report the last four faults after each power cycle of the unit See the Fault Table section in the Service Facts for a list of fault codes Clearing Faults To cl...

Page 6: ...R3 R2 R5 R7 Q8 Q4 PTC1 MOV1 L2 L3 K1 J3 J6 J9 D36 D35 D34 D1 D22 D29 D25 D24 D7 D4 D2 D28 C57 C54 C56 C51 C49 C48 C47 C52 C43 C42 C36 C35 C34 C31 C30 C29 C13 C7 C3 C2 C1 U1 C58 R105 C50 U2 J7 R24 R17...

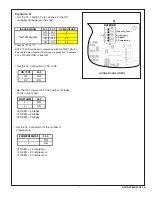
Page 7: ...C22 C19 C15 C12 C18 C21 C10 D9 L1 R22 Set the S1 4 dip switch for the number of stages on the outdoor unit OD STAGES S1 4 1 OFF 2 ON Set the S1 5 dip switch for the number of compressors COMPRESSORS S...

Page 8: ...minute FAN OPERATION CFM COMPRESSOR OPERATION ON OFF as required S2 1 1 1 2 3 4 5 1 2 3 4 5 HP 2 Compressor 2 Stages AC System OUTDOOR Capacity Tons OUTDOOR Torque CFM Ton Cool Off Delay INDOOR CFM 12...

Page 9: ...s 879 68 876 110 877 153 881 197 884 240 400 CFM ton CFM Watts 992 91 991 138 998 188 1005 237 1014 287 370 CFM ton CFM Watts 923 77 924 121 927 167 932 213 936 258 420 CFM ton CFM Watts 1036 101 1040...

Page 10: ...7 50 BAYEVAC10LG3 1 3 PH 9 60 32785 23 1 32 35 7 20 24589 20 0 28 30 BAYEVBC15LG3 1 3 PH 14 40 49178 34 6 47 50 10 80 36883 30 0 41 45 9 60 32785 40 0 54 60 7 20 24589 34 6 47 50 4 80 16392 20 0 25 25...

Page 11: ...J7 R24 R17 D6 D3 D14 D17 R NET 1 R NET 2 R73 1 J8 Yo R B O Y1 J1 W2 W1 R63 R62 R56 D21 D20 C32 C33 R38 R36 R16 R15 R32 R11 R28 R27 R26 D13 D12 D5 D11 D10 C24 C25 C4 C5 C16 C17 D8 R50 R45 R85 R84 D16...

Page 12: ...C has detected a fault condition refer to Fault LED on EVC 12 EHC HHC has detected a fault condition refer to Fault LED on EHC HHC 1 If Unit LED on AFC is flashing 2 times second AFC is causing the er...

Page 13: ...l 1 4 Evaporator Gas Sensor input out of range Verify resistance 5VDC output from control 1 5 Stepper Motor Coil is shorted Replace coil 2 6 Valve is not responding to a change in position Possible st...

Page 14: ...E Standby mode STATUS LED will flash 1 time per second Unit LED 1 Flash Normal Rapid Communication Busy Error Off No power EHC STATUS LEDS EHC FAULT CODES EHC Fault LED Description OFF No fault 1 Inte...

Page 15: ...eak and make to initialize To clear faults stored in memory apply a jumper between Close and Test pins for 10 seconds Open Valve Test Touch OPEN pin to TEST pin EEV drives open 5 sec max and stays ope...

Page 16: ...1 82 63 17 2 13824 1 79 64 17 8 13476 1 76 65 18 3 13138 1 73 66 18 9 12810 1 70 67 19 4 12491 1 67 68 20 0 12181 1 65 69 20 6 11879 1 62 70 21 1 11586 1 59 TEMP F TEMP C THERMISTOR RESISTANCE OHMS V...

Page 17: ...J3 connector on EVC See EVC table for J3 location Does voltage s measured correspond to return air temperature Verify resistance per Thermal Resistance Table and Voltage table Sensors are good No remo...

Page 18: ...at drop below 30F Is indoor temperature 85F NO Perform CLOSE VALVE test at EVC YES Does suction pressure go down EEV and coil are working Replace EVC Check operation YES YES Perform temperature sensor...

Page 19: ...check YES Perform CLOSE VALVE test at EVC Does suction pressure drop Perform OPEN VALVE test at EVC Does suction pressure rise Replace EVC YES Replace EVC YES Replace EEV Check operation Ohm coil per...

Page 20: ...7 www trane com For more information contact your local dealer distributor 01 11 The manufacturer has a policy of continuous product and product data improvement and it reserves the right to change de...

Reviews: