background image

Page 4

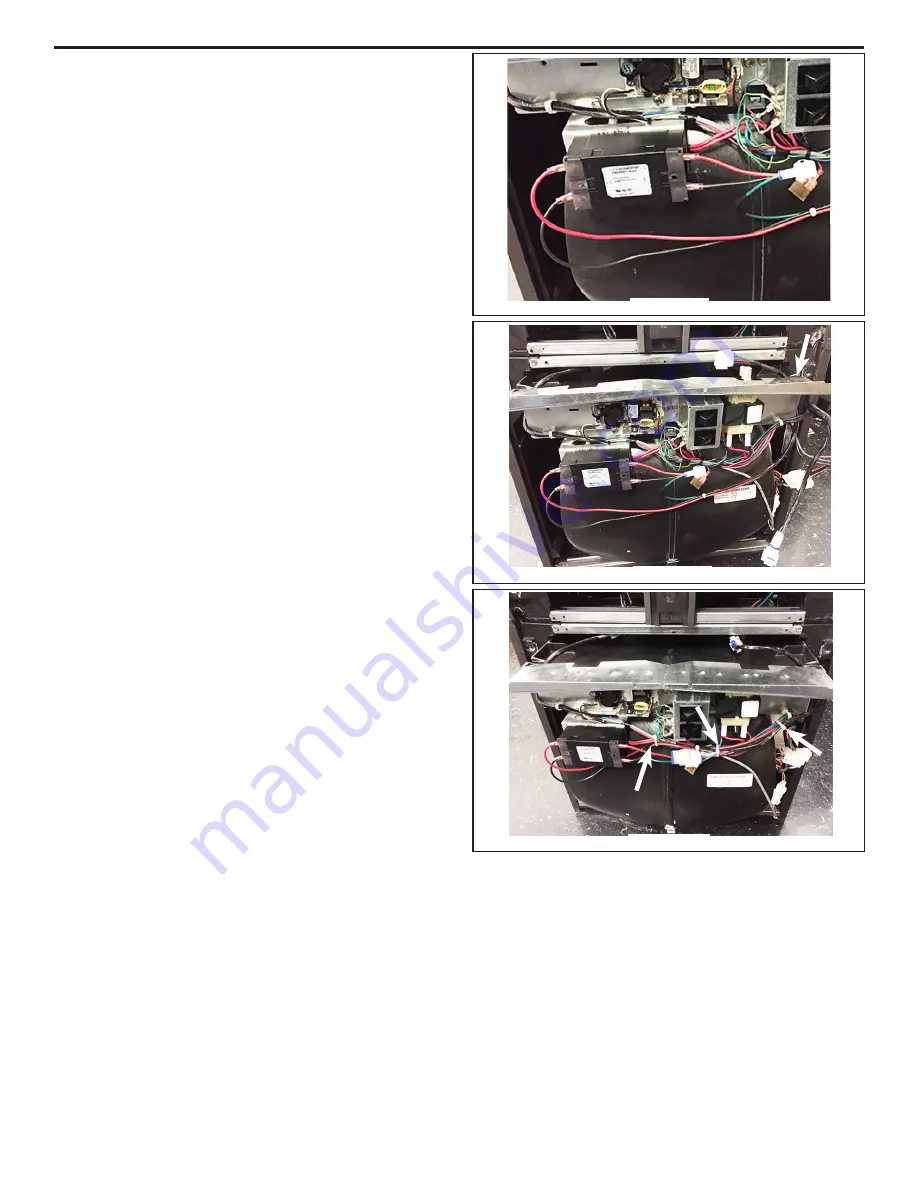
8.  Connect the included TAM / GAM harness (Item 2) to 

the line side and load side of the EMI filter, as shown in 
Figure 10.  The shorter leads with the female plug will 
be on the load side.  

9.  Make sure the new harness is secured in the blower 

slot.  Connect the male 3 pin connectors to the power 
supply above the blower in the coil cabinet.  Connect 
the female 3 pin connector from the EMI filter to the 
blower motor harness that was pulled out of the slot to 
the front of the blower.

10.  Use the included cable ties to secure the harness.  

FIGURE 10

FIGURE 11

FIGURE 12

Summary of Contents for BAYAHEMIKIT001A

Page 1: ...llow this warning could result in an electrical shock fire injury or death DISCONNECT POWER BEFORE SERVICING WARNING EMI Kit BAYAHEMIKIT001A ITEM Part Number Part Description Qty 1 D806151 TEM Male Fe...

Page 2: ...ing two 10 cutting screws Item 7 NOTE Make sure to align the left edge of the bracket with the left edge of the blower housing See Figure 4 4 Installing Ferrite Bead Item 6 on a variable speed motor P...

Page 3: ...cut to have enough wire to make the loops FIGURE 6 FIGURE 7 7 Disconnect the 3 pin connector between the blower motor and the power supply Pull the harness out of the blower deck slot and back in fro...

Page 4: ...d side 9 Make sure the new harness is secured in the blower slot Connect the male 3 pin connectors to the power supply above the blower in the coil cabinet Connect the female 3 pin connector from the...

Page 5: ...res pass through the ferrite bead twice See Figure 14 FIGURE 14 FIGURE 13 FIGURE 15 FIGURE 16 4 Installing Ferrite Beads Item 6 on a CTM motor Place one ferrite bead on motor power wires There should...

Page 6: ...s at the wire nut 7 Connect the incoming power wires to the line side of the EMI filter See Figure 17 8 Connect the 2 wire unit harness to the load side of the EMI filter See Figure 17 FIGURE 17 9 Use...

Page 7: ...es pass through the ferrite bead twice See Figure 20 FIGURE 20 FIGURE 19 FIGURE 21 FIGURE 22 4 Installing Ferrite Beads Item 6 on a CTM motor Place one ferrite bead on motor power wires There should b...

Page 8: ...between the line heater power and the unit controls 8 Take the male 6 pin connector and plug it into the EMI filter harness female connector on the line side See Figure 24 9 Take the female 6 pin conn...

Page 9: ...Page 9 FIGURE 26 Wiring Diagrams D806182P01 D806182P02 NOTE Place the appropriate EMI kit wiring diagram label next to the existing wiring diagram on the unit for future reference...

Page 10: ...on please visit www trane com or www americanstandardair com The manufacturer has a policy of continuous data improvement and it reserves the right to change design and specifications without notice W...

Reviews: