15
Installation (Continued)
Refrigerant Piping
Refrigerant piping must be properly sized and applied.
These two factors have a very significant effect on both sys-
tem performance and reliability.
Note: Use Type "L" refrigerant grade copper tubing
only.
Refrigerant Piping should be sized and laid out according to
the job plans and specifications. This should be done when
the system components are selected. The primary objective
when sizing refrigerant piping for this unit is to make refrig-
erant line sizes as small as possible while avoiding exces-
sive refrigerant pressure drops.
Sizing refrigerant lines as small as possible minimizes the
required refrigerant charge and maximizes compressor life.
Trane recommends that the Refrigerant Line Sizing pro-
gram in the "Trane C.D.S. Application Toolbox" be used to
size the refrigerant lines. This program supersedes the line
sizing tables in both the Trane Reciprocating Refrigeration
publication and the Trane Air Conditioning Manual. If you do
not have access to this program, contact your local Trane
Commercial Sales office for assistance.
Liquid Lines
Basic sizing parameters with the system operating at full
load for liquid lines are:
Maximum Liquid velocity ...................................... 600 fpm
Maximum allowable pressure drop .................. 7 psig (1
F)
As the pressure drop in the liquid line increases, the poten-
tial for liquid flashing, due to reduced refrigerant pressure
corresponding to a reduced liquid temperature (subcooling),
increases. Under these conditions, liquid lines exposed to
high surrounding ambient temperatures must be insulated.
Note: Adding refrigerant to a system with
improperly sized refrigerant lines will only
decrease system performance and reliability and
accentuate poor operating condition.
Isolate all refrigerant lines from the building. This prevents
transferring line vibration to the structure. Do not secure the
lines rigidly to the building at any point since this will defeat
the isolation system of the unit.
Refer to the appropriate unit illustration in Figure 3-2 for re-
frigerant line size connections and locations. Connect the
liquid line piping to the stubs provided at the liquid line shut-
off valves.
Note: The installer must cut an appropriately-sized
opening in the unit sheet metal for the refrigerant
piping entrance into the unit.
Liquid Line Components
Filter driers and valves (expansion valves, charging valves,
etc.) should be provided in the liquid lines just before the
evaporator. Minimize the use of valves, reducers and tube
bends as much as possible to avoid excessive pressure
drop before the expansion valve.
Liquid Line Filter Drier
Install the filter driers (provided by the installer) in the liquid
lines as close as possible to the expansion valves. Locate
them upstream of the moisture indicator and solenoid
valves (Solenoid valves may not be applicable).
Liquid Line Moisture Indicators
To aid in troubleshooting, charging and servicing the sys-
tem, install moisture indicators in the liquid lines near the
evaporator, down stream of the liquid line drier between the
solenoid valve (if applicable) and the expansion valve.
Liquid Line Solenoid Valves
Liquid line solenoid valves are not recommended on units
when they are connected to DX coils. Liquid line solenoid
valves are recommended for refrigerant migration control
when they are connected to an EVP chiller and should be
connected as described in the “Electrical Wiring” section.
Note: Do not use any solenoid valve as a
pumpdown device. Equipment damage will occur.
Thermostatic Expansion Valve (TEV)
Trane recommends a balance-ported externally equalized
valve in order to maintain satisfactory superheat control
down to lower valve loading conditions and to compensate
for pressure drops between the expansion valve and super-
heat control point (evaporator refrigerant outlet). The power
head should be a “VGA” charge with Sporlan valves or a
“W” charge with Alco valves. These charges provide smooth
control at air conditioning conditions and are less suscep-
tible to power head “charge migration” than the conven-
tional gas charged types.
Discharge (Hot Gas) Lines
Discharge lines should be pitched downward 1/2 inch for
each 10 feet of horizontal run in the direction of hot gas flow
and away from the compressor. Insulate any portion of the
discharge piping that is exposed to outdoor ambient tem-
perature.
Discharge line sizing is based on the minimum velocity re-
quired to provide good oil movement through the system.
Basic discharge line parameters are:
Maximum allowable pressure drop .......................... 6 psig
Maximum velocity .............................................. 3500 fpm
Minimum velocities at Minimum Load:
Horizontal Lines ................................................ 500 fpm
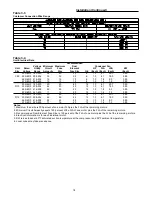
Vertical Lines .............................. Refer to the Table 3-2
Summary of Contents for CAUC-C80
Page 8: ...8 Figure 3 2 CAUC C80 Unit Dimensional Data Recommended Clearances ...
Page 9: ...9 Figure 3 2 Continued CAUC D10 Unit Dimensional Data Recommended Clearances ...
Page 10: ...10 Figure 3 2 Continued CAUC D12 Unit Dimensional Data Recommended Clearances ...
Page 19: ...19 Installation Continued Figure 3 5 Typical CAUC C80 through D12 Field Wiring Diagram ...
Page 28: ...28 Figure 5 2 Typical Wiring Schematic for 80 through 120 Ton Units ...
Page 29: ...29 ...
Page 30: ...30 Figure 5 3 Typical Control Panel Connections Diagram for 80 through 120 Ton Units ...
Page 31: ...31 ...
Page 36: ...36 ...


