background image


18-CD30D1-12  

25

Installer’s Guide

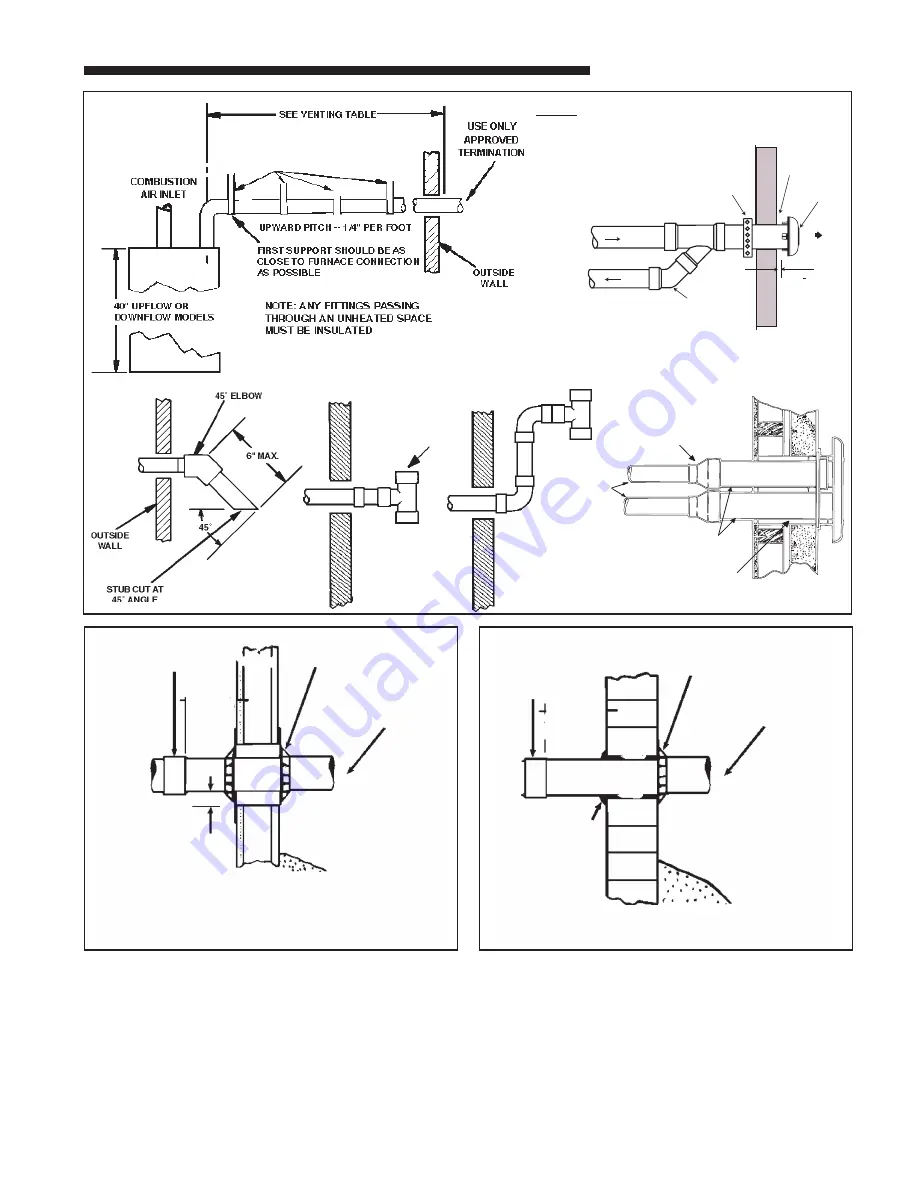
COMBUSTIBLE MATERIAL WALL

A minimum clearance of 1" to combustible materials must 
be maintained when using single wall stainless steel 
venting. See Figure 32.
Shield material to be a minimum of 24 gauge stainless 
or aluminized sheet metal. Minimum dimensions are 
12"x12". Shield must be fastened to both inside and out-
side of wall. Use screws or anchor type fasteners suited 
to the outside or inside wall surfaces.

NONCOMBUSTIBLE MATERIAL WALL

The hole through the wall must be large enough to main-
tain pitch of vent and properly seal.
Use cement mortar seal on inside and outside of wall. 
See Figure 33.

COUPLING
(PLASTIC
VENTING)

STUD

    PVC WALL
MOUNT FLANGE
   (OPTIONAL)

  APPROVED
TERMINATION

1” CLEARANCE
(AIR SPACE)

VENTING THROUGH COMBUSTIBLE WALLS
               Pitch - 1/4 Inch Per Foot

          CLEARANCE (0” ACCEPTABLE FOR PVC VENT PIPE)
(1” ACCEPTABLE FOR TYPE 29-4C STAINLESS STEEL VENT PIPE)

12” MINIMUM ABOVE
NORMALLY EXPECTED
SNOW ACCUMULATION
LEVEL 

6 IN. MIN.
(TO JOINT)

x

COUPLING
(PLASTIC
VENTING)

    PVC WALL
MOUNT FLANGE
   (OPTIONAL)

  APPROVED
TERMINATION

    CEMENT
MORTAR SEAL
    INSIDE & 
   OUTSIDE

VENTING THROUGH NON-COMBUSTIBLE WALLS
               Pitch - 1/4 Inch Per Foot

12” MINIMUM ABOVE
NORMALLY EXPECTED
SNOW ACCUMULATION
LEVEL

6 IN. MIN.
(TO JOINT)

c

NOTE: VENT AND INLET MUST BE SUPPORTED 

AT A MAXIMUM OF 3' INTERVALS

BAYAIR30AVENTA

3" PIPING

2", 2-1/2"

or 3" PIPING

REDUCING 
COUPLING,
FIELD SUPPLIED
IF NEEDED

SEAL ALL

WALL CAVITIES

BAYVENT200B

TEE

STRAPS OR OTHER SUITABLE SUPPORTS 
AT A MAXIMUM OF 3' 0" INTERVALS

z

RAIN CAP

COMBUSTION AIR

                    STRAP
(FIELD SUPPLIED)

COMBUSTION
AIR

VENT

ELBOW
(FIELD 
SUPPLIED)

VENT

1" + 1/2"

CONCENTRIC VENT  

SIDE WALL INSTALLATION

For Canadian applications only, IPEX 
196006, IPEX 081216, IPEX 081218, 
and IPEX 081219 may be used for hori-
zontal vent terminations.

Summary of Contents for DHMB060BCV3VB

Page 1: ...gnate a degree or level of seriousness associated with a particular hazard 2 The signal words for safety markings are WARNING and CAUTION 3 a WARNING indicates a potentially hazardous situation which...

Page 2: ...their previous condition of use WARNING Failure to follow safety warnings exactly could result in a fire or explosion causing property damage personal injury or loss of life Do not store or use gasol...

Page 3: ...ks with an open flame Use a commercially available soap solution made specifically for the detection of leaks to check all connections as specified in the Gas Piping section starting on page 34 6 Alwa...

Page 4: ...NT ALTITUDES REFER TO THE VENT LENGTH TABLE FOR PROPER APPLICATION UHM ACV OUTLINE DRAWING ALL DIMENSIONS ARE IN INCHES MODEL SEE NOTE 1 DIM A DIM B DIM C DIM D DIM E DIM F UHMB060ACV3VB UHMB080ACV3VB...

Page 5: ...ACV DOWNFLOW HORIZONTAL OUTLINE DRAWING ALL DIMENSIONS ARE IN INCHES MODEL SEE NOTE 1 DIM A DIM B DIM C DIM D DHMB060BCV3VB DHMB080ACV3VB 17 1 2 2 1 4 16 1 4 16 DHMC100ACV4VB 21 2 1 2 19 3 4 19 1 2 DH...

Page 6: ...ty to the furnace must be provided Any access door or panel must permit removal of the largest component 4 Are there at least 3 inches of clearance between the furnace combustion air openings in the f...

Page 7: ...urnace installation in an attic should be on a service platform large enough to allow for proper clearances on all sides and service access to the front of the furnace See Figure 5 Clearance Tables on...

Page 8: ...mately 4 6 inches to allow clearance for the condensate drain to exit the cabinet in the horizontal position The horizontal furnace may also be suspended from the joists using all thread rods with a s...

Page 9: ...ed space shall be provided with two permanent openings one commencing within 12 inches of the top and one commencing within 12 inches of the bottom of the enclosure The openings shall communicate dire...

Page 10: ...while installing or servicing Personal injury may result Where there is no complete return duct system the return connection must be run full size from the furnace to a location outside the utility r...

Page 11: ...left side or right side return air inlet Some filters may need to be trimmed for side or bottom filter use TABLE 4 NOTE For upflow 5 ton airflow models where the airflow requirement exceeds 1800 CFM...

Page 12: ...RNATE FILTER RACK INSTALLATION FOR SIDE RETURN AIR ON UPFLOW FURNACES LEFT OR RIGHT BAYRACK960 NOTE The filter rack installation is not allowed for right side return on the following models UHMB060ACV...

Page 13: ...ance holes with a 3 16 drill Bottom return holes are pre drilled Attach clip to bottom channel and rear of unit with screws provided for bottom return 2 Install the clips in front and rear of the desi...

Page 14: ...may be A or T TABLE 7 LOCATING FILTER RETAINER BRACKETS IN DUCTWORK CABINET WIDTH RETURN DUCT WIDTH DIMENSION A DIMENSION B FILTER BRACKET LOCATION 17 1 2 16 1 4 15 14 14 3 8 21 19 3 4 19 1 2 14 13 1...

Page 15: ...h appliance connected to the venting system being placed into operation could result in carbon monoxide poisoning or death The following steps shall be followed for each appliance connected to the ven...

Page 16: ...OR DOWNFLOW HORIZONTAL NOTE See Figures 23 24 In horizontal venting when the factory supplied off set 2X3 reducing coupling is used for 3 vent pipe installation make sure the marking Top is located o...

Page 17: ...throughout Listed in Table 9 are materials that meet these requirements The materials listed are various grades of PVC and ABS plastic PIPE JOINTS All joints must be fastened and sealed to prevent esc...

Page 18: ...NT PIPE with RTV sealant Seal INLET AIR PIPE with RTV sealant Front of Furnace VENT AND INLET AIR CONNECTIONS g 5 Wipe all excess cement from the joint with a rag Allow 15 minutes before handling Cure...

Page 19: ...r T Last two digits may be A thru Z 1 Minimum vent length for all models 3 horizontal or 3 vertical 2 DO NOT MIX PIPE DIAMETERS IN THE SAME LENGTH OF PIPE OUTSIDE THE FURNACE CABINET Except adapters a...

Page 20: ...from freezing then the space meets the condition of a heated space VENTING THROUGH THE ROOF When penetrating roof with a 2 PVC Vent Pipe a 2 electrical conduit flashing may be used for a weather tigh...

Page 21: ...n direct vent Installation must con form to national state and local codes The vent inlet terminals must be located at least 12 minimum above normally expected snow accumulation level See Figure 29 Av...

Page 22: ...period a battery operated carbon monoxide detector with an alarm shall be installed 2 APPROVED CARBON MONOXIDE DETECTORS Each carbon monoxide detector as required in accordance with the above provisio...

Page 23: ...ied locally For Canadian applications only IPEX 196006 IPEX 081216 IPEX 081218 and IPEX 081219 may be used for horizontal vent terminations HORIZONTAL VENT CLEARANCES See clearance tables 11 and 12 on...

Page 24: ...allation Instructions Table 12 Direct Vent Terminal Clearances Canadian Installations US Installations A Clearance above grade veranda porch deck or balcony 12 inches 30 cm 12 inches 30 cm B Clearance...

Page 25: ...tch 1 4 Inch Per Foot CLEARANCE 0 ACCEPTABLE FOR PVC VENT PIPE 1 ACCEPTABLE FOR TYPE 29 4C STAINLESS STEEL VENT PIPE 12 MINIMUM ABOVE NORMALLY EXPECTED SNOW ACCUMULATION LEVEL 6 IN MIN TO JOINT x COUP...

Page 26: ...AVENTA VERTICAL REMOVE RIBS FROM CAP COMBUSTION AIR ROOF BOOT FIELD SUPPLIED COMBUSTION AIR VENT ELBOW FIELD SUPPLIED MAINTAIN 12 IN MINIMUM CLEARANCE ABOVE HIGHEST ANTICIPATED SNOW LEVEL MAXIMUM OF 2...

Page 27: ...TAL VENTING TO VERTICAL VENTING 6 IN MIN SEE CAUTION STAINLESS STEEL VENT CAP OPTIONAL SUPPORT THE SINGLE WALL FLUE PIPE AND CENTER IT IN THE CHIMNEY OPENING WITH ANGLES AS SHOWN OR ANOTHER EQUIVALENT...

Page 28: ...cal source is utilized The integrated furnace control is polarity sensitive The hot leg of the 120V power supply must be connected to the Black power lead as indicated on the wiring diagram Provision...

Page 29: ...taller s Guide FIELD WIRING DIAGRAMS 41B Communicating Indoor Unit with Communicating Comfort Control and 24VAC Single Stage Cooling 41C 24 VAC Mode Indoor Unit with 24 VAC Comfort Control and 24VAC S...

Page 30: ...er s Guide 41D 24 VAC Mode Indoor Unit with 24 VAC Comfort Control and 24VAC 2 Stage or 2 Step Cooling 41E 24 VAC Mode Indoor Unit with 24 VAC Comfort Control and 24VAC Single Stage Heat Pump Field Wi...

Page 31: ...ween R and BK on the circuit board must be cut if an optional humidistat is installed HUMIDISTAT HOOKUP 24 V ONLY If an optional humidistat for humidity control in cooling is used the factory installe...

Page 32: ...e second ary heat exchanger drain connection to prevent water from damaging furnace controls if the primary drain outlet plugs up Where the furnace is installed above a finished ceiling the primary dr...

Page 33: ...osition into the other drain tap of the inducer which is located 90 clockwise around the inducer Move the cap from that drain tap to the unused drain tap On upflow units plug the hole in the blower de...

Page 34: ...SONAL INJURY OR DEATH CAUTION Use a backup wrench on the Gas Valve when installing Gas Piping to prevent damage to the Gas Valve and Manifold Assembly The upflow horizontal furnace is shipped standard...

Page 35: ...MANUAL SHUT OFF AUTOMATIC GAS VALVE WITH MANUAL SHUT OFF DRIP LEG DRIP LEG DRIP LEG DRIP LEG IMPORTANT A sediment trap must be installed in the gas line be fore the furnace gas valve The sed iment tr...

Page 36: ...t for one revolution Table 18 shows the flow rate in cubic feet per hour for a measured time of one revolution for a meter on which one revolution indicates 2 cubic feet per hour of gas flow For other...

Page 37: ...33 218 54 133 90 80 13 555 34 212 55 131 92 78 14 514 35 206 56 129 94 76 15 480 36 200 57 126 96 75 16 450 37 195 58 124 98 73 17 424 38 189 59 122 100 72 18 400 39 185 60 120 104 69 19 379 40 180 62...

Page 38: ...sure Switch PS 3 Pressure Switch PS 2 Negative Control Pressure Post Positive Control Pressure Post Modulating Gas Valve Orifice in H fitting must be pointing away from PS1 VACUUM HOSE ROUTING R To Pr...

Page 39: ...leaned annually using brushes and vacuum cleaner for any gas that might have escaped to dissipate LP Gas being heavier than air may require forced ventilation Turn the toggle switch on the Gas Valve i...

Page 40: ...n to scroll through setup menu Push ENTER to make selection Viewing Window User Interface pictured above adjusts Variable Speed Airflow options and is used for custom setup of Furnace operations See m...

Page 41: ...500 1600 A TDHMD120 1850 1850 2040 1660 1760 Information Menu Information Options MODEL NUMBER MODEL A TUHM SERIAL NUMBER SERIAL SW REV NUMBER SW REV NUMBER SYSTEM STATUS SYSTEM STATUS OFF REQUESTED C...

Page 42: ...1400 1400 1610 1120 1260 A TUHMC100 1620 1620 1790 1460 1540 CONT FAN CFM CONT FAN CFM A TUHMD120 1890 1890 2000 1700 1790 50 50 75 100 25 A TDHMB060 1040 1040 1160 900 950 A TDHMB080 1400 1400 1610...

Page 43: ...drive board to ramp down to that corresponding demand speed The reduction of the vent motor speed in steps allows the gas flow through the gas valve to also be reduced in steps decreasing the chance...

Page 44: ...or blower motor speed Thermostat call for W2 after W1 12 R and W2 thermostat contacts close signaling a call for W2 heat The IFC then signals the variable speed inducer drive to ramp up the vent motor...

Page 45: ...ent motor to ramp up The increase of the vent motor speed allows the gas flow through the gas valve to also be increased in 3 steps This 3 increase will be repeated every 1 minute until the capacity r...

Page 46: ...N and push the Enter button e When asked Are You Sure select Yes and push the Enter button f The furnace will now begin the ignition sequence g If pressure switch 1 2 learning routines have not been p...

Page 47: ...ustable 10 0 0 5 100 2 1 0 5 Not Adjustable 10 0 0 5 Downflow 120 2 1 0 5 Not Adjustable 10 0 0 5 Upflow 120 2 9 0 5 Not Adjustable 10 0 0 5 For upflow 120KBTU hr model 1st stage is 45 Manifold pressu...

Page 48: ...arning routine is complete and that the heat rise is stable j Read the 100 manifold pressure k If needed remove the high heat manifold adjustment cover and adjust to obtain the correct manifold pres s...

Page 49: ...E will now be displayed Press the Enter button STAGE and OFF OFF will now be displayed First or Second heat stage must be selected Use the or arrows to select the stage of heat wanted and then push th...

Page 50: ...ion being asked use the or arrows to select the YES and then press the ENTER button Are you Sure and NO NO will now be displayed With a NO NO question being asked use the or arrows to select the YES a...

Page 51: ...e for 100 high heat until it receives a call for 100 high heat PS 3 INDUCER LEARNING ROUTINE When the furnace IFC receives a digital signal for 100 high heat from the comfort control it will begin the...

Page 52: ...Control to a temperature higher than the in dicated room temperature to start the furnace Restrict the airflow by blocking the return air disconnecting the Indoor Blower may trip the Inducer Limit Wh...

Page 53: ...g Cycle or flame is not present at the sensor the Integrated Furnace Control IFC will close the Gas Valve The Integrated Furnace Control will then recycle the Ignition Sequence If Ignition is not achi...

Page 54: ...e displayed on the User Interface menu using a descriptive text message and on the comfort control display using an alert code number A com plete list of the alert codes is included with the comfort c...

Page 55: ...Failure Communication Message has been detected while configured for 24V Mode Solid ON Device count CNTRL FAULT ERR 18 18 Control Failure Internal control failure None Device count TWIN ERROR N A 19...

Page 56: ...ta improvement and reserves the right to change design and specifications without notice Trane 6200 Troup Highway Tyler TX 75707 For more information contact your local dealer distributor Literature O...

Reviews: