RLC-SVD05A-EN
29
Current Transformers
7
If the resistance reading above is out of tolerance, the problem is either with
the transformer, its wiring, or the Phoenix connector. First, double check the
schematic to be sure you are working the proper lead pair. Then, check the CT
resistance at the CT.
More than one current transformer is terminated to a single Phoenix
connector. When replacing, take care to note the proper positions of the
respective transformer wire terminations on the Phoenix connector for re-
termination. (The current transformers are NOT polarity or directionally
sensitive). The transformer lead wiring is #16 ga, UL 1015 600V and the proper
Phoenix connector must be used to ensure a reliable connection. Isolate the
problem to the current transformer or its wiring apart from the connector.
8
If the transformer/connector resistance proves accurate, recheck the
resistance with the connector held at different angles and with a light lead pull
(less than 5 lb.) to test for an intermittent condition.
9
To perform the following test, you will need to use a digital voltmeter with a
diode test function. With the transformer Phoenix connector disconnected
and the power off to the Starter, perform a diode test across the
corresponding pair of current transformer input pins on the Starter (header
J7). The meter should read from 1.0 to 1.5 volts for each current transformer
input. Repeat using the opposite polarity. The same reading should result.
Extreme errors suggest a defective Starter module. If the diode voltage drops
prove accurate, reconnect the transformers to the Starter and re-power the
unit.
WARNING
Live Electrical
Components!
During installation, testing, servicing and troubleshooting of this product, it may
be necessary to work with live electrical components. Have a qualified licensed
electrician or other individual who has been properly trained in handling live
electrical components perform these tasks. Failure to follow all electrical safety
precautions when exposed to live electrical components could result in death or
serious injury.
10 With the CTs reconnected to the Starter, attempt a restart of the chiller. As the
given compressor is started, and the inrush locked rotor transient has passed,
(locked rotor transient should last less than one second) simultaneously
monitor the actual compressor phase current(s) (using a clamp- on type
ammeter) and the voltage developed at the respective current transformer's
termination at the Starter (using a digital volt-meter on a 0-20 VAC scale).
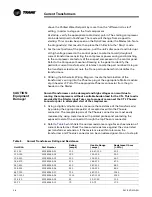
Refer to
Table 5
for the compressor phase current to output voltage
relationship for each extension current transformer. Using
Table 5
, look up the
current that corresponds to the output voltage read by the voltmeter and
compare to ammeter reading. Assuming relatively accurate meters, the
values should agree to within
±
5%.
11 If the measured current and the output voltage from the CT agree within the
tolerance specified, the CT is good. If diagnostics, overload trips, or other
problems potentially involving current sensing continue to occur with all
phase currents to the compressors verified to be within their normal range,
then the problem is with the Starter Model’s current input. It is advisable to
replace the Starter module at this point.


