background image

Summary of Contents for YCX024G1L-M

Page 1: ... This Document is customer property and is to remain with this unit Please return to service information pack upon completion of work All phases of this installation must comply with the NATIONAL STATE LOCAL CODES In the absence of local codes the installation must conform with National Electric Code ANSI NFPA 70 or LATEST REVISION Since the manufacturer has a policy of continuous product improvem...

Page 2: ...SSURE IN EXCESS OF 14 INCHES WATER COLUMN 1 2 PSIG IMPORTANT RECONNECT ALL GROUNDING DEVICES ALL PARTS OF THIS PRODUCT CAPABLE OF CONDUCTING ELECTRICAL CURRENT ARE GROUNDED IF GROUNDING WIRES SCREWS STRAPS CLIPS NUTS OR WASHERS USED TO COMPLETE A PATH TO GROUND ARE REMOVED FOR SERVICE THEY MUST BE RETURNED TO THEIR ORIGI NAL POSITION AND PROPERLY FASTENED IMPORTANT ALL POWER LEGS MAY NOT BE BROKEN...

Page 3: ...IR DUCT RETURN AIR DUCT ROOFMOUNTING CURB SEE NOTE I iON WiTH BAYCURB030 38A 3 M _ROOF FIELD SUPPLIED RIGIDINSULATION SUPPLY AIR DUCT NOTES 1 The YCX042G M YCX036G H models extend out past this end of the curb ONLY 2 Only the YCX048G 060G models extend past both the end and the side of the curb as illustrated SEE NOTE2 ROOF MOUNTING CURB RETURN AIR DUCT CANT STRIP FIELD SUPPLIED SUPPORTS ATEACH EN...

Page 4: ...63 YCX036G L 88 73 97 114 372 YCXO36G M 88 74 97 119 379 56 I 2 36 29 3 16 18 9 16 11 I 16 6 9 16 6 13 16 17 21 21 7 8 17 I 2 10 3 4 7 16 20 1 2 25 I 8 YCX036G H 93 76 100 124 393 YCXO42G M 97 79 105 127 407 64 36 29 3 16 18 9 16 11 I 16 6 9 16 11 1 8 17 20 1 2 28 1 2 17 I 2 10 3 8 3 4 YCX048G H 121 106 134 154 YCXO69G M 133 109 134 165 515 25 3 8 30 1 4 65 I 8 45 33 3 8 21 1 16 15 I 16 4 15 16 9 ...

Page 5: ...ESHAIR ACCESSORY 30 WITH ECONOMIZER MODEL YCX024G L YCXO24G M YCXO30G L YCXO30G M YCXO36G L YCXO36G M YCXO36G H YCXO42G M YCXO48G H YCXO6OG M A B C D 56 I 2 36 25 3 16 25 I 8 56 I 2 36 29 3 16 25 I 8 64 36 29 3 16 26 9 16 65 1 8 45 33 5 8 27 15 16 25 MM 1 DIA K O _OR 15 MM 1 2 NPT GAS CONNECTION _CONDENSER CO L GUARD D66 7952 CLEARANCE TO COMBUSTIBLE MATERIAL BOTTOM 0 0 BACK 1 0 LEFT SIDE 6 0 RIGH...

Page 6: ...RETURN OPENING 2 REMOVE RIGHT HAND SCREW AND MOVE PANEL TO THE RIGHT OR RE MOVE BOTH SCREWS REQUIRED CLEARANCE FOR UNIT INSTALLATION AND ROOF PENETRATION HOLE SiZE REQUIRED SERVICE CLEARANCE LINES SERVICE CLEARANCE LINES SIDE RAIL Y J WOOD NAILER SERVICE CLEARANCE PENETRATION DIMENSIONS MODEL NO A B C D E F YCXO24 036F L M 42 30 6 24 36 25 YCX036G H 42 30 12 30 44 25 YCX042G M YCX048G H 060G M 42 ...

Page 7: ...ate should be reviewed with a local engineer 3 See the unit s nameplate for the absolute minimum clearance between the unit and any combustible surface s IMPORTANT 1 Remove the Flue and Air Inlet Hood with gasket from the return air section of the unit The screws that attach the flue and air inlet hood will be installed in their proper location at the factory Therefore they must be removed and the...

Page 8: ...Inlet Hood with the gasket from the return air section of the unit The screws that attach the flue and air inlet hood will be installed in their proper location at the factory Therefore they must be removed and then used to attach the flue and air inlet hood 2 Remove the packaging material from the components and secure the Flue and Air Inlet Hood with the gasket to the unit with sheet metal screw...

Page 9: ... designed with a perimeter drip lip that is lower that the unit base bar see Figure 7 inset A 2 Position the unit drip lip down over and in contact with the outside corner of the curb as illustrated in Figure 8 insert A Continue to lower the unit on top d the curb with the unit drip lip astraddle and in contact with both the end and side rail of the curb The unit should now rest on top of the curb...

Page 10: ...t on the frame or roof curb Refer to Figures 9 or 10 5 Secure the unit to the frame or roof curb 6 Insulate any ductwork outside of the structure with at least two 2 inches of insulation and then weatherproof There must be a weatherproof seal where the duct enters the structure 7 Complete the installation according to the instructions in the following sections of this manual TYPICAL ROOFTOP APPLIC...

Page 11: ...al TYPICAL GROUND LEVEL APPLICATION YCX024 060G MODELS __ OUTDOOR AIR DISCHARGE SIDING I OUTDOOR AIR INTAKE FLUE HOOD EXTERIOR WALL INSULATE WEATHERPROOF FLEXIBLE DUCT ISOLATORS OR RAIN SHIELD CONNECTORS 1 PER CORNER AND 1 UNDER UNIT CONTROL BOX SUPPORT PAD FOUNDATION CONDENSATE DRAIN PiPiNG A 3 4 inch female NPT condensate drain connection is provided on the evaporator access panel end of the uni...

Page 12: ...watertight connection to prevent noise transmission from the unit to the ducts The flexible connection must be indoors and made out of heavy canvas NOTE Do not draw the canvas taut between the solid ducts i WEATHERPROOF UNIT THIS SEAM FLANGE FIELD DUCT DOWNFLOW The following warning complies with State of California law Proposition 65 kWARNING This product contains fiberglass wool insulation Fiber...

Page 13: ... 6 SP GR GAS i NOTE If this is an propane application consult your propane supplier for pipe sizes and deliveries GAS PRESSURE SET UP PRECAUTIONS WARNING NEVER USE AN OPEN FLAME TO TEST FOR GAS LEAKS AN EXPLOSION COULD OCCUR CAUSING INJURY OR DEATH IMPORTANT The furnace and its individual shut off valve must be disconnected from the gas supply piping system during any pressure testing of that syst...

Page 14: ... gas valve inlet boss connect the gas piping to the unit Check the completed piping for leaks using a soap and water solution or the equivalent 6 After installation of the gas pipe in the unit the pipe chase opening should be closed with the filler barrier plug pro vided MANIFOLD PRESSURE Check the manifold pressure at the unit gas valve Do not exceed the recommended pressure shown on the unit nam...

Page 15: ... Gas Flow CFH Chart Flow Reading 4 For 5 Cu Ft Dial Gas Flow CFH 10X Chart Flow Reading 4 6 Multiply the final figure by the heating value of the gas obtained from the utility company and compare to the nameplate rating This must not exceed the nameplate rating 7 Changes can be made by adjusting the manifold pressure a Attach a manifold pressure gauge b Remove the slot screw on top of the gas valv...

Page 16: ...T ROTATION Failure to change customer power leads to correct compressor rotation may result in compressor damage during operation OVER CURRENTPROTECTION The branch circuit feeding the unit must be protected as shown on the unit rating plate POWER WIRING The power supply lines must be run in weathertight conduit to the disconnect and into the bottom of the unit control box Provide strain relief for...

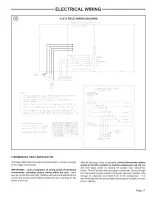
Page 17: ...ED E D N_ iALLEE RE J I I I i I I I I I L3C_zL L 61 1 1 i I i _ _ J 44Zx YI Y NIT iOL O F GE _EA ii iYPlCAL 9 SiAOE I ERMOt I_1 THERMOSTAT HEAT ANTICIPATOR The thermostat heat anticipators should be set to 4 amps on single or two stage thermostats IMPORTANT Upon completion of wiring check all electrical connections including factory wiring within the unit make sure all connections are tight Replac...

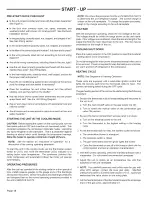
Page 18: ...compare them to the normal operating pressures provided in the unit s SERWCE FACTS NOTE Do not use the pressures from the unff s SERVICE FACTS to determine the unit refrigerant charge The correct charge is shown on the unit nameplate To charge the system accurately weigh in the charge according to the unit nameplate VOLTAGE With the compressor operating check the line voltage at the unit The volta...

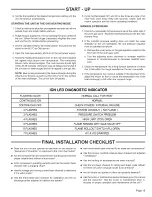
Page 19: ... s gas valve b Turn the adjusting screw clockwise to increase manifold pressure or counterclockwise to decrease manifold pres sure 3 Check the temperature rise during furnace operation to insure that it falls within the range specified on the unit nameplate 4 If the temperature rise noted is outside of the specified limits adjust the indoor air flow to cause the temperature rise d the heat exchang...

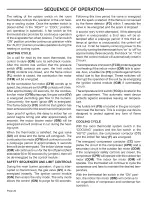
Page 20: ...de energized instantly The ignition control module IGN then enters the retry mode The retry mode allows the control IGN to purge for 60 seconds Following this time period the valve is energized and the spark is started If the flame is not sensed by the flame detector FD within 7 seconds the valve is de energized and the spark is stopped A second retry is then attempted If this attempt at ignition ...

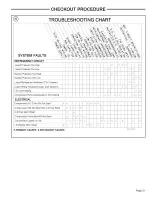
Page 21: ...TXV System Liquid Refrig floodback Cap Tube System I D Coil Frosting P P S Compressor Runs Inadequate or No Cooling S _ P S S P S ELECTRICAL Compressor O D fan Do Not Start P P S P P P Compressor Will Not Start But O D Fan Runs P S P P P g O D Fan Won t Start p p Compressor Hums But Wilt Not Start p Compressor Cycles on IOL P S I D Blower Won t Start P S P PRIMARY CAUSES S SECONDARY CAUSES P P P S...

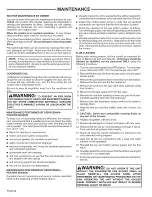
Page 22: ...ng season Visually inspect the unit to ensure that the airflow required for combustion and condenser coil is not obstructed from the unit Inspect the control panel wiring to verify that all electrical connections are tight and that the wire insulation is intact Check the operation of the gas ignition system as follows Turn off the gas supply with the unit operating to verify that the gas valve clo...

Page 23: ...and diagnosis calls are not included This limited warranty does not cover failure of your combination gas electric air conditioner if it is damaged while in your possession damage caused by unreasonable use of the combination gas electric air conditioner and or damage from failure to properly maintain the combination gas electric air conditioner as set forth in the Use and Care manual see Proper M...

Page 24: ...or s products covered under this warranty Warrantor shall not be obligated to pay for the cost of lost refrigerant No liability shall attach to Warrantor until products have been paid for and then liability shall be limited solely to the purchase price of the equipment under warranty shown to be defective THE WARRANTY AND LIABILITY SET FORTH HEREIN ARE IN LIEU OF ALL OTHER WARRANTIES AND LIABILITI...

Reviews: