CH
BEST PRACTICE OF MOUNTING
TALL FLOWERBED
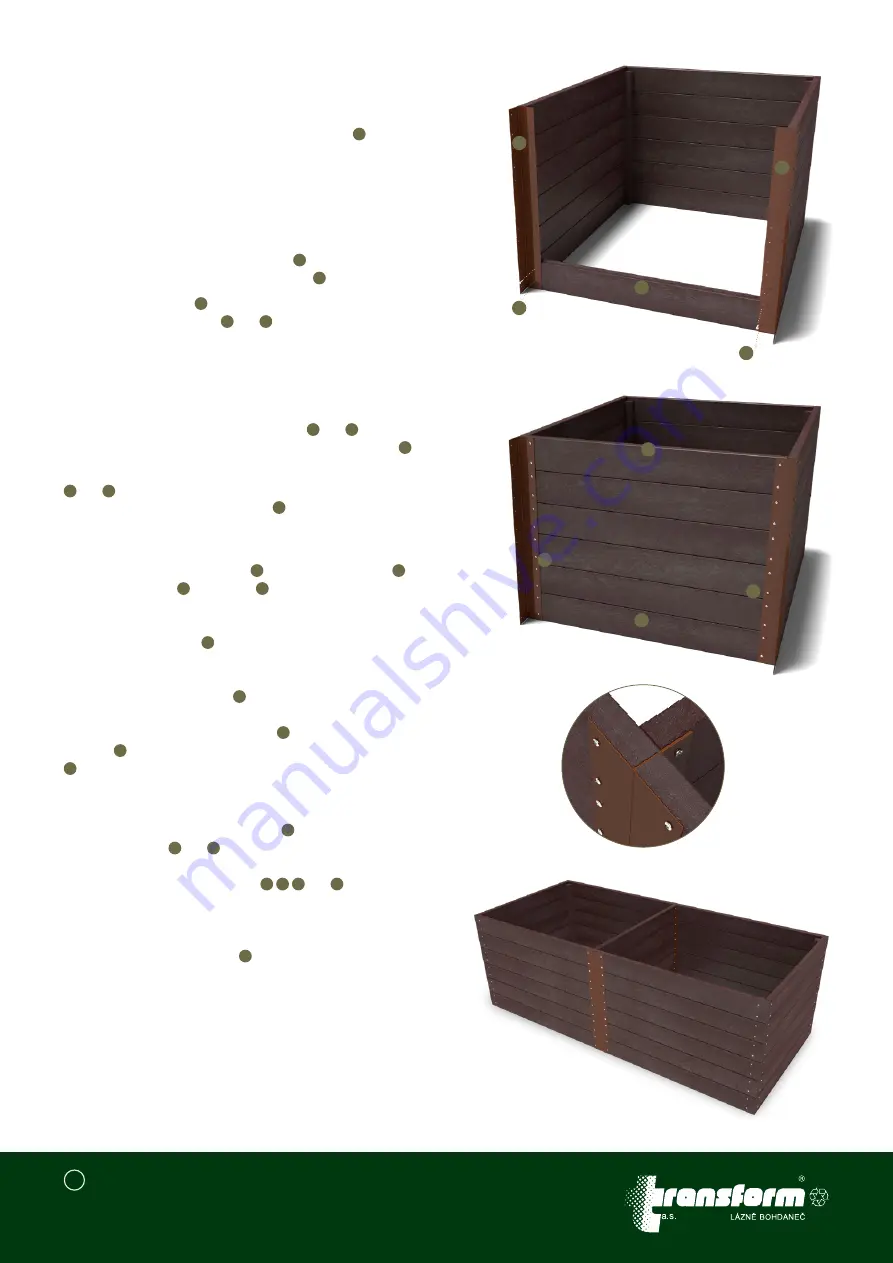
Put up the finished face and attach the decking board
2
as shown
in the Figure B. For the close-up detail on the corner, see the
Figure F. Predrill the holes for the screws (up to the joist again) in the
horizontal axis of the decking board so that they point to the middle
of the joist. We recommend you to horizontally set off the holes from
the top and bottom edges of the deck a little differently than on the
already assembled face so that screws avoid each other in the joist.
Gradually screw other four decking boards
2
one after the other and
end with the decking board without the spring
4
, see the Figure C.
Attach the metal corner
6
to the free end of the sidewall formed
by the longer decking boards
2
and
4
as shown in the Figure D. All
corners are identical with symmetrically pre-drilled holes and cannot
be confused when mounting. Push the corner to the decking boards
both from the front and from the side. Free end of the metal corner
is pointed at the inside of the future flowerbed - see the Figure D. We
recommend using clamps and fix the metal corner. On the basis of
the pre-drilled holes, drill the decking boards
2
and
4
with a 4 mm
diameter drill bit and screw the metal corn with twelve screws
8
.
Continue with mounting the second wall using the longer boards
2
and
4
in the same way as when mounting the opposite wall,
including ending with the metal corner
6
. Compare the result with
the Figure G, where the parting wall of the decking board 1 can
also be seen.
Prepare another two metal corners
6
and five decking boards
1
,
upper decking board
3
and screws
8
. Figure D shows how to attach
metal corners together, whose front sides must be in the plane so as
the pre-drilled holes on the adjacent areas face up with each other.
Attach the decking board
1
to the already attached corners from
the inside of the flowerbed and fix with the clamp on one side and,
after attaching and facing up the fourth metal corner, also on the
other side of the decking board
1
. This stage corresponds with the
Figure G. Drill the decking board through the pre-drilled holes in
metal corners and fasten it with screws
8
. Mount another decking
boarding
1
and end up the partition wall with the decking board
3
. Check continuously that the flowerbed does not fly open and
compare the result with the Figure H.
Continue with the walls of the second flowerbed chamber. Choose
one from free ends of the metal corners
6
and create a wall from
the decking boards
2
and
4
. Repeat the same procedure also on
the other side - see the picture detail CH. Assemble the second face
of the flowerbed using the elements
1
3
5
and
7
in the same
manner as you did with the first front face. Insert finished face
between free end of walls and fix with clamps, check the attachment,
pre-drill holes through the decking boards up to the joists and screw
them with the remaining screws
7
. We are done – see the Figure I.
The Tall Flowerbed Double Chamber is now ready for use.
1
1
3
8
8
8
8
6
6
G
H
I
ve
rs
io
n 1
1/
20
19 E
N
de
si
gn R
ed
ty
pe
TRANSFORM.EU
!
When working/assembling, use the protective equipment!
* The values given are for the flowerbed version in the size of 2400 × 1060 × 800 mm (width x depth x height). The number of pieces and their length vary according to the chosen size of the flowerbed.


