background image

IONPS-A, AC Power Module

12

Tech Support:  1-800-260-1312 – International:  00-1-952-941-7600 – (24 hours)

Maintenance — Continued

Replacing the fuse

CAUTION:  Ensure that the IONPS-A, AC Power Module has been disconnected from
the external power source and the ON/OFF switch is at  “0.” Failure to observe this
caution could result in damage or failure of the Power Module.

To replace the fuse in the IONPS-A, AC Power Module:

1. Ensure the ON/OFF switch on the Power Module is in the OFF position.

2. Disconnect the AC power cord from the external power source.

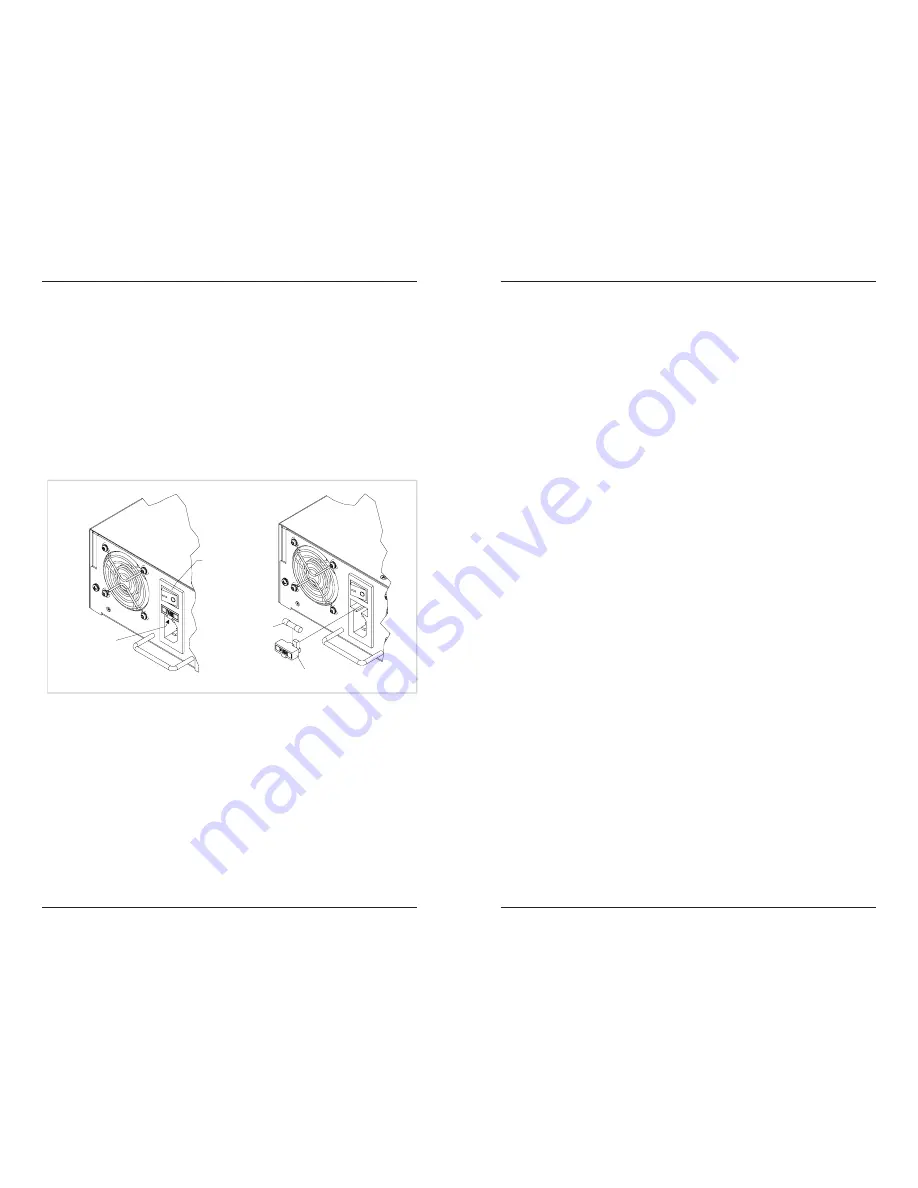
3.   Insert a small flat blade screwdriver into the groove on the front, inside edge of the

fuse holder, as shown in Figure 11A. 

4. Carefully pull the fuse holder from the Power Module. See Figure 11B.

Fuse 

Holder

Fuse 

Place Small Flathead

Screw Driver Here

(A )

(B )

Power ON/OFF
Switch

4. Remove the fuse from the fuse holder.

5. The replacement fuse MUST BE the same amperage and voltage rating.

6. Insert the fuse into the holder. 

7. Slide  the fuse holder fully into the Power Module.

8. Connect the power cord to Power Module and to the external power.

9. Push the power ON/OFF switch to the ON position.

Figures 11 A & B:  Replacing Fuse 

techsupport@transition.com – Click the “Transition Now” link for a live Web chat.

13

Technical Specification

For use with Transition Networks Model IONPS-A, AC Power Module.

Dimensions:

8.3" x 8.4" x 2.7" 

(211 mm x 211 mm x 69 mm)

Weight:

4 lb. 

(6.35 kg)

approximately

Power Input:

100-240 V, 47/63Hz, 2.35 – 1.1 Amp 

(typical with a fully-loaded chassis)

Voltage Tolerance:

± 10%

Low-Line Input Current:

3.5A max.

Inrush Current:

13A max. 

( peak starting current)

@ high line

Transient Recovery Time: 1ms  max.

Power Output:

12VDC at 16.67 Amp max.

Power Factor:  

>0.6 – 0.95, 10 to 100% load respectively

Fuse:

6.3 Amp/250 Volts  

MTBF:

Greater than 25,000 hours  

(MIL-HDBK-217F)

Greater than 68,750 hours 

(Bellcore7 V5.0)

Environment:

Operating temperature:

0 to 50°C 

(32 to 122°F )

Storage temperature:  

-25 to 70°C 

(-13 to 158°F)

Humidity:

5 to 90%, non condensing 

Warranty:

Lifetime

Summary of Contents for IONPS-A

Page 1: ...IONPS A AC Power Module User Manual 33423 A ...

Page 2: ...re and placed throughout this manual where appropriate CAUTION While installing or servicing the Power Module wear a grounding device and observe all electrostatic discharge precautions Failure to observe this caution could result in damage or failure of the Power Module WARNING Do not connect the Power Module to an external power source before installing it into the chassis Failure to observe thi...

Page 3: ...ION While installing or servicing the Power Module wear a grounding device and observe all electrostatic discharge precautions Failure to observe this caution could result in damage or failure of the Power Module Description continued Notices The IONPS A AC Power Module must be installed by qualified technical personnel only Transition networks assumes no responsibility for the improper installati...

Page 4: ... do the following Note The procedure is the same for installing the Power Module into either slot 1 Push the Power Module ON OFF switch to the OFF position See Figure 2 Power Module Switch OFF Position Figure 2 Power ON OFF Switch Installation Continued techsupport transition com Click the Transition Now link for a live Web chat 7 3 Remove the slot cover from the right chassis slot and keep the tw...

Page 5: ...2 Make sure that the Power Module ON OFF switch is in the OFF position See Figure 7 3 Plug the female end of the AC power cord into the AC power receptacle on the Power Module See Figure 7 4 Plug the male end of the AC power cord into the AC power source 5 Turn the power ON OFF switch to the ON position See Figure 7 Note Once the power ON OFF switch is in the ON position the power ON LED will lite...

Page 6: ...e Mounting Screws Power Module Chassis 4 Remove the two screws securing the Power Module to the chassis 5 Carefully pull the Power Module from the chassis See Figure 9 techsupport transition com Click the Transition Now link for a live Web chat 11 Figure 10 Power ON OFF Switch Maintenance Continued Installing the Power Module continued 6 Locate the new Power Module 7 Push the power ON OFF switch t...

Page 7: ...he same amperage and voltage rating 6 Insert the fuse into the holder 7 Slide the fuse holder fully into the Power Module 8 Connect the power cord to Power Module and to the external power 9 Push the power ON OFF switch to the ON position Figures 11 A B Replacing Fuse techsupport transition com Click the Transition Now link for a live Web chat 13 Technical Specification For use with Transition Net...

Page 8: ...national 00 1 952 941 7600 Transition Now Chat live via the Web with Transition Networks Technical Support Log onto www transition com and click the Transition Now link Web Based Seminars Transition Networks provides seminars via live web based training Log onto www transition com and click the Learning Center link E Mail Ask a question anytime by sending an e mail to our technical support staff t...

Page 9: ...ial environment This equipment generates uses and can radiate radio frequency energy and if not installed and used in accordance with the instruction manual may cause harmful interference to radio communications Operation of this equipment in a residential area is likely to cause harmful interference in which case the user will be required to correct the interference at the user s own expense Cana...

Reviews: