6
24-Hour Technical Support:
800-260-1312
-- International:
952-941-7600
SPS-1872-xx
GND
-
+
- +
_____
_
___
___
___
___
___
___
1
2
3
INPUT
POWER:
1
2
3
SPS-1872-xx
External Power Source
Installation
-- Continued
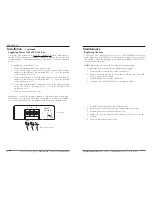
Supplying Power to the SPS-1872-xx
CAUTION: The power source MUST BE TURNED OFF when connecting it to
the SPS-1872-xx external power supply. Failure to observe this caution could
result in damage to, and subsequent failure of, the SPS-1872-xx and any attached
device.
To supply power to the SPS-1872-xx:
1.
Ensure that external power source is truned OFF.
2.
Connect the positive (+) terminal of the power source to the positive
terminal on the SPS-1872-xx
(marked with a “3”).
Turn the terminal
screw clockwise to secure it.
3.
Connect the negative (-) terminal of the power source to the negative
terminal on the SPS-1872-xx
(marked with a “2”)
. Turn the terminal
screw clockwise to secure.
4.
Connect the ground terminal of the power source to the ground terminal
on the SPS-1872-xx
(marked with a “1”).
Turn the terminal screw
clockwise to secure.
5.
Power on the external power source.
WARNING: The SPS1872 must be attached to a limited current circuit with a
non-hazardous energy level of less than 240VA and be located in a restricted
access area. Failure to observe this warning could result in an electrical shock.
techsupport@transition.com
-- Click the
“Transition Now”
link for a live Web chat.
7
Maintenance
Replacing the Fuse
CAUTION: The external power source MUST BE POWERED OFF when
replacing the fuse to the SPS-1872-xx external power supply. Failure to observe
this caution could result in damage to, and subsequent failure of, the SPS-1872-
xx and any attached device.
NOTE:
Replace the fuse only with one of the same size and rating.
To replace the fuse in the SPS-1872-xx external power supply:
1.
Ensure that the external power source is turned OFF.
2.
Remove and retain the four (4) screws that secure the cover to the SPS-
1872-xx external power supply.
3.
Carefully lift the cover from the SPS-1872-xx.
4.
Locate the fuse on the SPS-1872-xx
(see the picture below).
5.
Carefully remove the fuse the from the fuse holder.
6.
Install a same size and rating replacement fuse in the fuse holder.
7.
Carefully slide the cover onto the SPS-1872-xx.
8.
Replace the four (4) retained screws that secure the cover to the SPS-
1872-xx.
9.
Power on the external power source.


