background image

13

12

MEASUREMENT

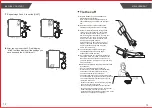
Tie the cuff

2~3cm

1.

4.

Hold your arm with your palm facing up and 

tie the cuff on your upper arm, then position 
the tube off-center toward the inner side of 
arm in line with the little finger. Or position the 
artery mark      over  the main artery (on the 
inside of your arm).  Note: Locate the main 
artery by pressing with 2 fingers 
approximately 2 cm above the bend of your 
elbow on the inside of your left arm. Identify 
where the pulse can be felt the strongest. 
This is your main artery.

The cuff should be snug but not too tight. 
You should be able to insert one finger 
between the cuff and your arm.

Remove all jewelry, such as watches and 
bracelets from your left arm.
Note: If your doctor has diagnosed you with 
poor circulation in your left arm, use your right 
arm.

Roll or push up your sleeve to expose the 
skin. Make sure your sleeve is not too tight.

2.

3.

5.

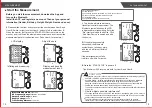
Sit comfortably with your tested arm resting on a 
flat surface. Place your elbow on a table so that 
the cuff is at the same level as your heart. Turn 
your palm upwards. Sit upright in a chair, and take 
5-6 deep breaths.

Rest for 5 minutes before first measuring.
Wait at least 3 minutes between measurements. 
This allows your blood circulation to recover.

The patient must relax as much as possible and do 
not move and talk during the measurement procedure.

For a meaningful comparison, try to measure under 
similar conditions. For example, take daily 
measurements at approximately the same time, on the 
same arm, or as directed by a physician.

6.

Take the measurement in a silent room.

The cuff should maintain at the same level as the 
right atrium of the heart.

Please sit comfortably. Do not cross your legs and 
keep your feet flat on the ground.
Keep your back against the backrest of the chair.

Helpful tips for Patients, especially for Patients with 
Hypertension:

Pul/min

MEMORY

TIME/DATE

S

M

START

STOP

Pul/min

MEMORY

TIME/DATE

S

M

START

STOP

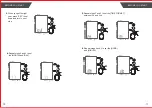
8

.After the unit is set,the LCD will display

“dOnE”first,then display all the settings you 
have done and then it will turn off.

7

.Repeat steps 2 and 3 to set the [UNIT].

Pul/min

MEMORY

TIME/DATE

S

M

START

STOP

BEFORE YOU START

START

STOP

Summary of Contents for TMB-1490-BS

Page 1: ...490 BS Please do read the user manual carefully and thoroughtly so as to ensure the safe usage of this product and keep the manual well for further reference in case you have problems version 1 0 Guan...

Page 2: ...ords Delete the Records INFORMATION FOR USER 18 Tips for measurement Maintenances ABOUT BLOOD PRESSURE 20 What are systolic pressure and diastolic pressure What is the standard blood pressure classifi...

Page 3: ...rd and using Measurement Principle This product uses the Oscillometric Measuring method to detect blood pressure Before every measurement the unit establishes a zero pressure equivalent to the air pre...

Page 4: ...high frequency HF surgical equipment at the same time CAUTION Warning This device is not AP APG equipment Do not use the device where flammable anesthetic are present or in environments mixture with...

Page 5: ...t three records Bluetooth icon The bluetooth icon blinks when the bluetooth is working Pulse in beats per minute Pulse display Deflation symbol The cuff is deflating Indicate it is in the memory mode...

Page 6: ...t use different types of batteries together Do not dispose the batteries in fire Batteries may explode or leak Remove batteries if the device is not likely to be used for some time Worn batteries are...

Page 7: ...right year press SET to set down and turn to next step 4 Repeat steps 2 and 3 to set the MONTH and DAY 5 Repeat steps 2 and 3 to set the TIME FORMAT between 12h and 24h Pul min MEMORY TIME DATE S M ST...

Page 8: ...that the cuff is at the same level as your heart Turn your palm upwards Sit upright in a chair and take 5 6 deep breaths Rest for 5 minutes before first measuring Wait at least 3 minutes between meas...

Page 9: ...nd it will finish the whole measurement save and transmit the measurement data for the desired user Take User A for example Install the APP and register an account Then set your personal information G...

Page 10: ...min MEMORY TIME DATE S M START STOP Recall the Records 2 Press the MEM or SET to get the record you want The most recent record 1 is shown first Each new measurement is assigned to the first 1 record...

Page 11: ...ase Avoid dusty and unstable temperature environment Do not attempt to clean the reusable cuff with water and never immerse the cuff in water Tips for Measurement Within 1 hour after dinner or drinkin...

Page 12: ...r Heartbeat Detector CAUTION The appearance of the IHB icon indicates that a pulse irregularity consistent with an irregular heart beat was detected during measurement Usually this is NOT a cause for...

Page 13: ...e measurement Relax for a moment and then measure again Relax for a moment and then measure again The measurement process does not detect the pulse signal Loosen the clothing on the arm and then measu...

Page 14: ...re operating normally Warning Use of accessories transducers and cables other than those specified or provided by the manufacturer of this equipment could result in increased electromagnetic emissions...

Page 15: ...ngle phase at 0 0 UT 250 300 cycle Conduced RF IEC61000 4 6 3 V 0 15 MHz 80 MHz 6 V in ISM and amateur radio bands between 0 15 MHz and 80 MHz 80 AM at 1 kHz 3 V 0 15 MHz 80 MHz 6 V in ISM and amateur...

Page 16: ...led and used in accordance with the instructions may cause harmful interference to radio communications However there is no guarantee that interference will not occur in a particular installation If t...

Reviews: