background image

-2-

II. RECEIPT INSPECTION

All Traulsen products are factory tested for performance 
and are free from defects when shipped.  The utmost care 
has been taken in crating this product to protect against 
damage in transit.  

You should carefully inspect your unit for damage during 
delivery.  If damage is detected, you should save all the 
crating materials and make note on the carrier’s Bill Of 
Lading describing the damage.  A freight claim should be 
filed immediately.  If damage is subsequently noted during 
or immediately after installation, contact our customer care 
team to file a freight claim.  There is a fifteen (15) day limit 
to file freight damage with the carrier.  Under no condition 
may a damaged unit be returned to Traulsen without first 
obtaining written permission (return authorization).  

You 

may contact Hobart/Traulsen customer care at 800-

333-7447 to request a return or file a claim.

III. a-LOCATION:

Select a proper location for your unit, away from extreme 
heat or cold.  Allow enough clearance between the unit 
and the side wall in order to make use of the door stay 
open feature at 120

0

 (self-closing feature operates up to 

90

0

).  The door must be able to open a minimum of 90

0

 in 

order to make use of the maximum clear door width.  Al-
low a minimum of 12 inches (high) above the cabinet for 
proper air circulation.

III. b-PACKAGING:

Your Traulsen unit is shipped from the factory bolted to a 
sturdy wooden pallet in stretch wrapped material.

Most exterior stainless steel surfaces have a protective  
vinyl covering to prevent scratching during manufactur-
ing, shipping and installation.  After the unit is installed in 
place of application  peel, remove and discard the covering 
from all surfaces.

To remove the wooden pallet, first if at all possible, we 
suggest that the cabinet remain bolted to the pallet dur-
ing all transportation to the point of final installation.  The 
bolts can then be removed with a 1/2” socket wrench.  
Avoid laying the unit on its front, side or back for removal 
of the pallet.

NOTE: 

Traulsen does not recommend laying the unit on 

its front, side or back.  If you must, please allow the unit to 
remain in an upright position for 24 hours before plugging it 
in so that the compressor oils and refrigerant may settle.


III. INSTALLATION

III. INSTALLATION (cont’d)

III. c-INSTALLING/ADJUSTING LEGS OR

        CASTERS:

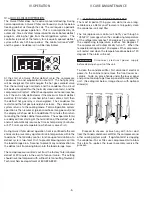
To install legs or casters, slide leg or caster into the caster chan-
nel from the side of the unit without the refrigeration system.  

To adjust the legs or casters, loosen the two bolts and move 
leg or caster to desired location, spacing between leg or caster 
not to exceed 39 inches.  Leg or caster on each end of the unit 
can not exceed 8 inches from the end of the cabinet. 

NOTE:

 Traulsen recommends to position legs or casters under 

the mullion when possible. 

III. d-CORD & PLUG:

All self-contained models are shipped standard with a NEMA 
5-15P plug and 9 foot cord .  Select only a dedicated electrical 
outlet for power source.

                       Do not cut or remove the round grounding    

prong from the plug. Do not use an extension cord.

III. e-POWER SUPPLY:

The supply voltage should be checked prior to connection to 
be certain that proper voltage for the cabinet wiring is available 
(refer to the serial tag to determine correct unit voltage, see 
page 1).  Make connections in accordance with local electrical 
codes.  Use qualified electricians.

Use of a separate, dedicated circuit is required.  Size wiring 
to handle indicated load and provide necessary over current 
protector in circuit (see amperage requirements on the unit’s 
serial tag).

BOLT

CASTER CHANNEL

CASTER PLATE

Summary of Contents for TU048QC

Page 1: ...record file with the service department In the event of any future questions you may have please refer to the model and serial number found on the name tag affixed to the unit Should you need service call us on our toll free number 800 825 8220 between 7 30 am 4 30 pm CST Monday thru Friday You may also log onto www traulsen com for further information It is our pleasure to help and assist you in ...

Page 2: ...ess Page 8 f Service Parameters Page 9 g Adjusting Thermostat Set Point High Page 9 h Adjusting Thermostat Set Point Low Page 10 i Changing The Temperature Scale Page 10 j Setting The 24 Hour Clock Page 11 k Setting The Date Page 12 l Setting Daylight Savings Time Page 12 m Starting A Manual Defrost Page 13 n Setting Defrost Lockouts Page 14 o Adjusting The Door Drawer Perimeter Heaters Page 15 p ...

Page 3: ...m all surfaces To remove the wooden pallet first if at all possible we suggest that the cabinet remain bolted to the pallet dur ing all transportation to the point of final installation The bolts can then be removed with a 1 2 socket wrench Avoid laying the unit on its front side or back for removal of the pallet NOTE Traulsen does not recommend laying the unit on its front side or back If you mus...

Page 4: ...heat is confined to the coil enclosure to prevent any significant rise in temperature within the food zone The fan delay control function upon termination of a defrost cycle is two fold First to prevent blowing warm air into the food storage area Second to prevent any condensation on the defrost coil from being blown into the food storage area The microprocessor control is set from the factory to ...

Page 5: ...should be cleaned with warm wa ter mild soap and a soft cloth Apply with a dampened cloth and wipe in the direction of the metal grain Avoid the use of strong detergents and gritty abrasive cleaners as they may tend to mar and scratch the sur face Do NOT use cleansers containing chlorine such as bleach this may promote corrosion of the stainless steel Care should also be taken to avoid splashing t...

Page 6: ...eak kitchen use Note The 24 hour clock must be set for this feature to operate correctly 5 Communication Ability A NAFEM Data Protocol NDP compliant RS 485 serial communications port is available to interface with data collec tion software by others All microprocessor control equipped models are capable of communicating within a NAFEM Data Protocol network if provided with an optional Gateway Hub ...

Page 7: ... will sound again and an additional Call Service message will display Possible Causes No product in unit Failed sensors Stuck Evaporator Relay Loss Of Power The audible alarm will sound and the display will read ELE LOS when the unit regains power after an outage To turn off the audible alarm and or clear the visual text press the alarm cancel button Condenser Clean The audible alarm will sound an...

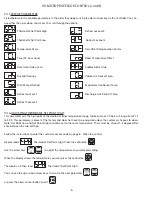
Page 8: ... back to displaying the cabinet temperature If you enter the wrong security code the controller will revert back to displaying the cabinet temperature You can exit the parameters at any time by pressing the alarm cancel button or by waiting 20 30 seconds FREEZER SET INTELA TRAUL F C GREEN SNOWFLAKE ICON SET BUTTON UP BUTTON DOWN BUTTON ALARM CANCEL BUTTON RED ALARM LIGHT 0 F LED 0 C LED LED DISPLA...

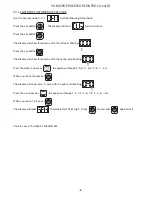
Page 9: ...ow three zeros with the center zero flashing Press the down arrow key to sequence through F E d C b A 9 8 7 etc When you reach A press set The display will show zero A zero with the right zero flashing Press the up arrow key to sequence through 1 2 3 4 5 6 7 8 9 A b etc When you reach 1 press set The display will read Thermostat Set Point High Press to view and again to exit You are now in the SER...

Page 10: ...he display shows the temperature you want press the set button The display will then read Thermostat Set Point High You can use the up or down arrow keys to scroll to the next parameter or press the alarm cancel button to exit VII MICROPROCESSOR CONTROL cont d 9 Listed below are the available parameters in the order they appear using the down arrow key on the controller You can use either the up o...

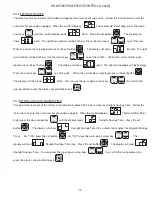
Page 11: ...tting When the display shows the temperature you want press the set button The display will then read Thermostat Set Point Low You can use the up or down arrow keys to scroll to the next parameter or press the alarm cancel button to exit VII i CHANGING THE TEMPERATURE SCALE The temperature scale determines if the temperature displayed will be in degrees Fahrenheit or degrees Celsius Follow the ins...

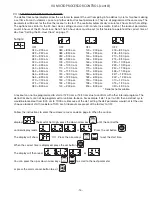
Page 12: ... 10 00 p m H05 5 00 a m H11 11 00 a m H17 5 00 p m H23 11 00 p m H06 6 00 a m H12 12 00 p m H18 6 00 p m H24 12 00 a m Follow the instructions to enter the customer access code on page 8 When the control displays Thermostat Set High press the down arrow key until the control display reads Clock Press the set button The display will show Hours The right two numbers will be flashing Use the arrow ke...

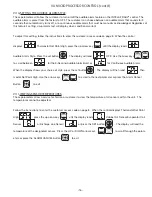
Page 13: ... When the correct day is displayed press the set button The display will then read Date You can use the up or down arrow keys to scroll to the next parameter press the alarm cancel button to exit VII l SETTING DAYLIGHT SAVINGS TIME This parameter is preset at the factory to automatically adjust the 24 hour clock for Daylight Savings Time Follow the instructions to enter the customer access code on...

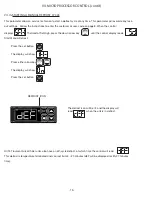
Page 14: ...al Defrost Press the set button The display will show Press either arrow key The display will show Press the set button VII MICROPROCESSOR CONTROL cont d 13 VII m STARTING A MANUAL DEFROST CYCLE SET SET NOTE Traulsen Quick Chiller units also have an off cycle defrost at which time the control will read This defrost is temperature terminated and can last from 3 20 minutes dEF will be displayed for ...

Page 15: ... p m 060 6 00 a m 120 12 00 p m 180 6 00 p m 240 12 00 a m 063 6 30 a m 123 12 30 p m 183 6 30 p m 243 12 30 a m 070 7 00 a m 130 1 00 p m 190 7 00 p m 010 1 00 a m 073 7 30 a m 133 1 30 p m 193 7 30 p m 013 1 30 a m 080 8 00 a m 140 2 00 p m 200 8 00 p m 020 2 00 a m Denotes not available A lockout can not be programmed to start at 12 00 am or 12 30 am due to conflicts with other internal program...

Page 16: ...he alarm cancel button to exit 15 VII MICROPROCESSOR CONTROL cont d SET SET VII o ADJUSTING THE DOOR DRAWER PERIMETER HEATERS This parameter allows the customer to turn ON and OFF the anti condensate door drawer perimeter heaters This parameter is set to the highest setting 100 at the factory so that the door drawer heaters stay on continuously If you choose to have the door drawer heaters cycle o...

Page 17: ...e audible alarm feature on the INTELA TRAUL control The audible alarm is preset from the factory to OFF The customer can choose between an audible alarm that sounds for 3 seconds then automatically turns off or a continuous audible alarm that must be manually acknowledged Regardless of this feature s setting visual alarm text will display when conditions warrant To adjust this setting follow the i...

Page 18: ... 17 VIII WIRING DIAGRAM NOTE Refer to the wiring diagram below for any service work performed by a qualified technician ...

Page 19: ... to speak to service support for Traulsen and most Hobart Refrigeration units please contact our Ft Worth facility by phone at 800 825 8220 or fax to 817 740 6748 parts fax or 817 740 6757 service fax To source parts locally follow instructions below for nearest location 1 Log onto www traulsen com 2 Select Service Directory top of screen 3 Select Locate Parts left side of screen 4 Click on State ...

Page 20: ...LSEN S discretion F O B factory any part of said control which proves to be defective Inspection by the TRAULSEN Service Department of parts claimed defective shall be final in determining warranty status The warranty is to include repair or exchange of any defective In Warranty control or part s of said control for Part s Any TRAULSEN microprocessor control supplied part s found to be defective L...

Page 21: ...GED LEFT SK 200 60593 00 DOOR ASSEMBLY HINGED RIGHT SK 200 60593 01 DOOR GASKET 341 60197 00 DRAWER DRAWER ASSEMBLY SK 550 10108 00 DRAWER FACE ASSEMBLY SK 550 10114 00 DRAWER FRAME ASSEMBLY SK 550 10104 00 DRAWER FRAME INSERT SER 60553 00 DRAWER GASKET 341 60176 07 DRAWER ROLLER 344 60155 00 SHELF CHROME SHELF 340 60230 01 TRAYSLIDE UNIVERSAL TRAYSLIDE 340 60240 00 LOUVER LOUVER PANEL SK 500 7009...

Page 22: ...NOTES ...

Page 23: ...NOTES ...

Page 24: ...ERATION Monday thru Friday 7 30 am 4 30 pm CST Quality Refrigeration 2015 Traulsen All Rights Reserved Traulsen 4401 Blue Moud Road Fort Worth TX 76106 Phone 800 825 8220 Fax 817 740 6757 Website www traulsen com ...

Reviews: