1 4
Installation
(for qualified installers only)
Travis Industries
4 0 1 1 0 2 5
9 3 5 0 8 1 0 4
Manifold Removal and Installation
•
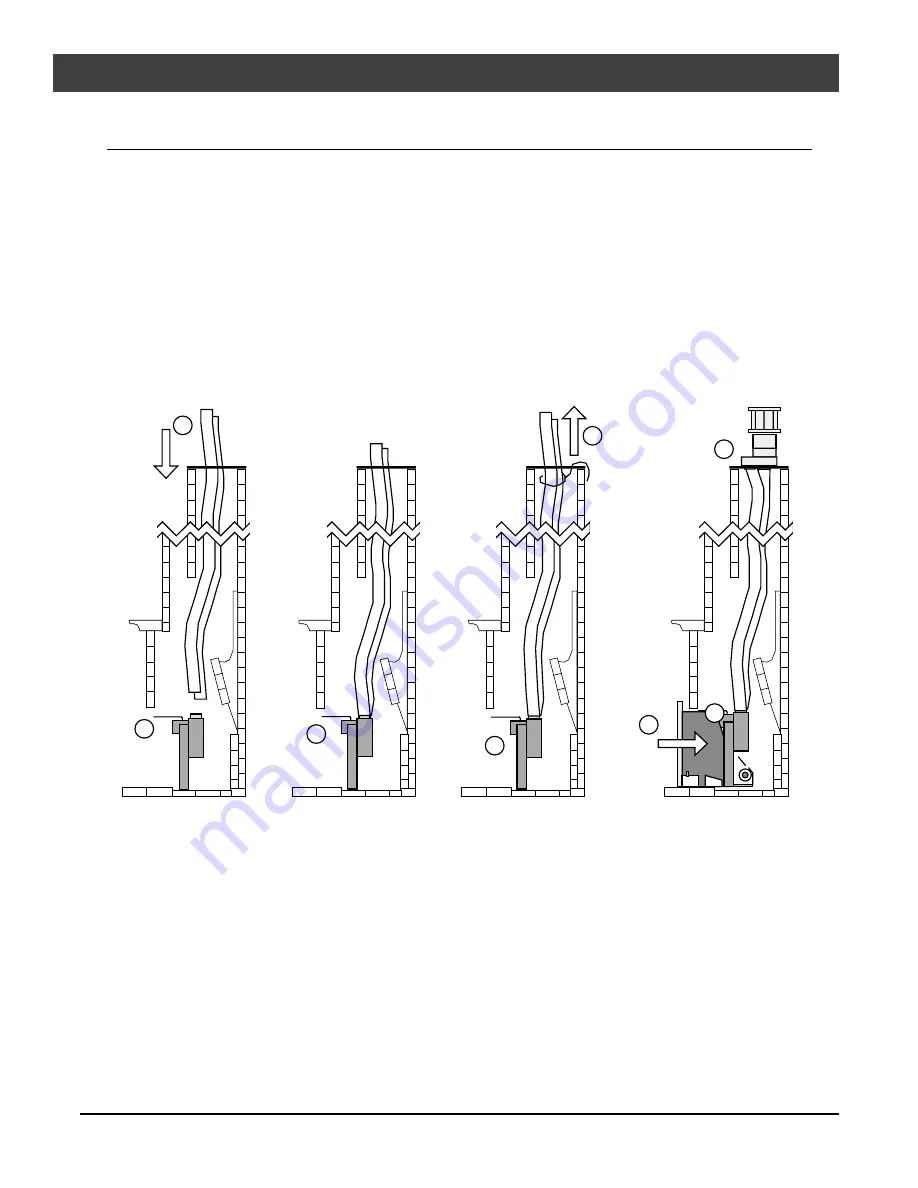
The manifold is shipped attached to the insert, but may be removed to facilitate especially tight
installations. See the directions below for installation.
1
Remove the manifold and place it within the fireplace (see the instructions on the following page).
2
Route the flex vent through the chimney from above (leave an extra 3' (914 mm) at the top).
3
Attach the flex vent to the manifold (seal with silicone and attach with screws).
4
Place the manifold in an upright position (so it rests on the manifold legs) and have a partner pull on
the excess flex vent. Temporarily attach the flex vent to the top of the chimney (leave extra slack).
5
Slide the insert into place, guiding the convection top over the insert until fully in place.
6
After removing any slack from the flex vent, attach the manifold to the appliance.
7
Remove any excess slack in the flex line then attach the vent termination.
4
AAA
AAA
AAA
AAA
AAA
AAA
AAA
AAA
AAA
AAA
AAA
AAA
AAAA
AA
A
AA
AA AA
AA
AA
AA
AA
AA
AA
AA
AA
AA
AA
AA
AA
AA
AA
AA
AA
AA
AA
AA
AA
AA
AA
AA
AA
AA
AA
AA
A
A
A
A
A
A
AA
AA
AA
AA
AA
AA
AA
AA
AA
AA
AA
AA
AA
AA
AA
AA
AA
AA
AA
AA
AA
AA
AA
AA
AA
AA
AA
AA
AA
A
A
AA
AA
AA
AAA
AAA
AAA
AAA
AAA
AAA
AAA
AAA
AAA
AAA
AAA
AAA
AAA
AA
AA
AA
AA
AA
AA
AA
AA
4
A
A
A
A
A
A
AA
AA
AA
AA
AA
AA
AA
AA
AA
AA
AA
3
AA A
AA
AA
AA
AA
A
A
A
A
A
A
A
A
A
A
A
A
A
A
A
A
A
A
A
A
A
A
A
A
A
A
A
A
A
A
A
A
A
A
AA
AA
AA
AA
AA
AA
AA
A
A
A
A
A
A
A
A
A
A
A
A
A
A
A
A
A
A
A
A
A
A
A
A
A
A
A
AA
AA
AA
AA
AA
AA
AA
AA
AA
AA
AA
AA
A
A
A
A
A
A
A
A
AA
AA
AA
AA
AA
AA
AAA
AAA
AAA
AAA
AAA
AAA
AAA
AAA
AAA
AAA
AAA
AAA
AAAA
AA
A
AA
AA AA
AA
AA
AA
AA
AA
AA
AA
AA
AA
AA
AA
AA
AA
AA
AA
AA
AA
AA
AA
AA
AA
AA
AA
AA
AA
AA
AA
A
A
A
A
A
A
AA
AA
AA
AA
AA
AA
AA
AA
AA
AA
AA
AA
AA
AA
AA
AA
AA
AA
AA
AA
AA
AA
AA
AA
AA
AA
AA
AA
AA
AA
AA
AA
AA
AA
AA
AA
AA
AA
AA
AA
AA
AA
AA
AA
AA
AA
AA
AA
AA
AA
AA
AA
AA
AA
2
1
A
A
A
A
A
A
5
7
AAA
AAA
AAA
AAA
AAA
AAA
AAA
AAA
AAA
AAA
AAA
AAA
AA
AA
AA
AA A
A
A
A
A
A
A
A
A
A
A
A
A
A
A
A
A
A
A
A
A
A
A
A
A
A
A
A
A
A
A
A
A
A
AA
AA
AA
AA
AA
AA
AA
AA
AA
AA
AA
AA
AA
AA
AA
AA
AA
AA
AA
AA
AA
AA
AA
A
A
A
AA
AA
AA
AA
AA
AA
AA
AA
AAA
AAA
AAA
AAA
AAA
AAA
AAA
AAA
AAA
AAA
AAA
A
A
A
A
AA
AA
AA
AA
A
A
A
A
A
A
6
A
A
AA
AA
A
A
A
A
Summary of Contents for DVL Insert
Page 2: ......


