background image


Installation 

(for qualified installers only)


17 

© Travis Industries 

4121120 

100-01315 

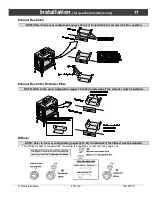
Exhaust Restrictor 

NOTE: Refer to the vent configuration (pages 18 to 23) to determine the correct restrictor position. 


Exhaust Restrictor Extender Plate 

NOTE: Refer to the vent configuration (pages 18 to 23) to determine if the extender must be installed. 


Diffuser 

NOTE: Refer to the vent configuration (pages 18 to 23) to determine if the diffuser must be adjusted. 


The diffuser is best accessed while  converting the appliance to rear vent  (see page  10). 


Summary of Contents for Lopi Northfield GS2

Page 1: ... not use any phone in your building Immediately call gas supplier from a neighbor s phone Follow the gas supplier s instructions If you cannot reach your gas supplier call the fire department Installation and service must be performed by a qualified installer service agency or the gas supplier This appliance may be installed in an aftermarket permanently located manufactured home USA only or mobil...

Page 2: ...Northfield Stove has the same serial number as yours The serial number is on the listing plate chained to the gas control valve This serial number will be needed in case you require service of any type Model Lopi Northfield GS2 Serial Number Purchase Date Purchased From Mail your WarrantyCard Today and Save Your Bill of Sale To receive full warranty coverage you will need to show evidence of the d...

Page 3: ...n with Horizontal Termination 23 Vent Termination Requirements see illustration below 24 Class A Chimney Conversion Kit top vent configuration only 25 Interior Masonry Chimney Conversions top vent configuration only 26 Steps for Finalizing the Installation 27 Air Shutter Adjustment 28 Face and Glass Removal 29 Log Installation 31 Rear Log Placement 31 Left Log Placement 32 Right Log Placement 32 L...

Page 4: ...afety hazard Direct questions about the type of fuel used to your dealer Check for a label on the flame adjust knob on the gas control valve this is the best place to check You may also check for a label on the gas control valve body Contact your local building officials to obtain a permit and information on any installation restrictions or inspection requirements in your area Notify your insuranc...

Page 5: ...ly turn the gas off at the gas control valve and call your dealer for service Instruct everyone in the house how to shut gas off to the appliance and at the gas main shutoff valve The gas main shutoff valve is usually next to the gas meter or propane tank and requires a wrench to shut off This unit is not for use with solid fuel Do not place anything inside the firebox except the included fiber lo...

Page 6: ...l or Mobile Home Straight or Corner Placement Bedroom Approved Heating Specifications Approximate Heating Capacity in square feet 500 850 with Blower 500 to 650 Without Maximum Input in BTUs 22 000 Heating capacity will vary depending on the home s floor plan degree of insulation and the outside temperature Dimensions Weight Electrical Specifications including optional blower Electrical Rating 120...

Page 7: ...al gas or propane LP All exhaust gases must be vented outside the structure of the living area Combustion air is drawn from outside the living area structure Notify your insurance company before hooking up this stove The requirements listed below are divided into sections All requirements must be met simultaneously The order of installation is not rigid the qualified installer should follow the pr...

Page 8: ...ng List Propane Conversion Kit Log Set Touch Up Paint Batteries 4 AA and 1 9v Rear Vent Flue Cover Intake Damper Plates 2 Exhaust Restrictor Extender Plate Additional Items Required Vent see Venting Requirements for details Gas Line Equipment shutoff valve pipe etc Installation Overview ...

Page 9: ...nsure the vent does not intersect with a framing member Fumes and smoke from the paint curing and oil burning off the steel may occur the first time you start this heater This is normal Werecommend you open windows to vent the room Stove Clearances NOTE If using the rear vent configuration you will require approximately 8 1 2 to the rear of the stove for the vent adapter and thimble See page 18 fo...

Page 10: ...netic tipped nutdriver on these screws take care to prevent the screws from falling into the intake channel Remove the diffuser Before Stock Position 1 After Position 2 DIFFUSER SIDE VIEW Bend the round portion of the diffuser so it is bent position 2 Replace the diffuser ADJUSTING THE DIFFUSER ON THE INNER FLUE ASSEMBLY Rear vent configurations with no rise require the diffuser to be bent to the ...

Page 11: ...Installation for qualified installers only 11 Travis Industries 4121120 100 01315 Top to Rear Vent Modification continued ...

Page 12: ...ling returns to 7 2134mm The alcove must be at least 28 1 4 718mm wide The heater must not be placed so the vents below or above the door along the sides of heater or along the back of the heater can become blocked This heater may be placed in a bedroom Please be aware of the large amount of heat this appliance produces when determining a location Floor Protection Requirements When the stove is in...

Page 13: ...witch or thermostat Warning Make sure all wiring is secure and does not contact hot or moving components The wall switch or thermostat may bypass the fireplace on off switch or be installed in parallel or series configuration see below Parallel Connection Series Connection On Off Switch ON On Off Switch OFF On Off Switch ON On Off Switch OFF Thermostat External Switch ON Heater is ON Heater is ON ...

Page 14: ...g the heater The location of the gas inlet is shown below A manual shutoff valve is required for installation it must be located within 3 of the heater T Handle gas cocks are required in Massachusetts in compliance with code 248CMR This stove is shipped with a 16 long 3 8 diameter flex gas line attached to an elbow on the gas control valve see illustration below for location The flex accepts a 3 8...

Page 15: ...ested at altitudes ranging from sea level to 6 000 feet 1 800 M In this testing we have found that the heater with its standard orifice burns correctly with just an air shutter adjustment Approved Caps Always use the high wind cap the sconce cap is not approved for this stove Approved Vent Use Simpson Dura Vent Direct Vent Pro or GS Other vent may be approved with this stove Check with the vent ma...

Page 16: ... dampers and extender plate Refer to the vent configuration pages 18 to 23 to determine the correctrestrictor damper extender and diffuser settings Intake Restrictor NOTE Refer to the vent configuration pages 18 to 23 to determine the correct restrictor position Intake Damper Plates NOTE Refer to the vent configuration pages 18 to 23 to determine if these plates must be installed Two intake damper...

Page 17: ...mine the correct restrictor position Exhaust Restrictor Extender Plate NOTE Refer to the vent configuration pages 18 to 23 to determine if the extender must be installed Diffuser NOTE Refer to the vent configuration pages 18 to 23 to determine if the diffuser must be adjusted The diffuser is best accessed while converting the appliance to rear vent see page 10 ...

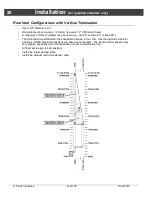
Page 18: ...1 45 elbow may be used between horizontal sections Diffuser must be set to closed 2 position Intake restrictor set to 1 stock Exhaust restrictor must be set to the 1 stock position except for LP extended vent configurations remove the exhaust restrictor and replace the screws Do not install the intake damper plate or exhaust restrictor extender plates Corner Installations 6 5 8 to 8 Adapter High W...

Page 19: ...um of one 1 45 or 90 horizontal elbow may be used see illustration The termination must fall within the shaded area shown in the chart Use the indicated restrictor positions NOTE Restrictor positions are based upon lab tests The ideal restrictor position may vary slightly especially when the termination is near a demarcation line Diffuser set to open stock position Do not install the intake damper...

Page 20: ...ree 3 elbows may be used e g one 90 and two 45 or three 90 The termination must fall within the shaded area shown in the chart Use the indicated restrictor positions NOTE Restrictor positions are based upon lab tests The ideal restrictor position may vary slightly especially when the termination is near a demarcation line Diffuser set to open stock position Install the intake damper plate Install ...

Page 21: ... vent the appliance through a code conforming masonry or metal zc stove All clearances to combustibles must be met and the flex vent must be vented through a non combustible stove chimney Use a high wind termination cap Vent height must be a minimum 10 and maximum 25 Diffuser must be set to closed 2 position Intake and exhaust restrictor must be set to the 1 stock position Do not install the intak...

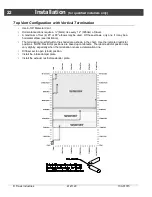
Page 22: ...y be used Of these elbows only one 1 may be a horizontal elbow see illustration The termination must fall within the shaded area shown in the chart Use the indicated restrictor positions NOTE Restrictor positions are based upon lab tests The ideal restrictor position may vary slightly especially when the termination is near a demarcation line Diffuser set to open stock position Install the intake ...

Page 23: ...may be used Of these elbows only one 1 may be a horizontal elbow see illustration The termination must fall within the shaded area shown in the chart Use the indicated restrictor positions NOTE Restrictor positions are based upon lab tests The ideal restrictor position may vary slightly especially when the termination is near a demarcation line Diffuser set to open stock position Do not install th...

Page 24: ...the floor NOTE Clearance in accordance with local installation codes and the requirements of the gas supplier G Minimum 48 1219mm clearance from any adjacent building H Minimum 84 2134mm clearance above any grade when adjacent to public walkways or driveways NOTE may not be used over a walkway or driveway shared by an adjacent building I Minimum 9 229mm clearance to any nonmechanical air supply in...

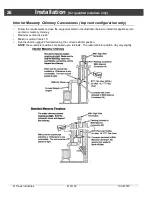
Page 25: ...correct position based upon the vertical rise height see the chart on page 22 The conversion kit does not work on interior masonry chimneys Chimney Conversion Kit A 931 Metalbestos 6 I D Security Chimneys 6 I D Jackes Evans 6 I D Hart Cooley 6 I D Pro Jet 6 I D Chimney Conversion Kit B 932 Simpson Dura Vent 6 I D Air Jet 6 I D Metal Fab 6 and 7 I D Amer Metals 6 7 I D Metalbestos 7 and 8 I D Jacke...

Page 26: ... requirements and use the equipment listed in the illustration below to install this appliance into an interior masonry chimney Maximum vertical rise is 40 Minimum vertical rise is 10 See the chart on page22 for determining the correctrestrictor position NOTE these restrictor positions are based upon lab tests The ideal restrictor position may vary slightly ...

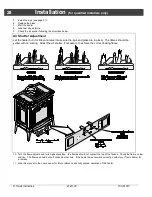
Page 27: ...ted once it enters the firebox ensuring gas does not build up 3 Make sure the accent light bulb is in place NOTE Take care to not touch the bulb with your fingers use a cloth or paper towel 4 Install the four AA batteries included in the owner s pack into battery holder see the illustration below The AA batteries act as a power backup in case the household AC power goes out Install the 9v battery ...

Page 28: ... logs and glass are in place The flames should be yellow with no sooting Adjust the air shutter if necessary to achieve the correct looking flame 10 Turn the flame adjust knob to its highest position the flames should not contact the top of the firebox Check the flame on low position The flames should burn off of each burner hole If the heater does not work correctly contact your Travis dealer for...

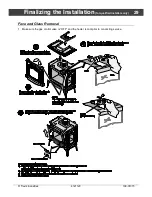
Page 29: ...lizing the Installation for qualified installers only 29 Travis Industries 4121120 100 01315 Face and Glass Removal Make sure the gas control valve is OFF and the heater is cool prior to conducting service ...

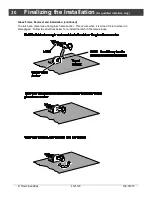
Page 30: ...ravis Industries 4121120 100 01315 Glass Frame Removal and Installation continued The latch can come loose from glass frame anchor This occurs when it is turned 1 4 turn when it is disengaged Follow the directions below to re install the latch if it becomes loose ...

Page 31: ...or failure to use only parts specifically approved with this appliance may result in property damage or personal injury If using propane LP convert the appliance before installing the logs see page 44 The burner must be correctly positioned before installing the logs Make sure the burner is fully seated and the pilot is properly aligned See page 44 for details on burner removal Rear Log Placement ...

Page 32: ...e hole and one elevated pad on the bottom Place the log so the pin on the burner inserts into the holes on the log and the pad inserts over the screw on the burner see photos below Right Log Placement The right log has two holes on the bottom Place the log so the two pins on the burner insert into the holes on the log see photos below ...

Page 33: ...o below The bottom of the twig has two holes Place the twig so the pins on the rear and left log insert into the holes on the twig Right Twig Placement The right twig has two holes in the bottom that fit over the pin on the back and right log see photos below The lower side of the twig rests on the right log Place the twig as shown below Left Twig Right Twig ...

Page 34: ... is placed on top of the burner to enhance the glow from the burner The rock wool works best when it is applied in a very thin porous layer The best method for applying the rock wool is to brush it on to the burner Compress a clump of rockwool between your thumb and forefinger Use a stiff brush to apply a thin layer of rockwool fibers onto the burner Do not use the entire bag of rockwool Use only ...

Page 35: ...urns the stove burners on and off Accent Light This knob controls the accent lights located behind the logs 9 Volt Battery Holder This holder contains a 9 volt battery used to light the controls Continuous Pilot GreenSmart Pilot This switch controls how the pilot flame works See the section Continuous Pilot GreenSmart Pilot for details Flame Adjust Knob This knob controls the flame height from low...

Page 36: ...e Stove On and Off Use the main burner switch to turn the main burner on and off NOTE FOR REMOTES THERMOSTATS OR WALL SWITCHES The on off switch on the stove may be required to be left in the ON or OFF position for the stove to operate Consult your installer or dealer for details Do not place any combustible items on top of or directly in front of the stove even temporarily An optional thermostat ...

Page 37: ...eowner may prefer to switch the stove to continuous pilot The most typical reasons for switching to continuous pilot are Very Cold Conditions in very cold conditions you may notice that the burner does not light quickly and the flames lift off the burner If this is the situation we recommend you switch to continuous pilot This will create a slight draft in the vent allowing the burner to light qui...

Page 38: ...mal Operating Odors This appliance has several areas that reach high temperatures Dust or other particles on these areas may burn and create a burnt paper smell This is normal during startup You may notice the smell is more acute if the appliance was left idle for a long period ...

Page 39: ...ightly dull in appearance especially over the top where it becomes hot This is normal The only cleaning we recommend is a light dusting when the appliance is cool DO NOT USE ANY LIQUID CLEANER OR ABRASIVES ON THIS FINISH Glass Clean the glass with soap and water do not use abrasive cleaners Glass removal instructions are on page 29 Battery Replacement Power Backup Batteries Four AA batteries are u...

Page 40: ...e Check the logs for sooting A small amount of soot along the bottom of the logs is normal If excessive sooting is found the stove will require adjustment Contact your dealer 4 Inspect the burner and remove any debris Make sure the burner is not warped cracked or damaged Check the firebox and area around the pilot to make sure there is no warping or damage If any problem is found discontinue use a...

Page 41: ...ature The blower fuse may be blown Check the breaker switch Let the stove burn for at least 15 minutes Replace the blower fuse See fuse location below Flames Are Too Blue The stove has just been started Improper air shutter adjustment This is normal see Starting the Stove for the First Time Adjust Air Shutter contact your dealer Flames Are Too Short Under 6 The flame height may be turned too low T...

Page 42: ...ystem in accordance with the manufacturer s installation instructions Use only approved coaxial direct vent system to vent this appliance to the exterior See owner s manual for approved brands of vent ing WARNING Improper installation adjustment alteration service or maintenance can cause injury or property damage Refer to th e owner s information manual provided with this appliance For assistance...

Page 43: ...t of the manufacturer s settingsof components lackof proper and regular maintenance damage incurred whilethe appliance isin transit alteration or act of God 8 This7 Year warranty excludesdamagecaused by normal wear and tear such aspaint discolorationor chipping worn or torn ga sketing corroded or cracked logs embers etc Also excludedis damage to the unit caused by abuse improper installation modif...

Page 44: ...n of carbon monoxide may result causing property damage personal injury or loss of life The qualified service agency is responsible for the proper installation of this kit The installation is not proper and complete until the operation of the converted appliance is checked as specified in the manufacturer s instructions supplied with the kit Install the conversion kit prior to installing the gas l...

Page 45: ...Optional Equipment for qualified installers only 45 Travis Industries 4121120 100 01315 3 Follow the directions below to replace the orifices ...

Page 46: ...d gasket see c below Place the LP regulator in place making sure the pre fitted gasket see c below is in place NOTE There is a label on the base of the regulator knob indicating regulator type NG or LP Secure the regulator with the screws included with the regulator tighten to 25 lb in of torque Place the included label on the valve body where it can be easily seen to insure proper identification ...

Page 47: ...he remote Remote Control Pilot Warnings Installing batteries in the battery holder or connecting the appliance to power may automatically initiate the CPI pilot mode resulting in a lit pilot flame Do not place combustibles in the firebox KEEP BATTERIES AND COVER INSTALLED AT ALL TIMES The remote control system requires the batteries and battery cover to remain in place at all times Once the batter...

Page 48: ...lower Hookup Pilot Sensor Appliance Ground Accessory Power Green Orange Yellow Green White Blue IPI CPI Switch 120 VAC Power In Black Red Yellow Black White Green Base Integrated Fireplace Control IFC 3 15A FUSE Red Red Black White Green Red Blue Red Blue Black ON OFF Comfort Control Switch AA Battery Tray Main Burner Switch Comfort Control Valve Accent Light Rheostat Accent Light s 2 5 Amp Fuse S...

Page 49: ...y Box Manual On Off Accent Light s 2 5 Amp Fuse Optional Blower s 2 5 Amp Fuse Appliance Ground Accessory Power Appliance Ground Green Orange Yellow Green White Blue IPI CPI JUMPER WIRE Blue Pink 120 VAC Power In TOP 4 AA Batteries Black Red Yellow Orange Yellow Flame Detect Black Red Purple Grey Black White Green Integrated Fireplace Control IFC 3 15A FUSE White Black White Black Black Black Whit...

Page 50: ...trol Battery Plate from the control panel keep the screws 2 Remove the control panel and place face downin front of the heater keep the screws 3 Disconnectthe comfort control and battery backup wires 4 Remove and place aside the Comfort Control Battery Plate with harness the batteries and assembly may be kept for spare parts ...

Page 51: ...s Industries 4121120 100 01315 5 Remove the rear panel from the heater and set aside It is held in place with seven screws 6 Disconnectinput power 7 Pull the base IFC to the rear of the stove to accessthe wiring it is held in place with Velcro Screw Locations ...

Page 52: ...ied installers only Travis Industries 4121120 100 01315 8 Disconnectthe following Power 3 wires Main harness On Off wires Pilot connections slide silicone tubing up 9 Remove and place aside the base IFC it may be kept for spare parts ...

Page 53: ... gasket see c below 11 The stepper motor adjustable regulator has an installation sheet included with it make sure to follow all of the directions Placethe stepper motor on the gas control valve see below MAKE SURE IT IS CORRECTLY ORIENTED Secureusing the screws included with the motor tighten to 25 Lb inches Leak test this area after installation to verify proper installation Route the stepper mo...

Page 54: ...er the IFC is placed in location see e below Wiring the Blower to the GSR2 IFC Bypassing the Rheostat and Snap Disc Disconnect the blower power input see a below Connect the blower wiring harness to the fuse output see b below Disconnect and discard the electrical line intended to connect the snap disk to the rheostat carefully remove the wire tie from the wiring harness see c Attach the jumper wi...

Page 55: ...cent Light to the GSR2 IFC Bypassing the Rheostat a Disconnect the accent light power input see a below b Disconnect the quick connects and molex connection leading to the switch box see b below NOTE the switch box and wiring may be removed and discarded or saved for spare parts c Attach the power lead included with the remote to the molex from the fuse labeled L or LIGHT see c below Attach the qu...

Page 56: ... only Travis Industries 4121120 100 01315 14 Attach the following Power 3 wires make sure orientation is correct Pilot connections Make sure silicone tubing is pushed down Comfort Control connection Main Harness Stepper Motor N White L Black Green ...

Page 57: ...nnectthe IPI CP switch from IPI CP wires Attach one of the jumper wires to the two wires Discardthe IPI CP switch 16 Remove the IPI CPI switchand place aside may be kept for spare parts 17 Connect the accent light wires to the GSR2 IFC NOTE If using a blower connect the power input to the GSR2 IFC ...

Page 58: ...ector to the main harness molex connector 19 Route the battery box harness through the control panel and attach to the battery box 20 Place the IFC in location inside the heater and attach using the supplied velcro tape 21 Use the two included cable ties to make sure all wiring is secure and does not contact any hot or moving parts ...

Page 59: ...Optional Equipment for qualified installers only 59 Travis Industries 4121120 100 01315 22 Re attach the control panel 23 Attach the battery box to the control panel using the screws removed in step 2 ...

Page 60: ...ndustries 4121120 100 01315 24 Re connect the input power 25 Replace the rear panel and restore the stove to the correctconfiguration turn on power and gas See the instructions included with the remote for synchronizing the remote and the operating instructions ...

Page 61: ...Optional Equipment for qualified installers only 61 Travis Industries 4121120 100 01315 ...

Page 62: ...Conversions 26 Listing Details 2 Location of Controls 35 Log Installation 31 LP Conversion Instructions 44 Maintaining Your Stove s Appearance 39 Mobile Home Requirements 9 Normal Operating Odors 38 Normal Operating Sounds 38 Optional Wall Switch or Thermostat Installation 13 Packing List 8 Rear Vent Configuration Vented into Stove with Co Linear Adapter 21 Rear Vent Configurations with Horizontal...

Reviews: